How to Install Vent Cap on Roof?
To install a vent cap on the roof, position the cap over the vent pipe, secure it with screws, and seal the edges with roofing tar. A vent cap is essential for allowing proper ventilation in your home and preventing water damage.
It ensures that the air flows freely while protecting against pests and debris. Installing a vent cap on the roof is a simple and effective way to maintain a healthy and functional ventilation system. We will provide you with a step-by-step guide on how to install a vent cap on your roof and keep your home well-ventilated and secure.
What Is A Vent Cap And Why Is It Important?
A vent cap is an essential component of the roofing system that allows for proper ventilation within the attic or roof space. It is typically installed on the top of the roof, covering the vent pipe or outlet. The primary function of a vent cap is to ensure the proper flow of air in and out of the roofing system while preventing the ingress of water, debris, and pests.

Definition and functionality of a vent cap
A vent cap, also known as a vent cover or roof vent cap, is a protective covering that is installed on top of a vent pipe or outlet on the roof. It is designed to allow air to escape or enter the roof space, while preventing water, insects, and other unwanted elements from entering the system.
Functionality:
- Airflow Regulation: A vent cap facilitates the proper flow of air within the roofing system, maintaining the balance of temperature and moisture levels. It allows hot air to escape during summers and prevents the buildup of moisture during winters, which can lead to mold growth and structural damage.
- Protection from Water and Moisture: One of the crucial roles of a vent cap is to act as a barrier against water and moisture. It prevents rainwater, snow, and ice from entering the vent pipe or opening, which could potentially lead to leaks and water damage inside the roof structure.
- Pest Prevention: Vent caps also serve as a deterrent for pests and insects that might attempt to enter the roof space through the vents. By securely covering the vent opening, it helps in keeping unwanted creatures out, safeguarding the attic against infestation and damage.
- Debris Blockage: Another crucial function of the vent cap is to block the entry of debris such as leaves, twigs, and small branches. By preventing the accumulation of debris inside the vent pipe or opening, ensures proper airflow and reduces the risk of blockages that could hinder the ventilation process.
Importance of proper venting in a roof system
Proper venting in a roof system is paramount to ensure the longevity and performance of the entire roofing structure. Neglecting the importance of proper venting can lead to a range of issues, including:
- Poor Air Circulation: Inadequate ventilation can result in poor air circulation within the attic or roof space, leading to an accumulation of heat and humidity. This can cause damage to the roofing materials, insulation, and overall structural integrity.
- Excessive Heat Buildup: Without proper ventilation, the trapped hot air in the attic can generate excessive heat, making the interior living spaces uncomfortable and increasing the cooling costs. It can also deteriorate the shingles and other roofing components, reducing their lifespan.
- Moisture Problems: Insufficient ventilation can lead to the buildup of moisture inside the roof system. This can result in the growth of mold, mildew, and rot, compromising the structural stability and posing health risks to occupants.
- Ice Dam Formation: In colder regions, improper roof ventilation contributes to the formation of ice dams, which occur when the warm air from the attic melts the snow on the roof, leading to refreezing at the eaves. This can damage the roof covering and cause water leaks inside the house.
- Energy Inefficiency: A poorly ventilated roof can cause energy inefficiency, as the excess heat trapped in the attic makes the cooling system work harder to maintain comfortable indoor temperatures. This results in higher energy bills for homeowners.
Choosing The Right Vent Cap For Your Roof
When it comes to installing a vent cap on your roof, choosing the right one is crucial for ensuring proper ventilation and the longevity of your roof. The vent cap plays a vital role in maintaining airflow and preventing moisture buildup, which can lead to various issues like mold growth or even structural damage.
Different types of vent caps are available
Before selecting a vent cap for your roof, it’s important to understand the different types available and their unique features. Here are some common types of vent caps you can choose from:
- Ridge Vent: This vent cap is installed along the peak of the roof, allowing for continuous airflow and maximum ventilation. It is an excellent choice for roofs with a sloping design.
- Soffit Vent: As the name suggests, this vent cap is installed in the soffit area of the roof. It draws in fresh air from the outside and helps remove warm and humid air from the attic space.
- Turbine Vent: This type of vent cap uses the natural wind to create a spinning motion, which in turn helps in removing the hot air from the attic. They are a great choice if you live in an area with constant wind.
- Gable Vent: These vent caps are located on the sides of the roof and provide excellent ventilation by allowing the air to escape through the gable area. They are commonly used in combination with other types of vent caps.

Factors to consider when selecting a vent cap
When it comes to choosing the right vent cap for your roof, there are a few key factors to consider. These factors will help you make an informed decision and ensure that the vent cap meets the specific requirements of your roof. Here are some factors to consider:
- Roof Type: Different roof types require different vent caps. For instance, a shingle roof may require a different cap than a metal roof. Consider the material and design of your roof before making a choice.
- Climate: The climate in your area plays a crucial role in determining the type of vent cap you should install. If you live in a hot and humid climate, a vent cap that offers maximum airflow will be ideal.
- Ventilation Needs: Assess the ventilation needs of your roof by considering factors like attic size, insulation, and any existing ventilation systems. This will help determine the number and type of vent caps you need.
- Budget: Set a budget for your vent cap installation project. Various options are available at different price points, so it’s important to find one that suits your budget without compromising on quality.
Assessing the specific needs of your roof
Before finalizing your vent cap selection, it’s crucial to assess the specific needs of your roof. Take into account the size and shape of your roof, as well as any existing ventilation systems. Ensure that the vent cap you choose is compatible with your roof and will provide the necessary ventilation.
In conclusion, selecting the right vent cap for your roof is essential for maintaining proper airflow and preventing moisture buildup. Consider the different types of vent caps available, the various factors to consider, and the specific needs of your roof. By doing so, you’ll ensure that your roof remains in good condition and that your home stays well-ventilated.
Step-By-Step Guide To Installing A Vent Cap On Your Roof
Installing a vent cap on your roof is an essential step in maintaining proper ventilation and preventing issues such as moisture buildup and mold growth. By following a simple step-by-step guide, you can install a vent cap on your roof and ensure effective ventilation for your home. In this guide, we will walk you through the process, from taking safety precautions to testing the functionality of the vent cap. Let’s get started!
Safety Precautions and Tools Required
Before you begin the installation process, it is important to prioritize safety. Ensure you have the necessary tools and equipment to complete the installation, including:
- Safety goggles
- Gloves
- Roofing ladder
- Tape measure
- Chalk line
- Circular saw or reciprocating saw (with a metal-cutting blade)
- Drill
- Screwdriver
- Silicone sealant
- Roofing nails or screws
Checking the Existing Roof Ventilation
Before proceeding with the installation, it is important to assess the existing roof ventilation. This will help determine the suitable location for the vent cap. Inspect the roof for any existing vents and ensure they are not obstructed or damaged. If there are no existing vents or they are not sufficient, proceed to the next step.
Measuring and Marking the Installation Area
Using a tape measure, determine the appropriate location for the vent cap. It should be placed near the peak of the roof, where warm air tends to accumulate. Once you have determined the location, use a chalk line to mark the area where the vent cap will be installed. This will serve as a guide when cutting the opening.
Cutting an Opening for the Vent Cap
With safety goggles and gloves on, carefully use a circular saw or reciprocating saw with a metal-cutting blade to cut along the marked lines. Make sure to follow the manufacturer’s instructions and take proper precautions to avoid injury. Once the opening is cut, remove any debris and smooth the edges of the opening.
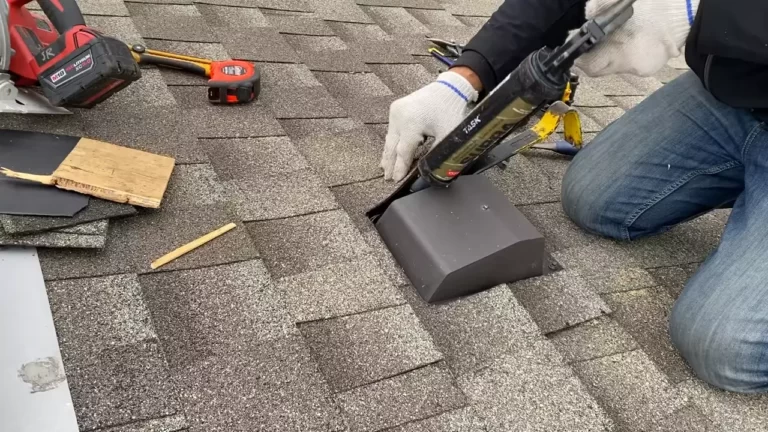
Securing the Vent Cap in Place
Place the vent cap over the newly created opening and align it with the roof’s slope. Using roofing nails or screws, secure the vent cap in place. Make sure to fasten it tightly to prevent any gaps or movement that could lead to leaks.
Sealing and Weatherproofing the Installation
To ensure the installation is watertight and weatherproof, apply a generous amount of silicone sealant around the edges of the vent cap. This will create a strong seal and prevent any water infiltration. Smooth the sealant with a putty knife to ensure a neat and even finish.

Testing the Functionality of the Vent Cap
Once the sealant has dried, it is important to test the functionality of the newly installed vent cap. Check for any signs of leaks or gaps. Also, ensure that air is properly flowing through the vent cap. If everything is working as expected, congratulations, you have successfully installed a vent cap on your roof!
Installing a vent cap on your roof is a straightforward process that can significantly improve the ventilation and overall health of your home. By following this step-by-step guide, you can ensure a successful installation and enjoy the benefits of effective roof ventilation.
Common Mistakes To Avoid During Vent Cap Installation
Proper installation of a vent cap is crucial for maintaining proper ventilation and preventing leaks in your roof. However, many homeowners make common mistakes during the installation process that can lead to costly repairs and potential damage to their homes. To ensure a successful vent cap installation, it is important to pay attention to the following key factors:
Ensuring proper alignment and positioning of the vent cap
One of the most common mistakes people make when installing a vent cap is not properly aligning and positioning it on the roof. Proper alignment ensures that the vent cap functions effectively and allows for efficient airflow. To avoid this mistake:
- Start by measuring and marking the proper location for the vent cap on the roof. Use a tape measure and level to ensure accuracy.
- Double-check the manufacturer’s instructions for specific guidelines on placement and alignment.
- Make sure the vent cap is positioned in a way that allows for proper airflow and ventilation.
- Use roofing nails or screws to securely fasten the vent cap to the roof, following the manufacturer’s recommendations for installation.
Proper sealing to prevent leaks
Inadequate sealing is another common mistake that can lead to water leaks and damage to your roof. To prevent this, it is essential to properly seal the vent cap:
- Apply a generous amount of roofing sealant around the base of the vent cap before installing it on the roof.
- Make sure the sealant creates a tight seal between the vent cap and the roof to prevent any water penetration.
- Inspect the sealant after installation to ensure there are no gaps or cracks that could allow water to seep through.
Adequate insulation around the vent cap opening
Insufficient insulation around the vent cap opening can result in energy loss and reduced efficiency of your home’s heating and cooling system. To avoid this mistake:
- Install insulation material around the vent cap opening to create a thermal barrier and prevent air leakage.
- Make sure the insulation is properly fitted and covers the entire opening to maximize energy efficiency.
- Take extra care to insulate any gaps or cracks to avoid air leakage and potential drafts.
By avoiding these common mistakes and taking the necessary precautions during vent cap installation, you can ensure a proper and effective ventilation system for your home. If you’re unsure about any aspect of the installation process, it is always recommended to consult a professional to ensure the job is done correctly.

Troubleshooting And Maintenance Tips For Vent Caps
Proper maintenance and regular inspection of vent caps are essential for ensuring the optimal performance of your roof ventilation system. In this section, we will discuss some common issues that may arise with vent caps and provide tips on troubleshooting and maintenance to address these problems promptly.
Identifying common issues with vent caps
It’s important to be able to identify common issues that may occur with vent caps on your roof. By being aware of these problems, you can take the necessary steps to resolve them and prevent further damage. Here are some common issues to watch out for:
- Cracked or damaged vent cap housing
- Loose or missing screws
- Clogged or obstructed vents
- Leaks or water intrusion
- Signs of wear and tear
If you notice any of these issues, it’s crucial to address them promptly to prevent potential damage to your roof and home.
Regular cleaning and inspection procedures
To maintain the optimal functionality of your vent caps, regular cleaning and inspection are necessary. Here are some essential steps to include in your maintenance routine:
- Remove any debris or dirt accumulated on the vent cap using a brush or soft cloth.
- Inspect the vent cap housing for any cracks or damages. If you notice any, it’s advisable to replace the vent cap to avoid further complications.
- Ensure that the screws securing the vent cap are tightened and in good condition. Replace any loose or missing screws as needed.
- Check for any signs of clogging or obstructions in the vent openings. Use a small brush or compressed air to clear any debris blocking the vents.
- Perform a visual inspection of the vent cap for signs of wear and tear, such as rust or corrosion. If necessary, consider replacing the vent cap to prevent further deterioration.
By incorporating these cleaning and inspection procedures into your maintenance routine, you can prolong the lifespan of your vent caps and maintain proper airflow in your roof ventilation system.
Addressing any problems or damages promptly
When it comes to vent cap maintenance, addressing any problems or damages promptly is crucial. Ignoring or delaying repairs can lead to more significant issues down the line. If you notice any of the following problems, take prompt action:
- Cracks or damages in the vent cap housing
- Leaks or water intrusion around the vent cap
- Excessive wear and tear
If you are uncomfortable or unsure about handling these repairs yourself, consider consulting a professional roofer or a qualified contractor. They will have the necessary expertise to assess the situation and make the appropriate repairs.
In conclusion, regular maintenance and troubleshooting of vent caps are essential for maintaining the overall health and performance of your roof ventilation system. By understanding common issues, performing regular cleaning and inspection, and addressing any problems promptly, you can ensure that your vent caps function optimally and prevent any potential damage to your roof.
Frequently Asked Questions For How To Install Vent Cap On Roof
How Do You Install A Vent Cap On The Roof?
To install a vent cap on the roof, start by measuring and marking the location. Then, use a reciprocating saw to cut the hole for the vent cap. Secure the vent cap with roofing nails and seal around the edges with roofing cement.
Finally, apply a layer of roofing cement over the nails for added protection.
What Tools Do I Need To Install A Vent Cap On The Roof?
To install a vent cap on the roof, you will need a few essential tools. These include a tape measure, reciprocating saw, roofing nails, hammer, roofing cement, and a ladder. It’s important to have the right tools on hand to ensure a successful installation.
Can I Install A Vent Cap On My Roof Myself?
Yes, you can install a vent cap on your roof yourself. However, it’s important to have basic knowledge of roofing and to follow proper safety precautions. If you’re unsure about the installation process, it’s always recommended to hire a professional to ensure the job is done correctly and safely.
How Long Does It Take To Install A Vent Cap On The Roof?
The time it takes to install a vent cap on the roof can vary depending on factors such as the type of roof and the accessibility of the installation area. On average, it can take anywhere from 1 to 2 hours to complete the installation process.
However, it’s best to allocate sufficient time to ensure a thorough and accurate installation.
Conclusion
Installing a vent cap on your roof is a crucial step in maintaining a properly functioning ventilation system in your home. By following the steps outlined in this guide, you can ensure that your vent cap is installed correctly and effectively.
Remember to consider the type of roof you have, gather the necessary tools, and take safety precautions during the installation process. With the right knowledge and approach, you can improve the air circulation in your home and prevent potential issues down the line.