How to Install Suspended Ceiling Tile?
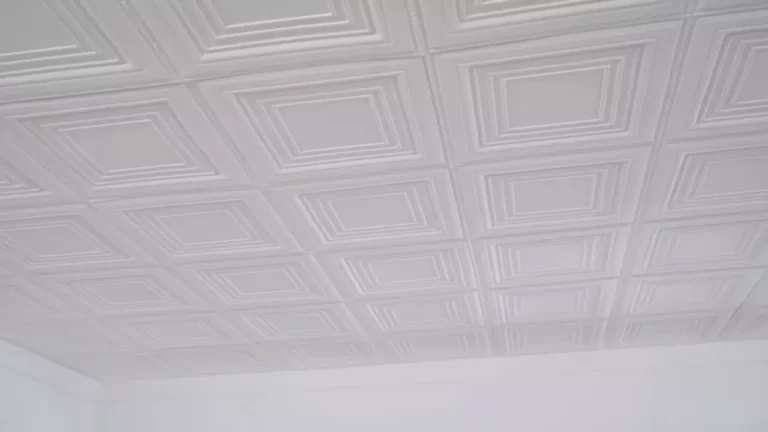
To install suspended ceiling tiles, first, measure and mark the placement of the tiles on the ceiling grid, then easily snap the tiles into place. Installing suspended ceiling tiles is a simple process that can transform the look of any room.
Suspended ceilings are popular in commercial and residential spaces due to their ease of installation and ability to hide wires, pipes, and ductwork. Whether you are looking to update the appearance of your home or office or you need a functional solution for concealing unsightly elements, suspended ceiling tiles are a great option.
We will discuss the step-by-step process of installing suspended ceiling tiles, as well as provide tips and tricks to ensure a successful installation.
Installing The Main T-Bar Grid System
When it comes to installing a suspended ceiling tile, one of the crucial steps is setting up the main T-bar grid system. This grid system lays the foundation for the entire ceiling, providing stability and support for the ceiling tiles. In this section, we will take you through the step-by-step process of installing the main T-bar grid system, ensuring a sturdy and level ceiling.

Attaching the Wall Angle
The first step in installing the main T-bar grid system is to attach the wall angle. The wall angle serves as a perimeter anchor for the ceiling, so it must be securely fastened to the walls. Below are the steps to follow:
- Measure and mark the distance from the wall where the ceiling will be installed.
- Cut the wall angle pieces to the appropriate lengths.
- Position the wall angle along the marked lines, ensuring it is level.
- Using a drill, attach the wall angle to the walls, placing screws at regular intervals.
Installing Hanger Wires
Once the wall angle is secured, the next step is to install the hanger wires. These wires will hold the main T-bars in place. Here’s how to do it:
- Measure and mark the locations on the ceiling where the hanger wires will be attached.
- Using a drill, create holes at the marked locations.
- Insert the hanger wires into the holes and twist them several times to secure them.
- Ensure that the hanger wires are all at the same length for a level ceiling.
Securing the Main T-Bars
With the wall angle and hanger wires in place, it’s time to secure the main T-bars. These T-bars will form the primary grid structure. Follow these steps:
- Measure and cut the main T-bars to the desired length using a T-bar cutter.
- Connect the main T-bars together to form the desired grid pattern.
- Place the main T-bars on the hanger wires, ensuring they are securely attached.
- Secure the connections between the T-bars using a T-bar clip or screw.
Adjusting and Leveling the Grid System
Lastly, it is crucial to adjust and level the grid system for a professional-looking finish. Follow these steps to achieve a level grid system:
- Use a laser level or a long straightedge to ensure that the main T-bars are level.
- If needed, adjust the hanger wires to achieve a level grid system.
- Make any necessary adjustments to the T-bar clips or screws to level the connections.
- Double-check the levelness of the grid system before proceeding with installing the ceiling tiles.
By following these step-by-step instructions, you can successfully install the main T-bar grid system for your suspended ceiling.
Placing And Securing The Cross T-Bars
Installing a suspended ceiling tile can be a great way to enhance the aesthetics of your space while also concealing unsightly wires and pipes. One crucial step in this process is placing and securing the cross T-bars, which provide support and stability to the entire ceiling grid. In this section, we will guide you through the process of determining the placement of cross T-bars and installing them correctly. Follow these steps to ensure a hassle-free installation of your suspended ceiling.
Determining the Placement of Cross T-Bars
Before you begin installing the cross T-bars, it is essential to determine their proper placement in the grid. This will guarantee that your suspended ceiling tile is aligned and evenly supported throughout the installation. Here are the key steps to follow:
- Start by measuring the length and width of your room.
- Note down the measurements and divide them by the recommended spacing for cross T-bars, typically 2 feet or 4 feet apart.
- Mark the locations where the cross T-bars should intersect the main T-bars.
- Use a chalk line or laser level to create straight, visible lines across the ceiling to guide the placement of the cross T-bars.
Installing and Locking the Cross T-Bars
Once you have determined the placement of the cross T-bars, it’s time to install and lock them securely in place. Follow these steps to ensure a sturdy and well-supported suspended ceiling tile:
- Start by inserting one end of a cross T-bar into the slot of the adjacent main T-bar.
- Gently push the opposite end of the cross T-bar up towards the ceiling until it aligns with the chalk line or laser level.
- Once the cross T-bar is in position, rotate it slightly to engage the locking tabs with the main T-bar, creating a secure connection.
- Repeat this process for all the remaining cross T-bars, ensuring they are evenly spaced according to your room’s measurements.
Remember to periodically check that the cross T-bars are aligned and securely locked in place as you progress with the installation of your suspended ceiling tile. This will help avoid any alignment issues or potential structural instability. Once all the cross T-bars are installed and locked, you can move forward with placing the ceiling tiles themselves, bringing you one step closer to achieving a visually appealing and professionally finished suspended ceiling.
Installing a suspended ceiling tile is a task that requires attention to detail and careful execution. By following the above steps for placing and securing the cross T-bars, you are well on your way to creating a visually stunning and structurally sound suspended ceiling. Exude confidence in your DIY project and enjoy the enhanced ambiance that a well-installed suspended ceiling can provide.

Placing And Cutting Ceiling Tiles
One of the key steps in installing a suspended ceiling is placing and cutting the ceiling tiles to fit your space. This process ensures that your tiles fit seamlessly into the grid and create a polished, finished look. In this section, we will guide you through the steps of measuring and cutting tiles to fit, as well as how to properly place them on the grid and ensure proper alignment and levelness.
Measuring and Cutting Tiles to Fit
Before you start cutting your ceiling tiles, it’s important to take accurate measurements of the space where the tiles will be installed. Measure the length and width of the area to determine the size of the tiles you will need. Using a tape measure, measure from the edge of the wall or the previous tile to the center of the T-bar on the grid.
Once you have determined the measurements, transfer them to the back of the ceiling tile using a pencil. Double-check your measurements before cutting to ensure accuracy. It’s recommended to use a straightedge or a square to create a precise cutting line.
When it comes to cutting the ceiling tiles, you have a few options. One method is to use a utility knife with a sharp blade. Score the tile along the pencil line, then break it along the score line. Another option is to use a ceiling tile cutter, which allows for more precise and effortless cutting. If you need to make any cutouts for light fixtures or vents, use a jigsaw or a hole saw.
Placing the Ceiling Tiles on the Grid
Once your tiles are cut to size, it’s time to place them on the grid. Start by positioning the first tile in one corner of the room, placing it in the grid with a slight downward tilt. Gently push the tile up and back into place, allowing it to rest securely on the grid. Repeat this process with the remaining tiles, fitting them snugly into the grid as you go.
If you encounter any obstacles such as electrical wires or plumbing pipes, carefully cut notches or holes in the tiles to accommodate them. This will ensure a professional and seamless installation.
Ensure Proper Alignment and Levelness
As you continue placing the ceiling tiles, it’s important to maintain proper alignment and levelness. Use a level to ensure that each tile is straight and even. Adjust the tiles as needed to achieve a consistent and symmetrical appearance.
Additionally, periodically step back and evaluate the overall look of the ceiling to identify any inconsistencies or areas that need adjustment. Taking the time to ensure proper alignment and levelness will result in a visually appealing and professionally installed suspended ceiling.
By following these steps to measure, cut, and place your ceiling tiles, you will be well on your way to a successful suspended ceiling installation. Remember to take accurate measurements, use the appropriate tools for cutting, and pay attention to alignment and levelness to achieve a finished look that will impress.

Installing The Suspended Ceiling Tile Trim
One crucial step in installing a suspended ceiling tile is adding the finishing touch with the trim pieces. The trim pieces help to conceal the edges of the ceiling tiles and give the installation a polished and professional look. In this section, we will walk you through the process of cutting and installing the trim pieces to ensure a flawless finish.
Cutting and Installing the Trim Pieces
The first step is to measure the length of the ceiling tile where the trim will be installed. Use a measuring tape to get an accurate measurement and mark it on the trim piece. Once you have the measurement, you can proceed to cut the trim using a miter saw or a utility knife. Make sure to take proper safety precautions when using these tools.
After cutting the trim to the appropriate length, it’s time to attach it to the ceiling. Apply a small amount of construction adhesive to the back of the trim piece, making sure to leave some space near the edges. This will prevent the adhesive from seeping out when pressing the trim against the ceiling.

Figure 1: Installing the Trim Piece
Next, carefully align the trim with the edge of the ceiling tile and press it in place. Apply gentle pressure to ensure that the trim adheres securely to the tile. If any excess adhesive oozes out, wipe it away with a damp cloth before it dries.
Ensuring a Professional Finish
Once the trim pieces are installed, it’s important to double-check the alignment and make any necessary adjustments. Take a step back and examine the ceiling to ensure that the trim is straight and flush with the tiles. If you notice any gaps or unevenness, gently remove the trim and reposition it accordingly.
To create a seamless look, consider using caulk to fill in any small gaps between the trim and the tiles. Apply a thin bead of caulk along the joint and smooth it out with a caulk tool or your finger. This will help to blend the trim with the tiles and give the ceiling a professional finish.
Lastly, clean up any debris or excess caulk before it dries. A damp cloth or sponge can be used to wipe away any smudges or stray caulk. This will ensure that the trim installation looks tidy and flawless.
With these steps, you can achieve a professional finish when installing the suspended ceiling tile trim. Taking the time to measure accurately, securely attach the trim, and make necessary adjustments will result in a polished look that enhances the overall appearance of your suspended ceiling installation.
Frequently Asked Questions For How To Install Suspended Ceiling Tile
Can You Attach Ceiling Tiles Directly To Joists?
Yes, you can attach ceiling tiles directly to joists.
Where Do You Start When Installing Ceiling Tiles?
To install ceiling tiles, start by measuring and marking the center of the ceiling. Then, begin at one corner and use adhesive or nails to secure the tiles to the ceiling, working in rows. Ensure each tile is aligned correctly and continue until the ceiling is covered.
Is It Hard To Install A Suspended Ceiling?
Installing a suspended ceiling is not hard. With proper instructions and tools, it can be a manageable DIY project.
What Do Ceiling Tiles Sit On?
Ceiling tiles sit on a grid system made of metal or wood. These grids are suspended from the ceiling and provide support for the tiles.
Conclusion
Installing suspended ceiling tiles can be an easy and cost-effective way to transform any space. By following the step-by-step process outlined in this blog post, you can achieve professional-looking results. From preparing the room and gathering necessary materials, to measuring, cutting, and installing the tiles, this guide has provided you with all the information you need.
So, what are you waiting for? Get started on your suspended ceiling tile installation project today and enjoy the new look of your space.