How to Install Rubbermaid Wire Shelving?
To install Rubbermaid wire shelving, start by measuring the desired space and marking where the brackets will be placed. Then, attach the brackets to the wall using screws and make sure they are level.
Finally, slide the shelf onto the brackets and secure it with the provided clips. Wire shelving from Rubbermaid is a popular choice for organizing spaces such as closets, pantries, and garages. Its versatile design allows for maximum storage and easy access to items.
This article will guide you through the step-by-step process of installing Rubbermaid wire shelving, ensuring a strong and functional storage solution for your needs. Whether you are a DIY enthusiast or a novice, follow these simple instructions to successfully install Rubbermaid wire shelving in any area of your home or workplace.
Materials Needed
List of materials needed for installing Rubbermaid wire shelving
Before you begin installing your Rubbermaid wire shelving, it’s important to make sure you have all the necessary materials on hand. This will save you time and frustration during the installation process. Here is a comprehensive list of the materials you will need:
- Rubbermaid wire shelving kit
- Mounting brackets
- Wall anchors
- Wood screws
- Level
- Tape measure
- Pencil or marker
- Power drill
- Screwdriver
- Stud finder (optional)

Proper tools required for installation
Along with the materials, you will also need to have the proper tools to successfully install your Rubbermaid wire shelving. Here’s a list of the tools you will need:
- Power drill with drill bit
- Screwdriver (depending on the type of screws included in the kit)
- Level
- Tape measure
- Pencil or marker
- Stud finder (optional, but helpful for locating wall studs)
Having these tools ready will ensure a smooth and efficient installation process. Make sure the power drill is charged and the batteries for the stud finder are working to avoid any delays.
Selecting The Right Wire Shelving
When it comes to organizing your space efficiently, rubbermaid wire shelving is a popular choice due to its durability and versatility. However, with a wide array of options available, it can be overwhelming to determine which type of rubbermaid wire shelving is best suited for your needs. In this section, we will explore the different types of rubbermaid wire shelving available and discuss the factors to consider when selecting the appropriate shelving system.
Different Types of Rubbermaid Wire Shelving Available
Rubbermaid offers several types of wire shelving, each designed to meet specific requirements and preferences. Understanding the features and functionalities of each type will help you make an informed decision. Here are some of the most common types of rubbermaid wire shelving:
- FreeSlide Shelving: This type of wire shelving is perfect for efficiently maximizing your storage space. The unique FreeSlide design eliminates the need for fixed brackets, allowing you to adjust the shelving without interference.
- TightMesh Shelving: If organizing small items is your priority, TightMesh wire shelving is an ideal choice. Its closely spaced wires prevent small objects from falling through, ensuring stability and preventing items from getting damaged.
- FreeSlide with Closet Rod Shelving: This versatile wire shelving combines the benefits of FreeSlide design with an additional closet rod feature. It allows you to hang clothes effortlessly while optimizing the storage space underneath.
- Configurations Closet Kits: If you’re looking for a comprehensive storage solution, Configurations Closet Kits offer a complete package. These kits come with adjustable shelves, hanging rods, and other accessories, providing a customizable and functional closet organization system.
- FastTrack Garage Shelving: Designed specifically for garage storage, FastTrack wire shelving is heavy-duty and durable. It can withstand the weight of tools, equipment, and other items, while its adjustable components make it easy to adapt to changing storage needs.

Factors to Consider When Selecting the Appropriate Shelving System
Choosing the right wire shelving system involves considering several factors to ensure it meets your requirements. Here are important factors to keep in mind when selecting a rubbermaid wire shelving system:
- Space and Dimensions: Measure your space accurately to determine the dimensions of the wire shelving system you need. Take into account any obstacles or limitations that may affect the installation process.
- Weight Capacity: Consider the weight capacity of the shelving system to ensure it can support the items you intend to store. Opting for a higher weight capacity will provide added safety and longevity.
- Adjustability: If you anticipate your storage needs changing over time, choosing an adjustable shelving system will allow for flexibility and accommodate future requirements.
- Accessories and Add-Ons: Depending on your specific needs, consider if you require any additional accessories or add-ons for your wire shelving system. Accessories such as hooks, bins, or dividers can enhance organization and optimize storage efficiency.
- Installation: Evaluate the installation process of the shelving system to ensure it aligns with your skill level and available tools. Some systems may require professional installation, while others are designed for easy DIY setup.
By considering these factors and understanding the different types of rubbermaid wire shelving available, you can confidently select the appropriate shelving system that best suits your needs. Whether you’re organizing your closet, garage, or any other space, rubbermaid wire shelving offers a durable and efficient solution to help you maximize your storage potential.
Step-By-Step Installation Process
When it comes to organizing your space efficiently, installing Rubbermaid wire shelving can be a great solution. The step-by-step installation process ensures that you can easily achieve the desired result without any hassle. In this guide, we will take you through each step in detail, making the installation process a breeze.
Pre-installation preparations
Before you begin the installation process, it’s essential to make some preparations. Gather all the necessary tools, including a measuring tape, level, pencil, drill, screws, and a stud finder. Ensure that you have the Rubbermaid wire shelving kit readily available. Having these items handy will save you time and make the process smoother.
Measuring the space for installation
The first step is to accurately measure the area where you plan to install the wire shelving. Measure the width, height, and depth of the space to determine the required size of the shelves. Take note of these measurements as they will be crucial in the subsequent steps.
Determining the desired height for the shelves
Consider the items you plan to store on the shelves and determine the desired height between each shelf. This will help you maximize storage space and ensure that everything fits perfectly. Take into account the height of your tallest items to avoid any limitations in the future.
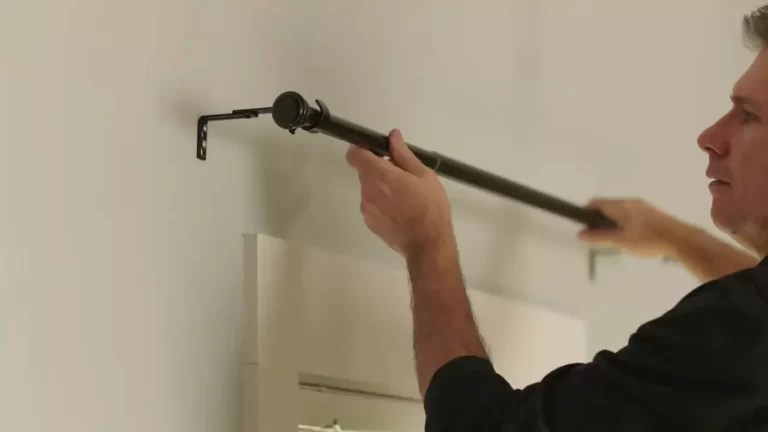
Marking the wall or studs for mounting brackets
Using a pencil, mark the spots on the wall where you will install the mounting brackets. It’s important to locate and mark the studs behind the wall as they provide the necessary support for the shelves. A stud finder can be a handy tool to easily locate the studs.
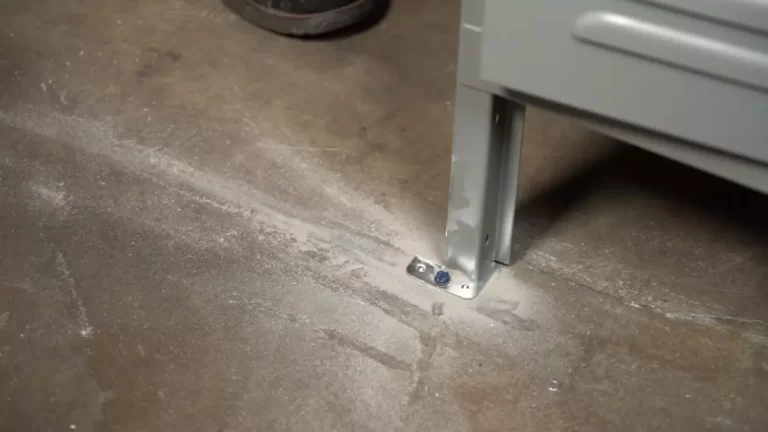
Installing the mounting brackets
Now it’s time to install the mounting brackets. Position the brackets on the marked spots and ensure they are level. Use a drill to create pilot holes for the screws, then fasten the brackets securely to the wall or studs using the provided screws.
Finding the studs in the wall
Before mounting the brackets, it’s crucial to locate the studs in the wall. Using a stud finder, scan the wall along the marked spots until you identify the position of the studs. Mark the location of each stud to ensure accurate installation of the brackets.
Mounting the brackets securely
Once you have located the studs, position the mounting brackets over them. Align the brackets with the marked spots and use a drill to secure them firmly into place, driving the screws directly into the studs. This step ensures that the shelves will be sturdy and can bear the weight of your items without any risk of collapsing.

Ensuring proper alignment and spacing of brackets
After mounting the brackets, take a step back and ensure that they are aligned perfectly. Use a level to check if the brackets are straight and adjust them if necessary. Additionally, make sure that the spacing between brackets is even to ensure stable shelf support.
Attaching the wire shelves
With the brackets securely in place, it’s time to attach the wire shelves. Each shelf should come with slots on the sides that fit into the brackets. Carefully slide the shelves into the slots on the brackets, making sure they rest evenly and securely.
Securing the shelves in place
To prevent the wire shelves from accidentally coming off the brackets, it’s important to secure them in place. Some Rubbermaid wire shelving kits come with locking clips or shelf clips that can be used to secure the shelves to the brackets. Attach these clips to the shelves to ensure stability.
Adjusting the height if necessary
If you find that the height of the shelves needs adjustment after securing them in place, it’s not a problem. Simply remove the shelves from the brackets, adjust the position of the brackets up or down, and then reattach the shelves. This allows you to customize the shelf height as per your specific storage needs.
By following this step-by-step installation process, you can easily install Rubbermaid wire shelving in your space. Not only will it provide you with an organized storage solution, but it will also maximize the use of your available space. Now, it’s time to transform your space and enjoy the benefits of a well-organized area.
Tips For Proper Usage And Maintenance
Proper usage and maintenance of your Rubbermaid wire shelving are essential to ensure its longevity and maximize its storage capacity. By following a few simple guidelines, you can keep your wire shelves in optimal condition and avoid common installation and usage mistakes. In this section, we will discuss how to maximize the storage capacity of wire shelving, clean and maintain Rubbermaid wire shelves, and avoid common installation and usage mistakes.
Maximizing the storage capacity of wire shelving
One of the primary advantages of wire shelving is its ability to maximize storage capacity. With a few tips and tricks, you can optimize your wire shelves to fit more items while still maintaining organization and accessibility.
To make the most of your wire shelving, consider the following:
- Utilize vertical space: Wire shelves offer excellent vertical storage potential. Make use of tall items and stack them on top of each other, ensuring stability and balance.
- Group similar items: Organize your items into groups or categories. This not only makes it easier to find what you need but also helps optimize the available space on your wire shelving. Consider using storage bins or dividers to separate different categories.
- Adjust shelf heights: Most Rubbermaid wire shelving is adjustable, allowing you to customize the height of each shelf to accommodate different items. Take advantage of this feature to create the ideal configuration for your storage needs.
- Use hooks and accessories: To further maximize storage capacity, consider using hooks or accessories that can be installed on your wire shelves. These can be used to hang smaller items or items that would otherwise take up valuable shelf space.
Cleaning and maintaining Rubbermaid wire shelves
Regular cleaning and maintenance are essential to keep your Rubbermaid wire shelves looking their best and functioning optimally. It is recommended to follow these steps:
- Remove all items: Before cleaning your wire shelves, remove all items from them.
- Wipe down surfaces: Use a damp cloth or sponge to wipe down the surfaces of your wire shelving, removing any dust, dirt, or spills.
- Avoid abrasive cleaners: To prevent scratches and damage, avoid using abrasive cleaners or harsh chemicals on your wire shelves. Instead, opt for a mild dish soap or a cleaner specifically designed for wire shelving.
- Dry thoroughly: After cleaning, make sure to dry your wire shelves thoroughly to prevent any moisture or rusting.
- Inspect for damage: Regularly inspect your wire shelves for any signs of damage such as bent wires or loose connections. If you notice any issues, address them promptly to ensure the longevity of your shelves.

Avoiding common installation and usage mistakes
To ensure the proper installation and usage of your Rubbermaid wire shelving, it is vital to avoid common mistakes that could compromise its performance or durability. Here are some things to keep in mind:
- Follow the manufacturer’s instructions: Before starting the installation process, carefully read and follow the manufacturer’s instructions. This will help you avoid unnecessary mistakes and ensure correct assembly.
- Avoid overloading: While wire shelves are generally sturdy, overloading them with excessive weight can lead to sagging or even collapse. Be mindful of the weight limits specified by the manufacturer and distribute the weight evenly across the shelves.
- Secure the shelving properly: Ensure that your wire shelving is securely fastened to the wall or other support structure. This will prevent accidents and maintain stability.
- Avoid improper cleaning techniques: As mentioned earlier, using abrasive cleaners or harsh chemicals can damage the wire shelves. It is also important to avoid using sharp objects that could scratch or puncture the wire surfaces.
- Regularly check for loose connections: Over time, the connections between the wire shelving components may become loose. Check the connections regularly and tighten them if needed to prevent wobbling or instability.
By adhering to these tips for proper usage and maintenance, you can ensure that your Rubbermaid wire shelving serves you well for years to come. Taking the time to maximize storage capacity, clean regularly, and avoid common mistakes will help you make the most of your wire shelves and keep your space organized and efficient.
Frequently Asked Questions On How To Install Rubbermaid Wire Shelving
How Do You Install Rubbermaid Wire Shelving?
To install Rubbermaid wire shelving, start by measuring and marking where you want to install the shelves. Then, use a level to ensure they are straight. Next, drill holes and insert wall anchors before attaching the brackets and shelf. Finally, slide the wire shelf onto the brackets and secure it in place.
What Tools Do I Need To Install Rubbermaid Wire Shelving?
To install Rubbermaid wire shelving, you’ll need a tape measure, level, drill, wall anchors, screws, brackets, and a rubber mallet. These tools will help you accurately measure, level, and secure the shelves to the wall.
Can Rubbermaid Wire Shelving Be Installed In Any Room?
Yes, Rubbermaid wire shelving is versatile and can be installed in any room. It is commonly used in closets, kitchens, garages, and laundry rooms. Its durable construction and adjustable design make it suitable for organizing and maximizing storage space in various areas of your home.
Conclusion
Installing Rubbermaid wire shelving is a simple and efficient way to organize your space. By following the step-by-step guide provided in this blog post, you can easily set up your shelving system without any hassle. With the durability and versatility that Rubbermaid wire shelving offers, you can enjoy a clutter-free and organized space for years to come.
So, go ahead and give it a try – you won’t be disappointed!