How to Install Interlocking Backsplash Tile?
To install interlocking backsplash tile, start by preparing the surface, applying adhesive, and then placing and securing the tiles. Now I will provide a well-rounded Are you looking to enhance the aesthetic appeal of your kitchen or bathroom?
Installing an interlocking backsplash tile can be a great option. Not only does it protect your walls from moisture and stains, but it also adds a stylish and modern touch to your space. Whether you’re a seasoned DIY enthusiast or a first-timer, this guide will walk you through the process of installing interlocking backsplash tiles.
From preparing the surface to securing the tiles in place, we’ll cover everything you need to know. So roll up your sleeves and get ready to transform your space with a stunning interlocking backsplash tile installation.
Factors To Consider When Selecting Backsplash Tile
When it comes to installing an interlocking backsplash tile, there are several factors that you need to consider. These factors can greatly impact the final look and feel of your kitchen or bathroom. In this article, we will discuss three important factors that you should keep in mind when selecting your backsplash tile: Material, Color and Design, and Size and Shape. Let’s dive into each of these factors in detail.

Material
The material of the backsplash tile plays a crucial role in both the aesthetics and durability of the tile. There are various materials available in the market, each with its unique characteristics. It’s essential to choose a material that not only complements the overall style of your space but also fits your lifestyle and maintenance preferences.
Here are some popular materials you can consider:
– Ceramic: Perfect for a traditional or contemporary look. It is affordable, easy to clean, and resistant to moisture.
– Glass: Adds a modern and sleek touch to your space. It is available in a plethora of colors and designs, reflecting light and creating an illusion of more space.
– Natural stone: Provides a sophisticated and natural look. Popular options include marble, granite, and travertine. Keep in mind that natural stone requires regular sealing to prevent stains.
– Porcelain: Known for its durability and versatility. It comes in a variety of designs and can mimic the look of natural stone or even wood.
– Metal: Brings an industrial or modern vibe to your backsplash. Stainless steel and copper are common choices for a contemporary kitchen.
Consider the characteristics of each material, such as durability, maintenance, and style compatibility, before making a final decision.
Color and Design
The color and design of your backsplash tile can significantly impact the overall aesthetic appeal of your space. When selecting the color, take into account the existing color scheme of your kitchen or bathroom. A complementary color can create a harmonious and cohesive look, while a contrasting color can add visual interest and make a bold statement.
Similarly, the design of the tile should align with your overall design theme. Whether you prefer a simple subway tile pattern, intricate mosaic designs, or geometric shapes, choose a design that speaks to your style and enhances the visual appeal of your space.
Remember, selecting a timeless and versatile color and design can ensure that your backsplash tile remains stylish and relevant for years to come.
Size and Shape
The size and shape of the backsplash tile can contribute to the overall aesthetic as well as the ease of installation. Smaller tiles, such as mosaics or hexagon, can create intricate patterns and visual interest. On the other hand, larger tiles, like subway or square, can provide a clean and modern look while minimizing grout lines.
Consider the size of your kitchen or bathroom and the desired visual effect. In smaller spaces, larger tiles may create an illusion of more space, while in larger areas, smaller tiles can add texture and dimension.
It’s vital to evaluate the ease of installation based on the size and shape of the tile. For example, interlocking backsplash tiles are easier to install due to their uniform size and shape, ensuring a smooth and hassle-free installation process.
Gather The Necessary Tools And Materials
Before you start installing interlocking backsplash tile, it’s important to gather all the necessary tools and materials. Having everything you need within reach will save you time and ensure a smooth installation process. Below, you’ll find a handy list of the tools and materials required for the job.
List of Tools:
In order to install interlocking backsplash tile with precision and ease, the following tools are essential:
| Tools |
|---|
| Caulk gun |
| Tape measure |
| Utility knife |
| Notched trowel |
| Grout float |
| Sponge |
| Level |
| Tile cutter |
| Bucket |
| Grout sealer |
| Grout spreader |
List of Materials:
In addition to the tools mentioned above, you will need the following materials to successfully complete your interlocking backsplash tile installation:
- Interlocking backsplash tiles
- Tile adhesive
- Grout
- Tile spacers
- Tile sealer
- Painter’s tape
- Protective eyewear
- Dust mask
- Gloves
Make sure to gather all of these tools and materials before you start your backsplash tile installation project. Being prepared will allow you to work efficiently and ensure the end result is both visually appealing and long-lasting. So, now that you have everything ready, let’s move on to the next step: preparing the surface for tile installation.
Taking Proper Measurements
Before you begin installing interlocking backsplash tile, it’s crucial to take accurate measurements of your space. Proper measurements ensure that you have enough tiles to cover the entire backsplash area and minimize wastage.
Measuring the Backsplash Area
The first step in taking the measurements is to calculate the backsplash area that needs to be covered. Measure the width and height of the space using a tape measure and write down the measurements. It’s important to measure from edge to edge, accounting for any trim or molding that may be present.
To simplify the process, consider dividing the backsplash area into smaller sections. This will help you focus on one area at a time and ensure accurate measurements. Use a pencil to mark each section on the wall, making it easier for you to visualize and keep track of your measurements.
Accounting for Outlets and Obstacles
When installing interlocking backsplash tile, you need to consider the presence of electrical outlets, switches, or any other obstacles that may require special attention. These areas present a challenge while cutting and installing the tiles, but with proper measurements, you can achieve a seamless and professional-looking finish.
To measure around outlets or obstacles, identify the center point of the object and measure from the edge of the nearest tile to the center. Take note of these measurements and use them to cut the tiles accordingly.
It’s worth noting that the measurements for outlets and obstacles may vary depending on the type and size of tile you are using. Some tiles may require additional clearance, while others may allow for a snug fit. Therefore, it’s essential to consult the manufacturer’s guidelines or seek professional advice if you have any doubts.
Taking proper measurements is the foundation of a successful interlocking backsplash tile installation. By accurately measuring the backsplash area and accounting for outlets and obstacles, you can ensure that your project proceeds smoothly and results in a stunning, well-fitted backsplash.
Prepping The Backsplash Area
Before installing interlocking backsplash tiles, it’s crucial to properly prep the backsplash area. This ensures a smooth and successful installation process, resulting in an eye-catching backsplash that adds style and functionality to your space. In this article, we will guide you through the essential steps to prep your backsplash area, including cleaning the wall and preparing the surface for tile installation.
Cleaning the Wall
The first step in prepping your backsplash area is to clean the wall thoroughly. Remove any dirt, grease, or debris that may be present on the surface. This is important for achieving a strong bond between the backsplash tiles and the wall, ensuring longevity and durability.
To clean the wall, follow these steps:
- Begin by wiping the surface with a damp cloth to remove any loose dirt or dust.
- Next, mix a solution of mild dish soap and warm water in a bucket. Dip a sponge or soft cloth into the soapy mixture.
- Gently scrub the wall in a circular motion, paying extra attention to any stained or greasy areas. Be sure to reach all corners and edges.
- Rinse the wall with clean water to remove any soap residue. Allow the wall to dry completely before moving on to the next step.
Preparing the Surface
Once the wall is clean and dry, it’s time to prepare the surface for tile installation. This step ensures that the interlocking backsplash tiles adhere properly and create a seamless look. Follow these guidelines:
- Inspect the wall for any cracks, holes, or unevenness. If any are found, fill them with a suitable wall filler or spackling compound. Smooth out the surface using a putty knife or sandpaper.
- If the wall has a glossy or glossy finish, lightly sand the surface to create a rough texture. This will help the adhesive bond better with the wall.
- Consider priming the wall with a high-quality bonding primer before installing the backsplash tiles. This step enhances the tile adhesion and prevents any potential peeling or cracking in the future.
By properly cleaning the wall and preparing the surface, you set the stage for a successful interlocking backsplash tile installation. Taking the time to follow these steps ensures a professional finish and a backsplash that will stand the test of time. Now that your backsplash area is prepped, it’s time to move on to the exciting part – installing the interlocking backsplash tiles!
Applying Adhesive
One key step in installing interlocking backsplash tile is applying the adhesive. Choosing the right adhesive and applying it correctly will ensure a strong bond between the tiles and the wall. Here, we will guide you through the process of applying adhesive to the wall, ensuring a successful tile installation.
Choosing the Right Adhesive
When it comes to choosing the right adhesive for your interlocking backsplash tile, it is essential to consider the type of tile material and the surface you will be adhering to. Different adhesives are designed for specific tile materials, such as ceramic, glass, or natural stone. Moreover, the surface condition, whether it is a drywall, plaster, or tile backer board, also plays an important role in selecting the adhesive.
Here is a quick guide to help you choose the appropriate adhesive:
| Tile Material | Suggested Adhesive |
|---|---|
| Ceramic | Ceramic tile adhesive |
| Glass | Glass tile adhesive |
| Natural Stone | Stone tile adhesive |
Always refer to the manufacturer’s recommendations for the specific tile and adhesive you plan to use as they may have specific requirements or suggestions.

Applying the Adhesive to the Wall
Before applying the adhesive, ensure that the wall surface is clean, dry, and free from any dirt or debris. Additionally, make sure to protect surrounding areas with drop sheets or masking tape to prevent any accidental spills or smears.
- Start by preparing the adhesive according to the manufacturer’s instructions. It is crucial to follow the recommended mixing ratios and any curing or drying times specified.
- Using a notched trowel, apply the adhesive to the wall in a thin and even layer. Hold the trowel at a 45-degree angle and spread the adhesive in smooth, sweeping motions.
- Work in small sections, typically the size of one or two tiles, to ensure the adhesive remains workable and doesn’t dry out before tile installation.
- After applying the adhesive, use the notched side of the trowel to create ridges in the adhesive. These ridges help improve the bond between the adhesive and the tiles, providing better adhesion and preventing slippage.
- Once the adhesive is applied, you can begin installing the interlocking backsplash tiles, pressing them firmly into the adhesive and ensuring proper alignment.
Remember to work diligently and efficiently, as some adhesives may have limited working time. Avoid stepping on or disturbing the adhesive during the installation process to prevent any displacement.
By choosing the right adhesive and properly applying it to the wall, you are setting the foundation for a successful interlocking backsplash tile installation. Take your time during this step to ensure a strong and durable bond between the tiles and the wall.
Installing The First Tile Row
Installing an interlocking backsplash tile can completely transform the look of your kitchen or bathroom. One of the most crucial steps in the installation process is getting the first row of tiles right. This sets the foundation for the rest of the project, ensuring a professional and seamless finish.
Determining the Starting Point
Before you begin installing the first tile row, it’s important to determine the starting point. This will ensure that the tiles are evenly distributed and aligned. Start by measuring the width of the backsplash area to determine the center point. Mark this point using a pencil or masking tape.
Next, consider the height of the backsplash. Ideally, you want to start with a full tile at the bottom and avoid small cuts. Measure the height of one tile and subtract it from the total height of the backsplash. Divide the remaining space by two to determine the height of the first row from the counter or edge. Use a level and draw a horizontal line at this height. This will serve as a guide for the first row of tiles.
Spreading the Adhesive
Now that you have determined the starting point, it’s time to spread the adhesive. Begin by applying a thin layer of tile adhesive directly onto the wall using a notched trowel. Make sure to cover an area slightly larger than the size of the first row. The notches in the trowel will create grooves that help the tiles adhere securely to the wall.
Working in small sections, start at the center of the wall and spread the adhesive towards the edges. Use the smooth edge of the trowel to flatten the adhesive and create an even surface. Avoid applying too much adhesive to prevent it from oozing out between the tiles.
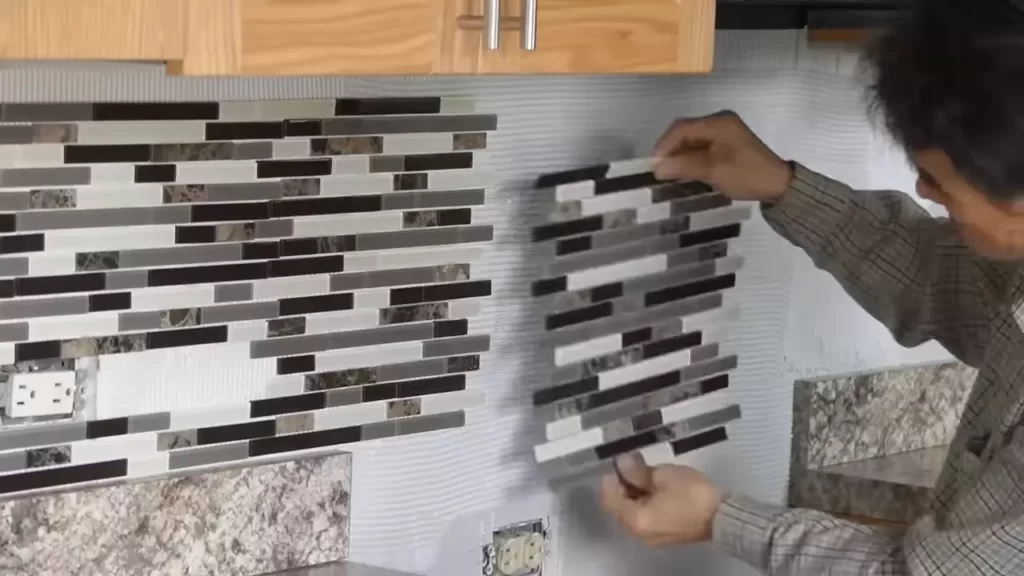
Pressing and Aligning the Tiles
With the adhesive in place, it’s time to press and align the tiles. Begin by placing the first tile at the center of the starting point, ensuring that it aligns with the horizontal and vertical guidelines. Press the tile firmly into the adhesive, applying even pressure to ensure it sticks securely.
Continue placing the remaining tiles using the same technique. Make sure to leave a small gap between each tile for grout. Use tile spacers to maintain consistent spacing. As you work, periodically check that the tiles are level using a level or straight edge. Make any necessary adjustments to ensure a straight and aligned row.
Once the first row is complete, allow the adhesive to dry according to the manufacturer’s instructions. This is typically around 24 hours. Avoid any movement or disturbance during this time to ensure the tiles set properly.
Congratulations! You have successfully installed the first row of interlocking backsplash tiles. Now, you can continue with the rest of the installation, creating a stunning and functional backsplash that will enhance the beauty of your space.
Continuing With Subsequent Rows
Now that you have successfully installed the first row of interlocking backsplash tile, it’s time to move on to the next rows. Continuing with the subsequent rows requires careful attention to detail to ensure a seamless and visually appealing outcome. In this section, you will learn how to apply adhesive for each row and how to ensure proper alignment and spacing.
Applying Adhesive for Each Row
Before proceeding with the installation of subsequent rows, it is crucial to apply adhesive to ensure a strong bond between the tiles and the wall. Here’s a step-by-step guide on how to apply adhesive for each row:
- Using a notched trowel, apply a layer of tile adhesive evenly on the wall, covering an area slightly larger than the size of the tiles you will be installing.
- Hold the trowel at a 45-degree angle and comb through the adhesive to create ridges. This step is important to ensure a proper bond between the tiles and the wall.
- Starting from the bottom, press the interlocking tiles firmly onto the adhesive, aligning them according to the desired pattern. Ensure that the tiles are snugly fit together without any gaps.
- Use a rubber mallet or a tapping block to gently tap each tile into place, ensuring that it is securely adhered to the adhesive. This step helps to eliminate any air pockets that may be trapped behind the tiles.
- Continue applying adhesive and installing subsequent rows, following the same process until you have covered the desired area.
Ensuring Proper Alignment and Spacing
Proper alignment and spacing are essential for a professional-looking backsplash. Here’s what you need to keep in mind to ensure correct alignment and spacing:
- Use spacer wedges or tile spacers to maintain consistent spacing between the tiles. Place them at the corners of each tile to ensure even spacing throughout the installation.
- Regularly check the alignment using a level to make sure that the tiles are perfectly straight horizontally and vertically. Adjust the tiles if necessary to maintain a straight pattern.
- Inspect the gaps between the tiles as you proceed with each row. Make sure the gaps are even and uniform. Adjust the positioning of the tiles as needed to achieve consistent spacing.
By following these steps, you will be able to continue installing interlocking backsplash tiles with confidence and precision. Remember to take your time and make necessary adjustments along the way to achieve a flawless and stunning result.

Cutting And Trimming Tiles
Cutting and trimming tiles is a crucial step when it comes to installing interlocking backsplash tile. It not only ensures that the tiles fit perfectly into your desired space, but also allows you to create precise cuts for edges and outlets. In this section, we will discuss two methods for cutting and trimming tiles: using tile cutters or wet saw, and making precise cuts for edges and outlets.
Using Tile Cutters or Wet Saw
When it comes to cutting and trimming interlocking backsplash tiles, you have two main options: tile cutters or a wet saw. Both methods have their advantages, so it ultimately depends on your comfort level and the complexity of the project.
Using a tile cutter is a popular choice because it is quick and easy. Here’s how you can do it:
- Measure the size of the tile you need to cut and mark it with a pencil or marker.
- Place the tile on the cutting tray of the tile cutter, aligning the mark with the cutting line on the tray.
- Hold the tile firmly in place and position the cutting wheel at the edge of the mark. Apply slight pressure and score the tile along the cutting line.
- Once the tile is scored, use the lever on the tile cutter to snap it along the scored line.
On the other hand, if you are dealing with complex cuts or thick materials, a wet saw might be your best bet. A wet saw uses water to cool the blade, reducing friction and allowing for smoother cuts. Here’s how you can use a wet saw:
- Ensure that you have the necessary safety equipment, including safety goggles and gloves.
- Adjust the cutting blade to the desired angle and depth.
- Turn on the wet saw and carefully feed the tile into the blade. Let the blade do the cutting, and do not force the tile.
- Continue cutting until you reach the desired shape or size.
Remember to always follow the manufacturer’s instructions and take proper safety precautions when using either method.
Making Precise Cuts for Edges and Outlets
When it comes to edges and outlets, making precise cuts is essential to achieve a professional-looking finish. Here are some tips to help you make precise cuts:
- Measure the space where the tile needs to fit, taking into account any necessary gaps or overlaps.
- Transfer the measurements to the tile, marking the area that needs to be cut.
- Using a tile cutter or wet saw, carefully cut along the marked line. Take your time and make sure to follow the line as closely as possible.
- For outlets, use measuring tools to determine the size and shape of the cutout needed. Transfer these measurements onto the tile and cut accordingly.
It’s a good idea to practice on scrap tiles before working on the actual project to ensure you are comfortable and confident with your cutting skills. And remember, measure twice and cut once to avoid any mistakes.
By following these tips and techniques for cutting and trimming tiles, you’ll be well on your way to installing interlocking backsplash tiles like a pro. Remember to take your time, have patience, and prioritize safety throughout the process. Happy tiling!
Grouting The Tile
Mixing the Grout
Mixing the grout is an essential step in the process of installing interlocking backsplash tile. By following these simple steps, you can ensure that your grout is the right consistency and ready for application.
- Gather all the necessary materials, including the grout powder, a mixing bucket, water, and a grout float.
- Start by pouring the grout powder into the mixing bucket. The amount of powder you’ll need will depend on the size of your project, so refer to the manufacturer’s instructions.
- Add water gradually to the grout powder, following the manufacturer’s recommended water-to-powder ratio. Use a stirring stick or a drill with a mixing attachment to combine the grout and water thoroughly. Aim for a smooth, lump-free consistency.
- Let the grout mixture sit for a few minutes to allow any air bubbles to rise to the surface. Then, give it one final stir to remove any remaining lumps.
Applying the Grout
Once your grout mixture is well-mixed and ready, it’s time to apply it to your interlocking backsplash tile. This step requires attention to detail and a careful approach to ensure a professional-looking finish. Follow these steps to achieve the best results:
- Start by holding the grout float at a 45-degree angle and apply the grout diagonally across the tile joints. Press the grout firmly into the joints, making sure to completely fill them.
- Work in small sections to prevent the grout from drying out before you can clean it off. As you go, use a smooth, sweeping motion to remove any excess grout from the tile surface.
- Continue this process until all the joints are filled and the tile surface is clean. Pay attention to any gaps or low spots that may require additional grout.
- Once you’ve finished applying the grout, allow it to cure according to the manufacturer’s instructions. This may take several hours or even days, so be patient and avoid disturbing the tile during this time.
Cleaning off Excess Grout
Cleaning off excess grout is the final step in grouting your interlocking backsplash tile. It’s crucial to take your time and ensure that the tile surface is free of any grout residue, as this can ruin the overall appearance of your backsplash. Follow these steps to clean off the excess grout:
- Wait for the grout to dry for a recommended amount of time. This will make it easier to remove the excess without smudging the grout lines.
- Take a clean, damp sponge or cloth and gently wipe the surface of the tile in a circular motion. Be careful not to press too hard or scrub aggressively, as this may dislodge the grout from the joints.
- Rinse the sponge or cloth frequently to remove any grout residue. Continue wiping the surface until all the excess grout is removed and the tile is clean.
- Allow the grout to dry completely, and then inspect the tile for any remaining haze or smudges. If necessary, repeat the cleaning process until the tile surface is spotless.
By following these steps for grouting your interlocking backsplash tile, you can achieve a beautiful and professional-looking result. Take your time, pay attention to detail, and enjoy the satisfaction of a job well done!
Sealing The Tile
Sealing the interlocking backsplash tile is a crucial step to ensure its longevity and resistance to stains and moisture. By applying a high-quality sealer, you can protect the tile from potential damage caused by spills, splashes, and everyday wear and tear. In this section, we will guide you through the process of choosing the right sealer and applying it effectively to safeguard your interlocking backsplash tile.
Choosing the Right Sealer
When it comes to selecting the appropriate sealer for your interlocking backsplash tile, several factors need to be taken into consideration. Here are some key points to help you make an informed decision:
- Type of Tile: Different types of tile require different sealers. Porous materials like natural stone or unglazed ceramic will need penetrating sealers, while non-porous materials like glass or glazed ceramic tiles may benefit from surface sealers.
- Finish: Determine the desired finish for your backsplash tile. Some sealers provide a natural, matte look, while others enhance the tile’s color and provide a glossy finish.
- Durability: Consider the level of durability required based on the location of the backsplash. For high-traffic areas or behind stovetops, choose a sealer that offers enhanced durability and resistance to heat and chemicals.
- Application Method: Ensure the sealer you choose is easy to apply and suitable for your preferred application method, whether it be spraying, brushing, or rolling.
- Budget: While it’s essential to invest in a high-quality sealer, it’s also important to consider your budget. Evaluate the cost per square foot and the coverage provided by each sealer option.
Applying the Sealer to Protect the Tile
Once you’ve selected the ideal sealer for your interlocking backsplash tile, it’s time to apply it. Follow these steps to ensure a successful sealing process:
- Prepare the Tile: Clean the backsplash tile thoroughly, removing any dirt, grime, or residue. Allow it to dry completely before applying the sealer.
- Test a Small Area: Before applying the sealer to the entire backsplash, test it on a small, inconspicuous area to ensure it produces the desired results.
- Follow Manufacturer’s Instructions: Read and follow the manufacturer’s instructions carefully for the specific sealer you have chosen. This will ensure you apply the product correctly and achieve the best outcome.
- Apply the Sealer: Use a brush, roller, or sprayer to apply the sealer evenly across the backsplash tile. Take care not to apply excessive amounts, as it may lead to an uneven finish or prolonged drying time.
- Allow Drying Time: Give the sealer ample time to dry according to the manufacturer’s instructions. This is crucial for proper bonding and effectiveness.
- Inspect and Repeat: After the initial coat has dried, inspect the tile for any missed or unevenly sealed areas. If necessary, repeat the application process for complete coverage.
By sealing your interlocking backsplash tile correctly, you will enjoy a beautiful and protected surface that withstands the test of time. Now that you know how to choose the right sealer and apply it effectively, you can confidently complete your backsplash installation and add a touch of elegance to your space.
Regularly Clean The Tile
Once you have successfully installed your interlocking backsplash tile and admired the stunning transformation it brings to your kitchen or bathroom, it is important to keep it clean and well-maintained. Regularly cleaning the tile not only enhances its appearance but also extends its lifespan. In this section, we will discuss some essential tips for cleaning and maintaining your interlocking backsplash tile.
Using Mild Cleaners
To keep your interlocking backsplash tile looking its best, it is recommended to use mild cleaners. These cleaners are gentle on the tile surface yet effective in removing dirt and grime. You can create a simple cleaning solution by mixing warm water with a few drops of mild dish soap. Apply this solution to the tile using a soft sponge or cloth, gently scrubbing away any stains or residue. Rinse the tile with clean water and wipe it dry with a clean cloth. Avoid using harsh chemicals or abrasive cleaners, as they can damage the tile’s surface and finish.
Avoiding Abrasive Cleaners and Tools
When it comes to cleaning your interlocking backsplash tile, it is crucial to steer clear of abrasive cleaners and tools. These can cause scratches or discoloration, ruining the tile’s aesthetic appeal. Instead, opt for non-abrasive cleaning tools such as soft sponges, microfiber cloths, or soft-bristle brushes. These tools provide effective cleaning without causing any harm to the tile’s surface. Additionally, avoid using abrasive cleaning products that contain bleach, ammonia, or vinegar, as they can corrode the tile and weaken its interlocking mechanism.
To summarize, regularly cleaning your interlocking backsplash tile is vital for maintaining its beauty and durability. Use mild cleaners that are gentle on the tile surface, and avoid abrasive cleaners and tools that can cause damage. By following these simple yet essential cleaning tips, you can enjoy a pristine and long-lasting interlocking backsplash tile in your kitchen or bathroom.
Fixing Loose Or Damaged Tiles
If you have installed interlocking backsplash tiles and notice that some of them are loose or damaged, don’t worry – it’s a common issue that can be easily resolved. In this section, we will explore two methods to fix loose or damaged tiles: removing and replacing individual tiles, and repairing grout cracks or damage. By following these steps, you can ensure your backsplash looks flawless and stays secure for years to come.
Removing and Replacing Individual Tiles
If you have a loose or damaged interlocking backsplash tile, replacing it is a straightforward process that you can handle yourself. Before you begin, make sure you have the necessary tools and materials:
- Utility knife
- Flathead screwdriver
- New tile or spare tile
- Grout scraper
- Grout
- Grout float
- Grout sealer
To remove and replace an individual tile:
- Carefully inspect the area and identify the loose or damaged tile.
- Use a utility knife to slice through the grout surrounding the tile. Be gentle to avoid damaging the neighboring tiles.
- Insert a flathead screwdriver under the tile and gently pry it up. Take your time to avoid applying excessive force, as this could cause damage.
- Remove any remaining adhesive or grout from the exposed area using a grout scraper or similar tool, being careful not to scratch the surrounding tiles.
- If necessary, clean the area to ensure proper adhesion of the new tile.
- Apply a thin layer of adhesive to the back of the new tile using a notched trowel, making sure to spread it evenly.
- Press the new tile firmly into place, making sure it aligns with the surrounding tiles.
- Allow the adhesive to dry completely, following the manufacturer’s instructions.
- Once the adhesive is dry, apply grout to the joints using a grout float, ensuring that all gaps are filled.
- Use a damp sponge to remove any excess grout from the tile surface.
- Allow the grout to cure for the recommended time and then seal it with a grout sealer.
Repairing Grout Cracks or Damage
If the issue with your interlocking backsplash tile is related to grout cracks or damage, there are steps you can take to fix it. Here’s how:
- Inspect the grout lines and identify any cracks or damage.
- Using a grout saw or similar tool, carefully remove the damaged grout from the affected area. Be cautious not to scratch the surrounding tiles.
- Clean the area to ensure proper adhesion and remove any debris or loose grout.
- Mix a small amount of grout according to the manufacturer’s instructions.
- Using a grout float, apply the new grout to the damaged area, ensuring it fills the gaps completely.
- Use a damp sponge to wipe away any excess grout from the tile surface.
- Allow the grout to cure for the recommended time.
- Once the grout is dry, apply a grout sealer to protect it and enhance its durability.
By following these steps, you can effectively fix loose or damaged interlocking backsplash tiles and ensure your backsplash remains resilient and visually appealing. Remember to take your time and be careful throughout the process to avoid any inadvertent damage to the surrounding tiles.
Frequently Asked Questions Of How To Install Interlocking Backsplash Tile
How Do You Install Interlocking Backsplash Tile?
To install interlocking backsplash tile, start by preparing the surface, ensuring it is clean and dry. Lay out the tiles beforehand to determine the layout and pattern. Apply adhesive to the backsplash area and press the tiles firmly in place using a tile adhesive trowel.
Leave it to dry for 24 hours, and then apply grout between the tiles using a grout float. Wipe away excess grout with a damp sponge and let it cure for another 24 hours.
Can You Install Interlocking Backsplash Tile Over Existing Tile?
Yes, you can install interlocking backsplash tile over existing tile as long as the surface is flat, sturdy, and clean. Make sure to fill in any cracks and clean the existing tile thoroughly before starting the installation process. Additionally, consider using a tile adhesive primer to improve the adhesion of the new tiles to the existing surface.
How Do You Cut Interlocking Backsplash Tile?
To cut interlocking backsplash tile, you can use a tile cutter, a wet saw, or a handheld tile nipper. Measure and mark the tile where you want to make the cut, then use the appropriate tool to carefully cut the tile along the desired line.
Remember to wear protective eyewear and follow the manufacturer’s instructions for the specific tool being used.
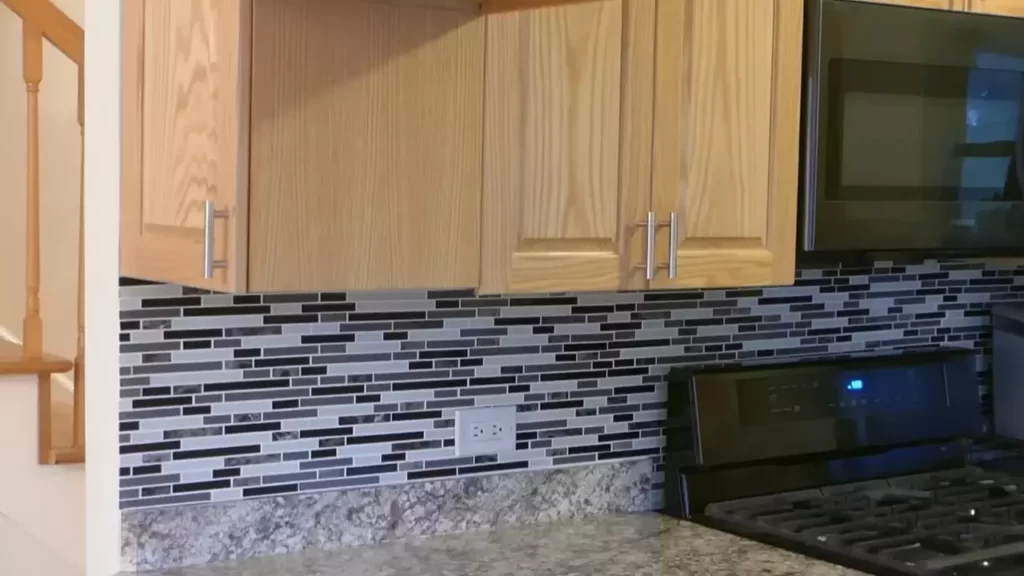
Conclusion
Installing interlocking backsplash tile can be a straightforward and rewarding DIY project. By following the step-by-step guidelines outlined in this blog post, you can achieve a professional-looking result. Remember to prepare and clean the surface, measure and cut the tiles carefully, and ensure proper adhesion.
With the right tools and a little patience, you can transform your kitchen or bathroom with a beautiful backsplash that is both functional and aesthetically pleasing. Happy tiling!