How to Install Cordless Mini Blind
To install cordless mini blinds, measure the window, mount the brackets, and secure the blind in place. Cordless mini blinds provide an easy and convenient solution for window coverings.
Whether you want to enhance privacy, control sunlight, or add a stylish touch to your home, installing cordless mini blinds is a straightforward process. By following these simple steps, you can quickly and efficiently install your cordless mini blinds without any hassle.
With the right tools and a little bit of patience, you’ll have beautiful and functional window coverings in no time. So let’s get started!
Choosing The Right Cordless Mini Blinds
When it comes to selecting the perfect cordless mini blinds for your windows, there are a few important factors to consider. Not only do you want blinds that complement your decor, but you also want to ensure they provide the functionality and convenience you need. In this article, we’ll discuss the different types of cordless mini blinds available in the market and the key factors to take into account when making your decision.
Factors to consider when selecting cordless mini blinds
Choosing the right cordless mini blinds involves considering a few key factors. Let’s take a closer look at each one:
- Privacy: One of the primary reasons for installing blinds is to control the amount of privacy in a room. Determine how much privacy you require in each specific space and select blinds that offer the appropriate level of coverage.
- Light control: If you enjoy having control over the amount of natural light that enters your room, it’s important to consider the light control capabilities of the blinds you choose. Some blinds offer complete blackout options, while others provide adjustable slats to allow for customized light filtering.
- Functionality: Consider how frequently you will be raising and lowering your blinds. If they will be used daily, it’s crucial to choose blinds that are durable and easy to operate. Look for models that are designed with smooth lifting mechanisms and sturdy materials.
- Energy efficiency: In addition to enhancing your room’s aesthetics, cordless mini blinds can also contribute to energy efficiency in your home. Opt for blinds that offer insulation properties, helping to keep your room cool in the summer and warm in the winter.
- Safety: Cordless blinds are an excellent choice if you have children or pets at home. They eliminate the risk of cords, preventing any potential accidents. Be sure to select blinds that are certified as child-safe.
Different types of cordless mini blinds available in the market
Now that we have discussed the crucial factors to consider, let’s explore the various types of cordless mini blinds that you can find in the market:
1. Vinyl blinds: These blinds are affordable and low-maintenance. They are resistant to moisture, making them an excellent choice for bathrooms, kitchens, and other high-humidity areas. Vinyl blinds are available in a wide range of colors and styles, allowing you to find the perfect match for your space.
2. Aluminum blinds: If you’re looking for a sleek and modern option, aluminum blinds might be just what you need. They are lightweight, durable, and easy to clean. With their sleek design, they are suitable for both residential and commercial spaces.
3. Faux wood blinds: If you love the timeless elegance of wood blinds but want a more affordable and practical option, faux wood blinds are an excellent choice. They mimic the look of real wood while offering improved moisture resistance and durability.
4. Fabric blinds: For those who prefer a softer, more delicate look, fabric blinds are a fantastic option. They come in various colors, patterns, and textures, allowing you to add a touch of elegance to any room. Fabric blinds offer light filtration and can be an excellent choice for bedrooms or living areas where you want to create a warm and cozy atmosphere.
By considering these factors and exploring the different types of cordless mini blinds available, you’ll be well-equipped to choose the perfect window treatment for your home. Remember to prioritize functionality, style, and safety to ensure you make a decision that you’ll be happy with for years to come.
Credit: www.familyhandyman.com
Measuring Your Windows For Cordless Mini Blinds
Properly measuring your windows is a crucial step before installing cordless mini blinds. Accurate measurements ensure a perfect fit and optimum functionality for your blinds. In this step-by-step guide, we will walk you through the process of measuring your windows accurately. We will also provide you with some handy tips for measuring odd-shaped windows. Let’s get started!
Step-by-step guide to accurately measure windows for blinds
Follow these simple steps to ensure precise measurements for your cordless mini blinds:
- Start by gathering the necessary tools, including a metal tape measure, a pencil, and a notepad or a phone to record the measurements.
- Measure the width of the window frame from inside edge to inside edge. Take three separate measurements: at the top, middle, and bottom of the frame. Note down the narrowest measurement.
- Next, measure the height of the window frame from the top to the bottom inside edge. Again, take three separate measurements: on the left side, middle, and right side of the frame. Write down the shortest measurement.
- In case there is any window trim or obstructions, make sure to measure from the outermost points of the trim or obstructions instead of the window frame itself. This will ensure a proper fit for your blinds.
- Double-check all the recorded measurements to ensure accuracy. It’s always a good idea to measure twice to avoid any errors.
Tips for measuring odd-shaped windows
Odd-shaped windows require some extra attention to ensure a proper fit for your cordless mini blinds. Here are a few helpful tips:
- In case of arch-shaped windows, measure the width of the window frame at both the top and bottom. Additionally, measure the height from the highest point of the arch to the bottom of the window frame. This will help you find the right size of mini blinds that will cover the entire window area.
- If you have a bay window or windows with unusual shapes, measure each individual window pane separately. Treat them as separate windows while recording the width and height measurements.
- For triangular-shaped windows, measure the width and height at the widest points. Take these measurements separately for each triangular section of the window and record them accurately.
By following these step-by-step instructions and tips for measuring odd-shaped windows, you will be able to obtain precise measurements for your cordless mini blinds. These measurements will help you select the perfect blinds that fit your windows flawlessly, allowing you to enhance the aesthetic appeal and functionality of your space.
Preparing For Installation
Before you can start installing cordless mini blinds, it’s important to properly prepare your windows. This involves gathering the necessary tools and materials as well as ensuring that your windows are clean and ready for installation. In this section, we will take a closer look at the steps you need to take before you begin installing your cordless mini blinds.
Tools and materials needed for installing cordless mini blinds
Before you start installing your cordless mini blinds, it’s essential to gather all the necessary tools and materials. Having everything ready beforehand will help streamline the installation process and ensure that you have everything you need within arm’s reach. Here is a list of tools and materials you will need:
| Tools | Materials |
|---|---|
| Measuring tape | Cordless mini blinds |
| Pencil | Mounting brackets |
| Screwdriver | Screws |
| Level | Drill (optional) |
| Step ladder | |
Preparing the windows for installation
After gathering all the necessary tools and materials, it’s time to prepare your windows for the installation process. This typically involves making sure the windows are clean and free from any dust or debris. Follow these steps to ensure your windows are ready:
- Start by wiping the window frame and glass with a clean cloth to remove any dirt and dust.
- Inspect the window frame for any signs of damage or loose screws. If you notice any issues, make sure to address them before proceeding with the installation.
- Using a pencil, mark the desired height and position where you want to install your cordless mini blinds. It’s crucial to measure twice to ensure accuracy.
- If necessary, use a level to ensure that the blinds will be installed straight and level.
- Once the windows are clean and properly marked, you’re ready to move on to the next step: installing the cordless mini blinds.
By taking the time to gather the necessary tools and materials and prepping your windows properly, you can ensure a smooth and efficient installation of your cordless mini blinds. Now that you are prepared, let’s move on to the next section where we will guide you through the installation process step by step.
Installing Cordless Mini Blinds Inside Mount
Installing cordless mini blinds inside the window frame is a great way to enhance the look and functionality of your windows. With their sleek design and cordless operation, these blinds provide both convenience and style. In this step-by-step guide, we will walk you through the process of installing cordless mini blinds inside mount, ensuring a perfect fit for your windows.
Step-by-step instructions for installing blinds inside the window frame
- Start by gathering all the necessary tools and materials. You will need a measuring tape, a pencil, a level, a screwdriver, and of course, your cordless mini blinds.
- Measure the window frame carefully to determine the correct width and length for your blinds. It’s important to measure both the inside width and height accurately to ensure a proper fit.
- Using the measurements you obtained in the previous step, mark the positions where the brackets will be installed on the inside top corners of the window frame. Make sure to align the brackets evenly.
- Attach the brackets to the window frame using the provided screws and a screwdriver. Make sure the brackets are securely fastened.
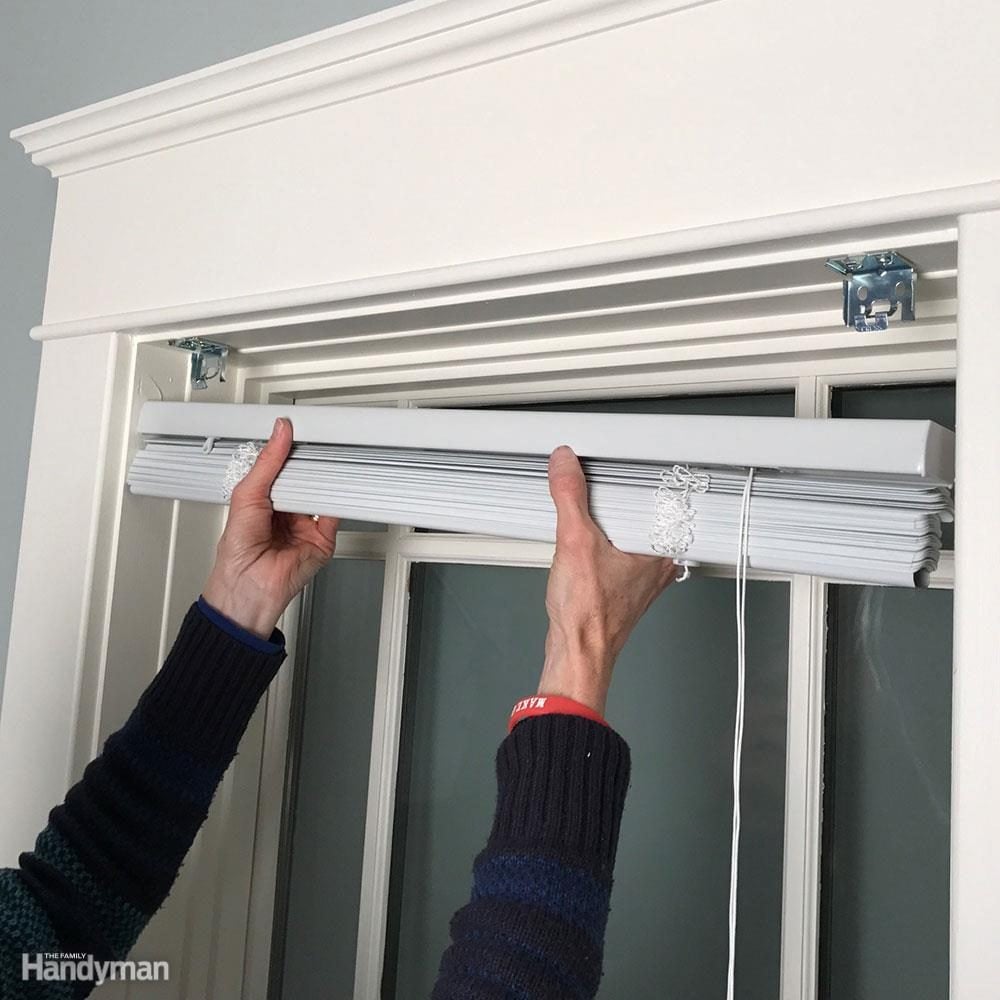
- With the brackets in place, carefully insert the headrail of the cordless mini blinds into the brackets. Make sure it fits snugly and is level.
- Test the operation of the blinds by raising and lowering them a few times. Ensure that they move smoothly and without any obstructions.
- Once you are satisfied with the installation, secure the bottom rail of the blinds by attaching the hold-down brackets to the wall or window sill. This will prevent the blinds from swaying when the window is open.
Adjusting the blinds for a perfect fit
After installing the blinds, you may need to make some adjustments to ensure a perfect fit. Follow these tips to fine-tune the appearance and functionality of your cordless mini blinds:
- Use the built-in mechanisms on the blinds to adjust the slats and control the amount of light entering the room.
- If the blinds are too long, you can easily trim the excess fabric by following the manufacturer’s instructions.
- Ensure that the blinds are aligned properly and centered within the window frame. Use a level to make any necessary adjustments.
- Regularly clean the blinds to keep them looking their best. Dusting or using a vacuum cleaner attachment will help remove any dirt or debris.
By following these step-by-step instructions and adjusting the blinds as needed, you will be able to install cordless mini blinds inside mount with ease. Enjoy the benefits of enhanced privacy, light control, and a stylish window treatment in your home.
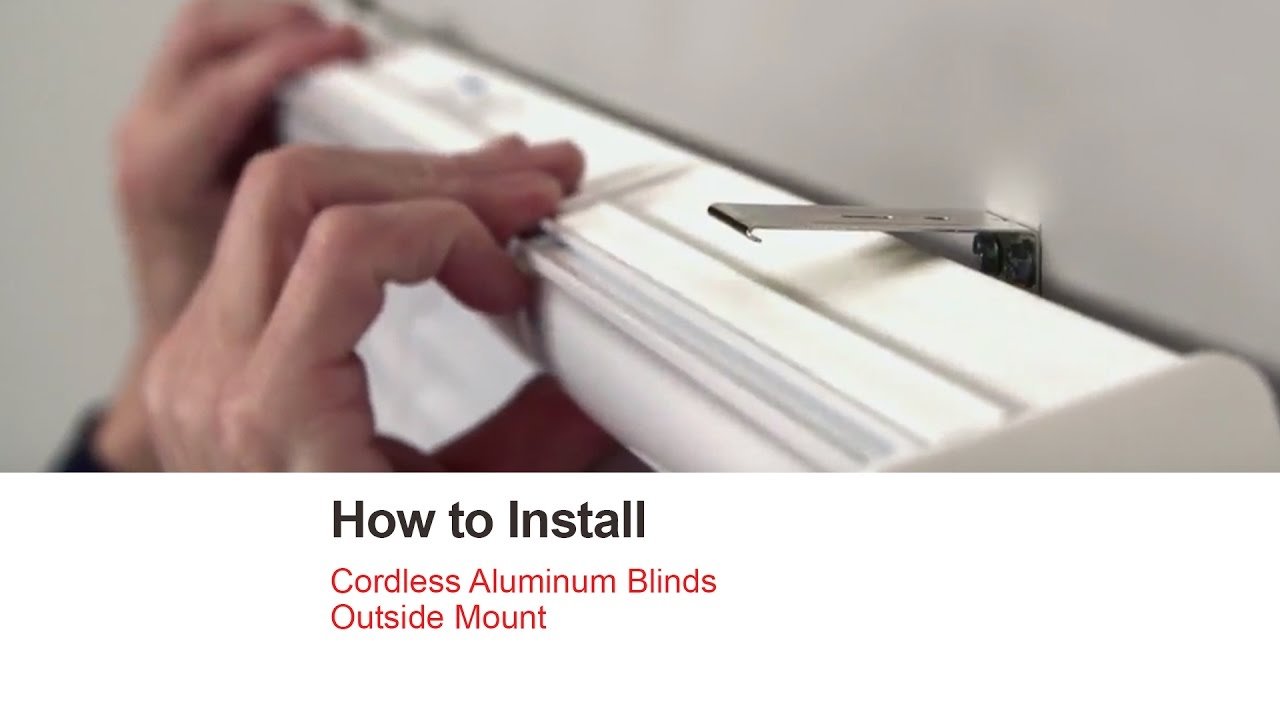
Installing Cordless Mini Blinds Outside Mount
Step-by-step Instructions for Installing Blinds Outside the Window Frame
Installing cordless mini blinds outside mount can be a great way to enhance the aesthetic appeal of your windows while enjoying the added benefits of light control and privacy. Whether you’re a seasoned DIY enthusiast or a beginner looking to take on a new home improvement project, installing blinds on the outside of your window frame is a relatively simple process. To help you get started, here are step-by-step instructions for installing cordless mini blinds outside mount:
Materials You Will Need:
- Cordless mini blinds
- Tape measure
- Pencil
- Screwdriver
- Screws
- Level
Step 1: Measure Your Windows
Begin by measuring the width and height of your windows. Measure from the outer edge of the window trim to determine the size of the blinds you’ll need. Make a note of these measurements as they will be crucial in selecting blinds that fit perfectly.
Step 2: Selecting the Right Size Blinds
With your measurements in hand, it’s time to select the right size cordless mini blinds. Make sure to choose blinds that are slightly wider and longer than the actual window size to ensure proper coverage and privacy.
Step 3: Marking the Mounting Locations
Using a pencil, mark the mounting locations for your blinds on the outside of the window frame. Generally, you’ll want to place the brackets at least 1.5 inches from the edges on each side to allow room for the blinds to operate smoothly. Use a level to ensure that your markings are straight and aligned properly.
Step 4: Installing the Brackets
Using a screwdriver, attach the brackets to the marked locations. Ensure that the brackets are securely fastened to the window frame, as they will be supporting the weight of the blinds. Double-check their alignment with a level to ensure that they are perfectly horizontal or vertical, depending on your window orientation.
Step 5: Mounting the Blinds
Once the brackets are in place, it’s time to mount the blinds. Carefully insert the headrail of the blinds into the brackets, making sure it is seated securely. Give it a gentle tug to ensure it is properly locked in place and won’t accidentally fall down.
Tips for Ensuring Proper Alignment and Symmetry
Installing cordless mini blinds outside mount requires attention to detail to achieve a polished and symmetrical look. Here are a few tips to help you ensure proper alignment and symmetry:
- If you have multiple windows in the same room, measure each window separately, as sizes may vary slightly.
- Use a level to ensure that your brackets are aligned horizontally or vertically, depending on the orientation of your windows.
- If your blinds come with multiple brackets per side, make sure they are evenly spaced to maintain symmetry.
- Stepping back and visually assessing the alignment and symmetry can provide a fresh perspective and help you identify any adjustments that may be necessary.
By following these step-by-step instructions and tips for ensuring alignment and symmetry, you’ll be able to install cordless mini blinds outside mount with ease and achieve a professional-looking result. So go ahead and enhance the functionality and style of your windows, giving your space a fresh new look.
Troubleshooting Common Installation Issues
Installing cordless mini blinds can be a great way to enhance the functionality and appearance of any room. However, like any other installation process, it is not immune to challenges. In this section, we will discuss how to troubleshoot common issues that may arise during the installation of cordless mini blinds. By identifying and resolving these problems, you can ensure a smooth and successful installation.
Identifying and resolving common problems during installation
During the installation of cordless mini blinds, you may encounter various issues that can potentially hinder the process. Here are some common problems and their solutions:
- Blinds not fitting properly: One of the most common issues is when the blinds do not fit the window frame correctly. This can happen if the measurements were not taken accurately. To resolve this problem, double-check your measurements and ensure they match the size of your window frame. If necessary, trim the blinds to the appropriate size using a hacksaw or a utility knife.
- Difficulty in mounting brackets: Another common issue is difficulty in mounting the brackets securely. Ensure that you are using the correct type of screws and that they are long enough to provide a secure hold. If the existing holes do not align with the brackets, you may need to use a power drill to create new holes.
- Operating mechanism not functioning properly: If the cordless mechanism is not functioning smoothly, there may be an issue with the installation of the lifting mechanism. Check that the lifting mechanism is properly attached and aligned with the blinds. If necessary, refer to the manufacturer’s instructions for troubleshooting specific models.
Maximizing functionality and appearance of cordless mini blinds
Once you have successfully installed your cordless mini blinds, there are a few tips that can help you maximize their functionality and appearance:
- Regular dusting: To keep your blinds looking clean and fresh, make it a habit to dust them regularly using a microfiber cloth or a feather duster. This will help prevent dust buildup and maintain their appearance.
- Proper adjustment: Cordless mini blinds offer the flexibility to adjust the amount of light and privacy in a room. Experiment with different positions of the blinds to find the perfect balance that suits your needs.
- Keeping cords organized: While cordless mini blinds eliminate the need for cords, some models may still have cords for tilting the blinds. Make sure to keep these cords neatly organized to prevent tangling and minimize the risk of accidents.
By following these troubleshooting tips and implementing measures to maximize the functionality and appearance of your cordless mini blinds, you can ensure a successful installation that will enhance the overall aesthetics of your space.
Maintaining Your Cordless Mini Blinds
Cleaning tips for keeping blinds looking fresh and new
Regular cleaning is essential to keep your cordless mini blinds looking fresh and new. Here are some cleaning tips to maintain the beauty of your blinds:
- Vacuuming: Start by using a vacuum cleaner with a brush attachment to remove any dust or debris that may have accumulated on the blinds. Make sure to gently vacuum both sides of the blinds, paying close attention to the slats.
- Spot cleaning: For stubborn stains or spots, lightly dampen a clean cloth with a mild detergent and water solution. Gently blot the affected area, being careful not to scrub or rub too harshly as it may damage the blinds’ material.
- Avoid harsh chemicals: It is important to note that harsh chemicals, bleach, or abrasive cleaners should be avoided as they can deteriorate the blinds and discolor the fabric or material.
- Drying: After spot cleaning, let your cordless mini blinds air dry naturally. Avoid using a hairdryer or placing them in direct sunlight as excessive heat can cause warping or fading.
How to properly operate and maintain the cordless mechanism
The cordless mechanism of your mini blinds is designed for easy operation and maintenance. Follow these steps to ensure proper functionality:
- Smooth operation: When raising or lowering the blinds, avoid pulling or forcing the blinds too quickly as it may damage the internal mechanisms. Instead, use a gentle and even pressure to smoothly operate the blinds.
- Checking alignment: Periodically check the alignment of the blinds to ensure that they are hanging straight and level. If any slats appear misaligned, gently adjust them by hand to maintain a uniform appearance.
- Inspecting cords and mechanisms: Check the cords and mechanisms regularly for any signs of wear or damage. If you notice any fraying or broken cords, it is important to have them repaired or replaced by a professional to ensure safe and proper operation.
- Lubrication: Apply a silicone-based lubricant to the moving parts of the cordless mechanism at least once a year. This will help to keep the mechanism functioning smoothly and prevent any sticking or stiffness.
By following these cleaning and maintenance tips, you can ensure that your cordless mini blinds not only look great but also continue to operate efficiently for years to come.
Enhancing The Aesthetics Of Your Windows With Cordless Mini Blinds
Windows play a vital role in the overall aesthetic of your space. They not only allow natural light to enter your home but also serve as a decorative element. To enhance the aesthetics of your windows, you can consider installing cordless mini blinds. These blinds not only offer privacy and light control but also add a touch of elegance to your windows. In this article, we will explore inspiring ideas for incorporating cordless mini blinds into your interior design, helping you create a cohesive and stylish look for your windows.
Inspiring Ideas for Incorporating Blinds Into Your Interior Design
When it comes to interior design, every detail matters. Blinds can be a game-changer when it comes to enhancing the aesthetics of your windows. Below are some inspiring ideas for incorporating cordless mini blinds into your interior design:
- Color Coordination: Choose blinds that complement the color scheme of your room. Opt for neutral shades like white, beige, or gray for a timeless and classic look. If you want to add a pop of color, consider selecting blinds in a shade that complements your existing decor.
- Contrasting Textures: Mix and match different textures to create visual interest. Pair smooth blinds with textured curtains or install blinds made from natural materials like bamboo or wood to add warmth and character to your space.
- Pattern Play: If you want to add a statement to your windows, choose blinds with a pattern. Floral, geometric, or even abstract patterns can instantly elevate the look of your windows and tie in with your overall interior design theme.
- Layering with Curtains: For a more luxurious and layered look, consider combining cordless mini blinds with curtains. The blinds can offer privacy and light control during the day, while the curtains can provide added insulation and a soft, decorative touch.
- Customization: Don’t be afraid to think outside the box and customize your cordless mini blinds. Add decorative trims, tassels, or valances to make them unique and personalized to your style.
Using Blinds to Create a Cohesive and Stylish Look for Your Windows
Creating a cohesive and stylish look for your windows is essential to achieve a well-designed space. Here are some tips on how to use cordless mini blinds to create a cohesive and stylish look for your windows:
- Consistency: Install the same type of cordless mini blinds throughout your home to maintain consistency and a unified look. This will create a cohesive aesthetic and enhance the overall harmony of your space.
- Proportion: Consider the size of your windows when selecting the blinds. For smaller windows, opt for narrower blinds, while wider windows can accommodate wider blinds. Keeping the proportion in mind will create a balanced and visually pleasing appearance.
- Placement: Install the blinds at the correct height to achieve a polished and stylish look. Typically, blinds should hang just above the window frame or at the desired height if you prefer a more dramatic effect.
- Light Control: Determine how much light control you need for each room. Opt for blackout blinds in bedrooms to ensure a restful sleep, while semi-opaque or sheer blinds in living areas can allow natural light to filter through while maintaining privacy.
Frequently Asked Questions (Faqs)
Answers to common questions about installing cordless mini blinds
When it comes to installing cordless mini blinds, many homeowners may have some common questions and concerns. In this section, we’ve compiled the most frequently asked questions to help you navigate the installation process with ease.
1. How do I measure my windows properly for cordless mini blinds?
Measuring your windows correctly is essential to ensure a proper fit for your cordless mini blinds. Here’s a step-by-step guide:
- Start by using a metal tape measure for accurate measurements.
- Measure the width of the window from the inside of the window frame.
- Next, measure the height of the window from the top to the bottom.
- Take note of the measurements and round them down to the nearest 1/8 inch for accuracy.
- Repeat the process for each window you plan to install blinds on.
2. Can I install cordless mini blinds on any type of window?
Yes, cordless mini blinds can be installed on a variety of window types, including single-hung, double-hung, casement, and sliding windows. However, it’s important to ensure that your window frame is sturdy enough to support the blinds.
3. What tools do I need for installing cordless mini blinds?
Installing cordless mini blinds requires a few basic tools that you likely already have at home. Here’s what you’ll need:
- A cordless drill
- A screwdriver set
- A measuring tape
- A pencil
- A level
- An optional power screwdriver for faster installation
Additional tips and advice for successful installation
Aside from the common questions about measuring and tools, here are some additional tips to ensure a successful installation of cordless mini blinds:
- Before starting the installation, read the manufacturer’s instructions carefully to familiarize yourself with any specific requirements or recommendations.
- Make sure to clean your windows thoroughly before installing the blinds to ensure a smooth surface.
- Use a level to ensure that your blinds are installed straight and aligned.
- If you encounter any difficulties while installing the blinds, do not hesitate to contact the manufacturer’s customer support for assistance.
- Consider installing blinds during the daytime when natural light is available, as it can help you see more clearly while working on the installation.
- After installation, test the cordless feature of the blinds to ensure smooth and effortless operation.
By following these helpful tips and answering common questions, you’ll be well-equipped to install cordless mini blinds with confidence and achieve the desired result for your windows.
Frequently Asked Questions Of How To Install Cordless Mini Blind
How Do You Install Cordless Blinds?
To install cordless blinds, follow these steps: 1. Start by measuring your window frame accurately. 2. Mount the brackets provided with the blinds onto the upper corners of the window frame. 3. Attach the headrail of the blinds onto the mounted brackets.
4. Test the blinds to ensure they operate smoothly. 5. Finally, adjust the blinds to your desired position and enjoy the convenience of cordless operation.
Are Cordless Blinds Easy To Install?
Yes, cordless blinds are easy to install. They require no cords, making installation quick and hassle-free. Simply follow the included instructions to mount the brackets and attach the blinds. With no cords to worry about, you can enjoy a safer and cleaner window covering solution.
Do Cordless Mini Blinds Work Well?
Yes, cordless mini blinds work well. They are easy to use and are operated by a simple push and pull mechanism, making them convenient for daily use. These blinds also provide privacy and light control, making them a practical choice for any room in your home.
How Do You Install Cordless Blinds Without Drilling?
Install cordless blinds without drilling by following these simple steps: 1) Measure your window frame accurately. 2) Choose cordless blinds that come with adhesive brackets. 3) Clean the window frame and brackets thoroughly. 4) Attach the brackets to the frame and let them set for 24 hours.
5) Install the blinds by simply sliding them into the brackets. Enjoy a hassle-free installation without any drilling!
Conclusion
Installing cordless mini blinds is a simple and effective way to enhance the functionality and style of your space. With the step-by-step instructions provided in this blog post, you can easily transform any room into a more comfortable and visually appealing environment.
By following the correct installation process, you can enjoy the convenience and safety of cordless blinds while enjoying the benefits of natural light control. Don’t hesitate to give it a try and elevate your living experience today!

