How to Install Closetmaid Shelftrack?
To install Closetmaid Shelftrack, begin by measuring and marking the desired position on the wall. Then, install the track using wall anchors, attaching a bracket every 12-16 inches.
(23 words) Are you looking to add more storage space in your closet? Installing a Closetmaid Shelftrack system can help you achieve just that. With its simple installation process and customizable design, Closetmaid Shelftrack allows you to create a functional and organized space.
In this guide, we will walk you through the steps to install Closetmaid Shelftrack in your closet, ensuring a seamless installation process. Let’s dive in and transform your closet into a clutter-free oasis.
Understanding The Basics Of Closetmaid Shelftrack
Welcome to our comprehensive guide on installing Closetmaid Shelftrack! If you’re looking to optimize your closet space and enhance its functionality, Closetmaid Shelftrack is the perfect solution for you. In this section, we will explore the benefits of using the Closetmaid shelf track, understand the components and tools needed for installation, and familiarize ourselves with the installation process. Let’s dive in and transform your closet into an organized haven!
Exploring the Benefits of Using Closetmaid Shelftrack
When it comes to closet organization, Closetmaid Shelftrack brings a plethora of benefits. Let’s explore some of the standout advantages:
- Maximum Versatility: Closetmaid Shelftrack offers unmatched versatility, allowing you to customize your closet based on your unique needs. From adjustable shelves to organized hanging space, you have full control over the configuration.
- Easy Accessibility: Bid farewell to the days of digging through piles of clothes or struggling to find your favorite pair of shoes. With Closetmaid Shelftrack, everything is at your fingertips, making it effortless to locate and retrieve items.
- Enhanced Storage Capacity: As an innovative storage solution, Closetmaid Shelftrack maximizes your closet’s storage capacity. By utilizing vertical space and incorporating additional shelves and drawers, you can store more items without sacrificing organization.
- Durability and Longevity: Closetmaid Shelftrack is built to last. Made from high-quality materials that withstand daily wear and tear, this system ensures longevity and retains its functionality for years to come.
Understanding the Components and Tools Needed for Installation
Before diving into the installation process, it’s essential to familiarize yourself with the components and tools required. Here’s a breakdown of what you’ll need:
| Component | Quantity |
|---|---|
| Shelftrack Wall Standards | Varies based on closet size |
| Brackets | Varies based on desired shelf configuration |
| Shelves | Varies based on desired shelf configuration |
| Hang Track | 1 per installation |
| Anchors and Screws | As needed for wall mounting |
| Level, Drill, and Screwdriver | 1 each |
Familiarizing Yourself with the Installation Process
Now that you have a grasp of the benefits and necessary tools, it’s time to familiarize yourself with the installation process. While every closet may have unique aspects, the following steps provide a general overview:
- Measure and Plan: Start by measuring your closet space and planning the desired configuration. This step helps determine the quantity of components needed.
- Install Wall Standards: Begin by attaching the Shelftrack Wall Standards vertically to the wall using anchors and screws. Make sure they are level and securely fastened.
- Attach Hang Track: Next, install the Hang Track at the top of the wall. This horizontal track acts as a support for the Shelftrack system. Ensure it is level and screwed into studs for optimal stability.
- Mount Brackets and Shelves: Following the manufacturer’s instructions, mount the brackets onto the Wall Standards at desired heights. Place the shelves onto the brackets, ensuring they are level and secure.
- Adjust and Organize: Once the basic installation is complete, make any necessary adjustments to ensure everything is level and aligned. Now, it’s time to organize your clothing and accessories, maximizing the efficiency of your newly installed Closetmaid Shelftrack system!
With these steps in mind, you’ll be well-prepared to install your Closetmaid Shelftrack system effortlessly. Enjoy the benefits of an organized closet without the hassle of searching for your belongings. Upgrade your space today and experience the convenience and practicality of Closetmaid Shelftrack!
Preparing The Closet Space For Installation
Removing any existing shelving or fixtures
Before installing the Closetmaid Shelftrack in your closet, it is essential to remove any existing shelving or fixtures that are currently occupying the space. Start by taking an inventory of what is currently installed and assess whether it needs to be entirely removed or partially dismantled. This will provide a clean canvas for the new shelf system and ensure a seamless installation process.
Measuring and marking the desired height for the new shelves
Once you have a clear closet space, the next step is to measure and mark the desired height for the new shelves. Careful planning at this stage will help optimize the storage capacity and make it easier for you to organize your belongings. Using a tape measure, measure the height at which you want the shelves to be installed. Make sure to take into account any specific requirements or preferences you might have. Mark the measurements using a pencil or masking tape to ensure accuracy.

Patching and painting the walls, if necessary
If you find that the walls of your closet are damaged or have imperfections that may affect the installation or the overall aesthetics, it is crucial to patch and paint them before proceeding. This step will not only improve the appearance of your closet but also create a durable surface for attaching the Closetmaid Shelftrack. Use spackle or a similar filler to repair any holes, cracks, or dents in the walls. Once the walls are smooth and even, apply a fresh coat of paint that complements your closet’s overall design.
Installing The Shelftrack Wall Standards
One of the key steps in installing a Closetmaid Shelftrack system is attaching the wall standards securely to the wall. These wall standards act as the foundation for your shelving system, providing the stability and support needed to hold your belongings. In this post, we will guide you through the process of installing the Shelftrack wall standards, ensuring proper spacing and alignment, and using anchors and screws for added stability.
Attaching the wall standards securely to the wall
Before you begin attaching the wall standards, make sure you have all the necessary tools such as a drill, level, and measuring tape. Start by determining the desired height of your shelves and use a level to mark the positions on the wall where the standards will be installed. Once you have marked the positions, hold the first standard against the wall at the desired height and use a pencil to mark the screw holes. Repeat this process for the second standard.
Next, use the drill to create pilot holes at the marked locations. Pilot holes will make it easier to screw in the screws without splitting the wall or damaging the standards. Make sure the pilot holes are slightly smaller than the screws you will use.
Ensuring proper spacing and alignment for the standards
Proper spacing and alignment of the wall standards are crucial for the stability and functionality of your Closetmaid Shelftrack system. To ensure the standards are aligned correctly, measure the distance between them with a measuring tape and adjust as necessary. Double-check the alignment using a level to ensure that the standards are perfectly vertical.
For proper spacing, follow the specific instructions provided by Closetmaid for your particular Shelftrack system. Measure the recommended distance between each standard and adjust accordingly. This will ensure that your shelves will fit securely and evenly.
Using anchors and screws for added stability
To provide extra stability and support to your Shelftrack system, it is recommended to use anchors and screws. Anchors are particularly important if you’re mounting the standards onto drywall or other materials that may not be able to support the weight of your shelves without additional reinforcement.
Start by inserting the anchors into the pilot holes you created earlier. Gently tap the anchors into place using a hammer. Then, line up the wall standards with the pilot holes and screw them into the anchors. Make sure the screws are tightened securely, but be cautious not to overtighten as it can cause damage to the wall or standards.
Repeat this process for each standard, ensuring that they are all securely attached to the wall. Once all the standards are in place, you can proceed with installing the rest of the Closetmaid Shelftrack system, including the brackets, shelves, and other accessories.
With the wall standards securely installed, properly spaced, and anchored for stability, you can now enjoy a well-organized and functional closet using the Closetmaid Shelftrack system. Follow the provided instructions for additional steps on completing the installation and enjoy the benefits of a clutter-free and organized space.
Installing The Shelf Brackets And Shelves
Once you’ve gathered all the necessary materials and prepared the wall standards, it’s time to move on to the exciting part of installing the shelf brackets and shelves for your Closetmaid Shelftrack system. This next step requires careful attention to detail to ensure a sturdy and functional storage solution for your closet. In this section, we will guide you through the process of attaching the shelf brackets to the wall standards, determining the spacing and arrangement of the shelves, and installing the shelves onto the brackets.
Attaching the Shelf Brackets to the Wall Standards
Before you can begin attaching the shelf brackets to the wall standards, make sure the standards are securely anchored to the wall. This will provide a stable base for your shelves. Once the standards are properly installed, follow these steps to attach the brackets:
- Start by placing the first bracket against the standard, aligning it with the desired height for your first shelf. Use a level to ensure it is perfectly vertical.
- Once the bracket is properly aligned, mark the holes for the screws on the wall.
- Drill pilot holes on the marked spots to make screwing in the brackets easier.
- Secure the bracket to the wall using the provided screws, making sure it is tightly fastened.
- Repeat the process for the remaining brackets, adjusting their heights according to your desired shelf spacing.

Determining the Spacing and Arrangement of the Shelves
Now that the shelf brackets are securely attached to the wall standards, it’s time to determine the spacing and arrangement of the shelves. Consider the height and width of the items you plan to store on the shelves to ensure adequate space.
Here’s how to determine the spacing and arrangement:
- Measure the height of the items you plan to store on each shelf. Leave enough space between each shelf to accommodate these items.
- Take into account any specific requirements or preferences you have for shelf spacing. For example, if you’ll be storing larger items, you might want to leave more room between shelves.
- Consider the overall aesthetic of your closet and arrange the shelves in a way that is visually appealing.
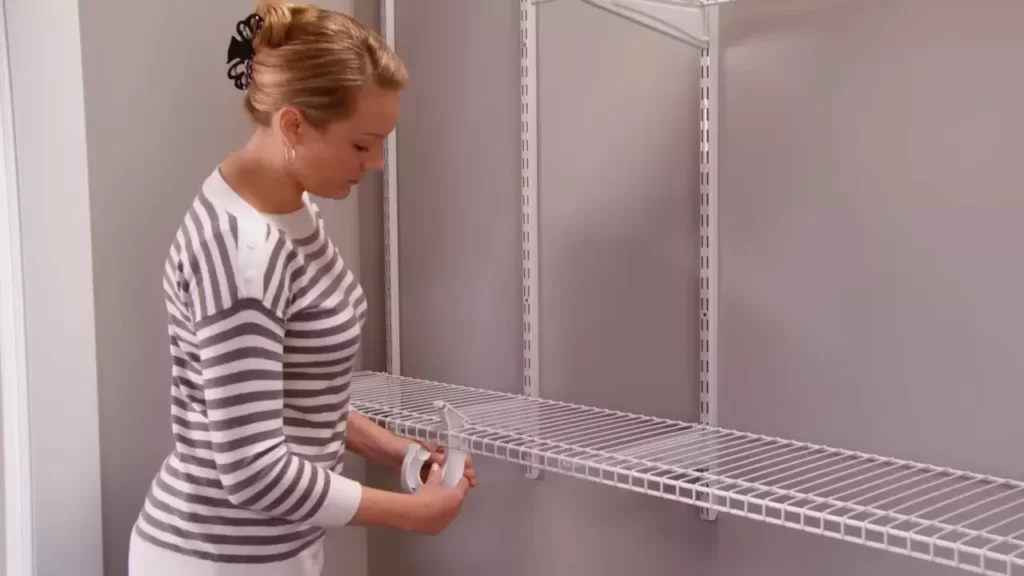
Installing the Shelves onto the Brackets
With the spacing and arrangement determined, it’s time to install the shelves onto the brackets. Follow these steps:
- Align the front lip of the shelf with the front edge of the bracket.
- Slide the shelf onto the bracket, ensuring it is securely in place.
- Check the levelness of the shelf and make any necessary adjustments.
- Repeat the process for each shelf, working your way up from the bottom to the top of the closet.
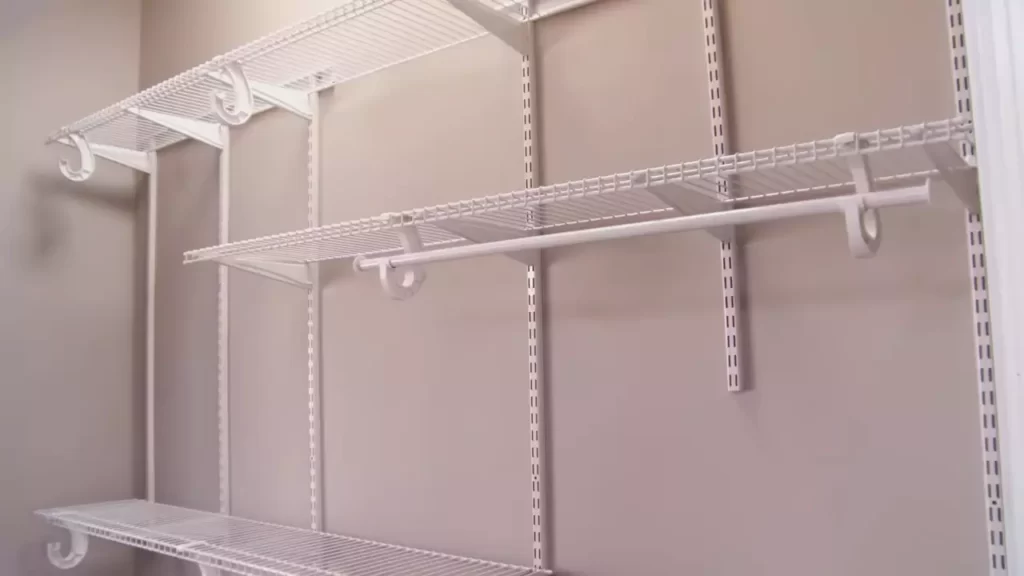
By following these steps, you’ll have a properly installed Closetmaid Shelftrack system with sturdy shelf brackets and arranged shelves that perfectly suit your storage needs. Now, it’s time to start organizing and enjoying your newly optimized closet space!
Adding Accessories And Finishing Touches
Once you have successfully installed your Closetmaid Shelftrack system, it’s time to add those final finishing touches that will make your closet organization dreams come true. Adding accessories such as wire baskets, drawers, or other storage components can significantly enhance the functionality of your shelves. In this section, we will guide you through the process of installing accessories, securing them to the shelf brackets, and making final adjustments to ensure your shelves are level and sturdy.
Installing wire baskets, drawers, or other accessories
Now that you have your shelves in place, it’s time to add some additional storage options. Whether you need wire baskets to store small items or drawers to keep your belongings neatly tucked away, Closetmaid Shelftrack offers a wide range of accessories to suit your needs. To install these accessories, simply follow these steps:
- Start by determining the preferred location of your accessory on the shelf.
- Attach the appropriate brackets or hooks provided with the accessory to the underside of the shelf. Make sure they are securely fastened.
- Slide the accessory onto the installed brackets or hooks. Ensure it is aligned correctly and fits snugly.
This simple process allows you to effortlessly customize your closet setup, giving you the flexibility to organize your belongings in the most efficient way possible.
Securing the accessories to the shelf brackets
After you have installed the accessories on the shelves, it is important to ensure that they are securely fastened to the shelf brackets. This will prevent any unwanted shifting or wobbling of the accessories when you use them. To secure the accessories, follow these steps:
- Tighten any screws or nuts that may have come loose during the installation process.
- Check that the brackets or hooks holding the accessories are firmly attached to the shelves.
- Gently shake the accessories to test their stability. If you notice any movement, readjust or retighten the brackets as necessary.
By securely fastening your accessories to the shelf brackets, you can have peace of mind knowing that they will remain stable and reliable, even with regular use.
Final adjustments and leveling of the shelves
Before you declare your Closetmaid Shelftrack installation complete, take the time to make final adjustments and ensure that all shelves are level. This will provide a polished and professional look to your closet organization system. Follow these steps for the final adjustments:
- Use a level to check the alignment of each shelf. If necessary, adjust the shelf brackets accordingly to achieve a level surface.
- Double-check that all shelves are evenly spaced and aligned, providing a clean and uniform appearance.
- Make any additional adjustments as needed to optimize the overall functionality and aesthetic appeal of your Closetmaid Shelftrack system.
By taking the time for these final adjustments, you can ensure that your shelves are not only visually pleasing but also functional and efficient for all your storage needs.
With the addition of accessories and these final finishing touches, your Closetmaid Shelftrack system is ready to take organizing to a whole new level. Enjoy the satisfaction of a well-organized and clutter-free closet!
Maximizing Storage Space With Closetmaid Shelftrack
If you’re looking to maximize the storage space in your closet, Closetmaid Shelftrack is the perfect solution. With its innovative design and versatility, Shelftrack allows you to create a custom storage system that meets your specific needs. In this blog post, we will explore three key ways to maximize storage space with Closetmaid Shelftrack: utilizing vertical space, incorporating adjustable shelves and accessories, and organizing items based on frequency of use or category.
Utilizing vertical space for efficient storage
When it comes to storage, utilizing vertical space is crucial. Closetmaid Shelftrack allows you to make the most of your closet’s height by installing shelves and accessories from floor to ceiling. By doing so, you’ll not only increase your storage capacity but also create a more organized and efficient space. Here are some tips to make the most of your vertical space:
- Install shelving units from the floor to the ceiling. This will help you maximize the available space and prevent any wasted gaps.
- Consider using stacking bins or boxes to make use of the height of your shelves. These can be easily labeled and pulled out when needed.
- Utilize hanging organizers for items such as handbags, scarves, or belts. These can be easily hung on the sides of your shelves, freeing up valuable shelf space.
Incorporating adjustable shelves and accessories for versatility
One of the most significant advantages of Closetmaid Shelftrack is its flexibility. The system allows you to adjust shelves and accessories according to your changing storage needs. This ensures that your closet space remains functional and adaptable. Here’s how you can incorporate adjustable shelves and accessories:
- Install adjustable shelves that can be easily moved up or down. This allows you to accommodate items of different sizes and prevents wasted space.
- Add drawers or baskets that can slide in and out, providing easy access to items stored inside.
- Include hanging rods at different heights to maximize hanging space for clothing.
- Integrate shoe racks or cubbies that can be adjusted to fit shoes of various sizes and styles.
Organizing items based on frequency of use or category
A well-organized closet not only maximizes storage space but also helps you find what you need quickly and easily. When organizing your items, consider grouping them based on frequency of use or category:
- Store frequently used items at eye level or within easy reach. This includes everyday clothing, shoes, and accessories.
- Place less frequently used items, such as seasonal clothing or special occasion items, on higher shelves or in labeled bins.
- Group similar items together, such as shirts with shirts, pants with pants, and bags with bags. This makes it easier to locate specific items when needed.
- Label storage containers or use clear bins to quickly identify the contents without having to open them.
By following these tips and utilizing the benefits of Closetmaid Shelftrack, you can maximize the storage space in your closet and create a well-organized and efficient system. Take advantage of the vertical space, incorporate adjustable shelves and accessories, and organize your items strategically. With Closetmaid Shelftrack, you’ll have a functional and stylish storage solution that meets all your needs.
Troubleshooting Common Installation Issues
Addressing problems with wall studs or uneven walls
One common issue that you may encounter when installing the Closetmaid Shelftrack system is dealing with wall studs or uneven walls. However, there are a few troubleshooting steps you can take to overcome these challenges and ensure a secure and stable installation.
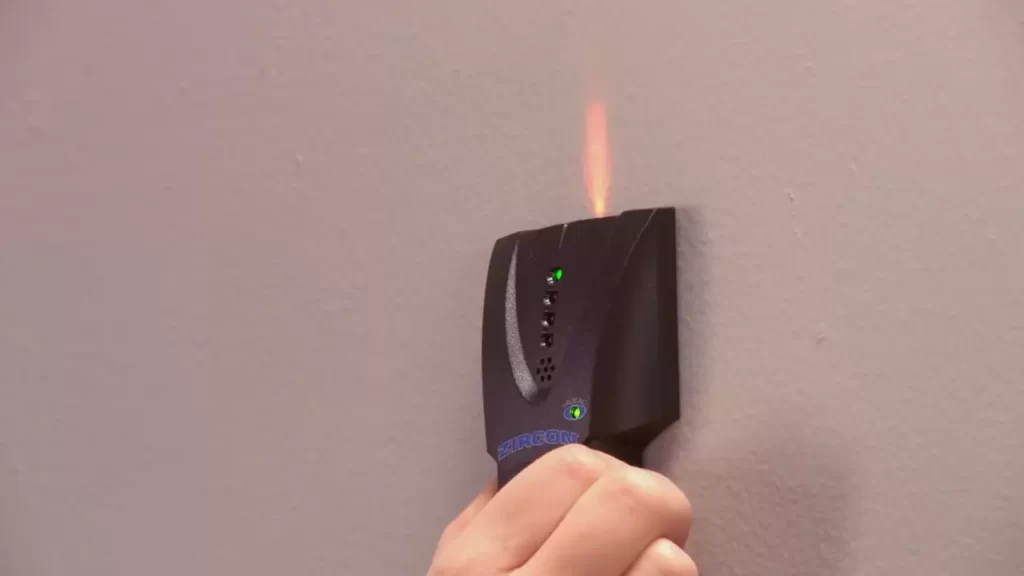
1. Locating wall studs accurately
- Begin by using a stud finder to identify the location of the wall studs. This will help you determine the best spots to secure the Shelftrack system.
- Ensure that the stud finder is properly calibrated and follow the manufacturer’s instructions for accurate detection.
- Use a pencil or marker to mark the center of each stud.
By accurately locating the wall studs, you can prevent the shelves from sagging or becoming unstable over time.
2. Dealing with uneven walls
If you’re dealing with uneven walls, it’s important to level the installation to maintain stability and enhance the aesthetic appeal of the Closetmaid Shelftrack system. Here’s how:
- Start by measuring the height of the wall at various points to determine the highest and lowest spots.
- Adjust the mounting standards accordingly to compensate for the unevenness.
- Use a level to ensure that the standards are perfectly vertical.
- If the discrepancy is significant, you may need to use shims or spacers to fill in the gaps and create a level surface for your installation.
By following these steps, you can overcome the challenges posed by uneven walls and create a more visually appealing and stable Closetmaid Shelftrack installation.
Dealing with misaligned or unstable components
Another common installation issue you may encounter is misaligned or unstable components. To address this problem effectively, follow the steps outlined below:
1. Checking for misalignment
During the installation process, it’s crucial to regularly check for any misalignment in the components:
- Ensure that the brackets are properly aligned with the standards and secured tightly.
- Check that the shelves are level and aligned with one another.
- Use a level and a measuring tape to confirm the precision of your installation.
2. Reinforcing stability
In some cases, you may find that the components are not as stable as desired. To enhance the stability of your installation, consider the following tips:
- Make sure the brackets are securely fastened to the studs or wall anchors.
- Consider adding additional brackets for extra support, especially if you plan to store heavy items on the shelves.
- Tighten the screws on all components to ensure a secure and stable assembly.
By addressing misalignment and reinforcing the stability of your Closetmaid Shelftrack system, you can avoid potential issues and create a reliable storage solution.
Adjusting the installation to accommodate closet doors or obstructions
If your closet has doors or other obstructions that could interfere with the installation of the Shelftrack system, don’t worry. There are simple adjustments you can make to ensure a seamless fit:
1. Measuring door clearances
Before starting the installation, measure the clearance between your closet doors and the surrounding walls. This will help you determine the available space for the Shelftrack system.
2. Modifying the design
If the door clearances are limited, consider adjusting the design of the Shelftrack system to accommodate the restrictions:
- Install the system on one side of the closet only, leaving enough clearance for the doors to open and close smoothly.
- Use shorter shelves or customize their length to fit the available space.
- Utilize the vertical space in your closet by installing additional shelving above the doors or obstructions.
By adapting the installation to accommodate closet doors or other obstructions, you can maximize your storage space without compromising functionality.
Maintaining And Cleaning Closetmaid Shelftrack
Maintaining and cleaning your Closetmaid Shelftrack system is essential to keep it looking its best and functioning properly. With regular care and attention, you can ensure that your shelves and accessories stay clean, secure, and in top condition for years to come.
Regular dusting and wiping down of shelves and accessories
One of the easiest and most effective ways to maintain your Closetmaid Shelftrack system is by regularly dusting and wiping down the shelves and accessories. Dust and debris can accumulate over time, making your shelves look dirty and dull. To prevent this, use a microfiber cloth or a soft, lint-free cloth to wipe off any dust or dirt from the surfaces gently. For best results, it’s recommended to dampen the cloth slightly, but avoid using excessive water as it may damage the finish of the shelves.
Checking for loose screws or brackets periodically
Ensuring the stability of your Closetmaid Shelftrack system is crucial for its longevity and safety. Periodically check for any loose screws or brackets that may have come undone due to regular wear and tear or improper installation. Tighten any loose screws using a screwdriver, and if needed, reposition or replace any brackets that are no longer secure. By addressing these minor issues promptly, you can prevent them from turning into larger problems and maintain the overall integrity of your shelving system.
Troubleshooting and repairing any damages or wear over time
Over time, your Closetmaid Shelftrack system may experience some damage or wear and tear. It’s important to address these issues promptly to prevent further deterioration and ensure the longevity of your shelves. If you notice any damages, such as chipped edges or scratches, consider using touch-up paint or a matching color marker to repair the surface. Additionally, if any parts become loose or broken, such as closet rod holders or shelf brackets, replace them to maintain the functionality of your system.
By following these maintenance and cleaning tips for your Closetmaid Shelftrack system, you can keep it looking and functioning at its best. Regular dusting and wiping down of shelves and accessories, checking for loose screws or brackets periodically, and troubleshooting and repairing any damages or wear over time will help preserve the quality and appearance of your shelving system for years to come.
Frequently Asked Questions For How To Install Closetmaid Shelftrack
How Do I Install Closetmaid Shelftrack?
To install Closetmaid Shelftrack, start by measuring the space, attach the hang track to the wall, install the standards and brackets, snap in the shelving, and secure it in place with clips. Finally, arrange the shelves to fit your needs.
Conclusion
To sum up, installing a Closetmaid Shelftrack is a straightforward process that can transform your closet organization. By following the steps and tips outlined in this guide, you can achieve a functional and visually pleasing space. Whether you have a small or large closet, the Shelftrack system offers flexibility and customization options.
Get started on your closet makeover today and enjoy the benefits of a well-organized space. Happy organizing!