How to Install Ceiling Medallion?
To install a ceiling medallion, begin by locating the center point on the ceiling where you want to place it. Then, apply adhesive to the back of the medallion and carefully press it onto the ceiling, making sure it is centered.
Understanding The Purpose And Benefits Of Ceiling Medallions
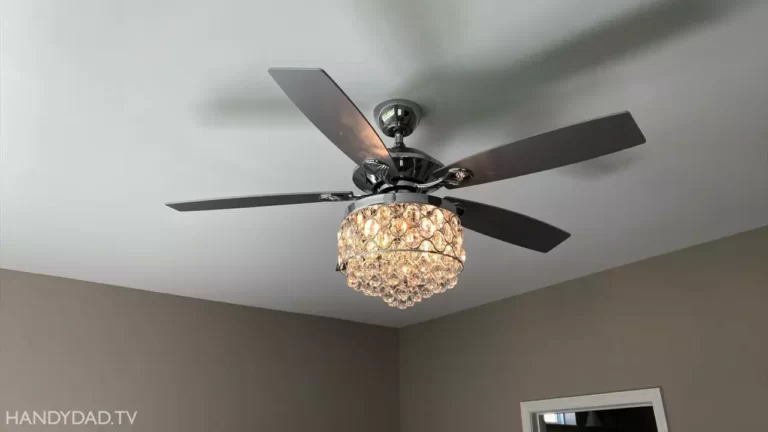
Ceiling medallions are exquisite decorative elements that can completely transform the look and feel of a room. These elegant pieces are designed to be installed in the center of the ceiling, surrounding light fixtures, chandeliers, or ceiling fans. Not only do ceiling medallions provide a stunning focal point, but they also offer numerous benefits that can elevate the overall aesthetics of your space. Let’s explore some of the key advantages of incorporating ceiling medallions into your home decor.
Enhancing the Aesthetics of Your Space
One of the primary benefits of installing a ceiling medallion is the instant enhancement it brings to your space’s visual appeal. By adding a decorative element to what is traditionally a flat and often overlooked area of a room, a ceiling medallion creates a captivating centerpiece that draws the eye upwards. From intricately designed patterns to elegant and minimalist styles, ceiling medallions come in an array of shapes, sizes, and designs to suit various interior aesthetics.

Adding Dimension and Elegance to Your Ceiling
Another advantage of ceiling medallions is the dimensional effect they lend to your ceiling. By incorporating a textured or intricate pattern, a ceiling medallion adds depth and character to an otherwise plain and monotonous surface. This additional dimension creates a sense of grandeur and elegance, making the ceiling a standout feature of the room. Whether you choose a medallion with ornate details or opt for a more understated design, the result is a ceiling that exudes sophistication and style.
Moreover, ceiling medallions can also be used to create a harmonious look by complementing other architectural elements or decor pieces in the room. From coordinating with crown moldings to matching the style of furniture or artwork, a ceiling medallion can tie together various design elements and contribute to a cohesive and seamless aesthetic in the space.
Installation of a ceiling medallion is a relatively straightforward process that can be done by following a few simple steps. Once you have chosen the perfect medallion for your space, make sure you have the necessary tools, such as adhesive, caulk, and a ladder, to complete the installation. While the exact process may vary slightly depending on the medallion type, the installation typically involves applying adhesive to the back of the medallion and affixing it to the ceiling around the light fixture or chandelier. Once the medallion is securely in place, any visible gaps can be filled with caulk, and a final touch-up can be done as needed.
Assessing The Ceiling And Choosing The Right Size And Style
Installing a ceiling medallion is a great way to add elegance and charm to any room. Not only does it enhance the beauty of your ceiling fixture, but it also acts as a focal point that adds character to the space. However, before diving into the installation process, it is essential to assess your ceiling and choose the right size and style of the medallion.
Measuring the Diameter of the Ceiling Fixture
An important step in choosing the right ceiling medallion is to accurately measure the diameter of your ceiling fixture. This ensures that the medallion perfectly complements the size and shape of your existing light or ceiling fan. Here’s how to measure the diameter:
- Turn off the power to the ceiling fixture to ensure your safety.
- Climb a stable ladder or use a step stool to reach the fixture.
- Use a measuring tape to determine the diameter of the fixture.
- Measure from one edge of the fixture to the opposite edge, passing through the center.
Once you have obtained the diameter, it is recommended to add a few inches to the measurement. This provides a visually pleasing proportion between the medallion and the fixture.
Considering the Style and Design Elements
When choosing a ceiling medallion, it is important to consider the style and design elements of your room. The medallion should complement the overall aesthetic and enhance the existing decor. Here are some factors to consider:
- Architectural Style: Determine the architectural style of your home, be it modern, classic, or eclectic. Choose a medallion that harmonizes with the overall theme.
- Size and Shape: Consider the size of the room and the height of the ceiling. A larger medallion works well in spacious areas, while smaller ones are suitable for compact rooms.
- Design Details: Take note of the intricate design details in your room, such as the molding, textures, and patterns. Select a medallion that complements these elements to create a cohesive look.
- Material: Medallions come in a variety of materials, including plaster, polyurethane, and metal. Choose a material that not only matches your style but also suits the durability needs of your room.
Gathering The Necessary Tools And Materials
Gathering the necessary tools and materials is an essential first step in installing a ceiling medallion. By ensuring you have everything you need before you begin, the installation process will be smoother and more efficient. In this section, we will discuss the specific tools and materials you will need to successfully install your ceiling medallion.
Measuring Tape
The measuring tape is an indispensable tool when it comes to installing a ceiling medallion. You will need it to accurately measure the diameter of your ceiling medallion, as well as the positioning for your mounting screws. Having a measuring tape that is flexible and easy to read will help you achieve precise measurements, ensuring a proper fit for your medallion.
Construction Adhesive
Construction adhesive is a strong bonding agent that will be used to attach the ceiling medallion to the ceiling. It is important to choose a high-quality construction adhesive that is specifically designed for ceiling applications. The adhesive should be able to provide a secure and long-lasting bond, ensuring that your medallion stays in place for years to come. Make sure to read the manufacturer’s instructions for proper application and drying times.

Caulk Gun
A caulk gun is a tool used to apply the construction adhesive evenly to the back of the ceiling medallion. This ensures that the adhesive is distributed properly and prevents any gaps or uneven surfaces. A caulk gun with a smooth trigger and good control will make it easier to apply the adhesive in a neat and precise manner.
Level
A level is a crucial tool to ensure that your ceiling medallion is installed correctly and evenly. Before attaching the medallion, use a level to check that the surface of the ceiling is even. This will help you position the medallion accurately and prevent any tilting or unevenness. An electronic level or a traditional bubble level can both be used for this purpose.
Clearing The Workspace And Protecting The Ceiling
Before you begin the installation process, it’s important to clear the workspace and take measures to protect the ceiling and surrounding areas. This will not only ensure a smooth installation but also prevent any damage to your furniture and floors.
Removing Light Fixtures or Ceiling Fans
Start by identifying if you have any light fixtures or ceiling fans that need to be removed before installing the ceiling medallion. These fixtures can obstruct the installation process and may need to be temporarily relocated. Follow these steps to safely remove them:
- Switch off the power to the fixtures or fans at the circuit breaker.
- Use a ladder or step stool to reach the fixtures.
- Remove any screws or fasteners holding the fixtures in place.
- Disconnect the electrical wiring, making sure to cap and tape the exposed ends to prevent accidents.
- Carefully lower the fixtures and set them aside in a safe location.
Remember to consult a professional if you’re unsure about the electrical connections or if the fixtures are heavy and require assistance.
Covering the Floor and Furniture with Drop Cloths
Once you have removed the light fixtures or ceiling fans, it’s time to protect your floor and furniture from any debris or accidental spills that may occur during the installation. Here’s how you can effectively cover them:
- Prepare the area by moving any furniture or valuable items away from the installation zone.
- Place drop cloths or plastic sheets on the floor, extending them to cover the surrounding area.
- Ensure the drop cloths are securely in place, using tape or weights if necessary.
- If there are any furniture pieces that cannot be moved, cover them with additional drop cloths or plastic sheets.
By taking these precautions, you can rest assured that your floor and furniture will be well-protected throughout the installation process.
Applying Adhesive To The Back Of The Medallion
When it comes to installing a ceiling medallion, one crucial step is applying adhesive to the back of the medallion. This step ensures that the medallion securely attaches to the ceiling, providing a beautiful and finished look to any room. In this article, we will guide you through the process of applying adhesive to the back of the medallion, covering important aspects such as applying an even layer of adhesive and avoiding excessive adhesive that could impact the installation. Read on to discover the key tips for a successful installation.
Applying an Even Layer of Adhesive
Before applying the adhesive, it is important to clean the back of the medallion and the ceiling surface to ensure proper adhesion. Use a clean cloth or sponge to remove any dust or debris. Once the surfaces are clean, it’s time to apply the adhesive.
Start by selecting a high-quality adhesive suitable for ceiling medallions. A strong adhesive, specifically designed for this purpose, will provide a reliable and long-lasting hold. Consult the manufacturer’s instructions to determine the recommended adhesive type and quantity for your specific medallion.
Next, carefully apply the adhesive to the back of the medallion. Using a putty knife or a caulking gun, apply the adhesive in a thin, even layer. Ensure that the adhesive covers the entire back surface of the medallion, paying extra attention to the edges. A consistent layer of adhesive will help distribute the weight of the medallion evenly and prevent any areas from standing out.
Avoiding Excessive Adhesive
While it is important to apply enough adhesive to ensure a secure bond, excessive adhesive can lead to messy installations and compromised aesthetics. Here are some tips to avoid using excessive adhesive:
- Follow the manufacturer’s recommendations regarding the amount of adhesive to use. Using more than the recommended quantity may not result in stronger adhesion and can create a mess.
- Spread the adhesive evenly over the back of the medallion. Applying it in thick blobs can lead to uneven weight distribution and potential slippage.
- If you find that you have applied too much adhesive, use the putty knife to carefully remove the excess before installing the medallion. A clean and tidy application will ensure a professional-looking finish.
By following these guidelines, you’ll be able to apply the adhesive to the back of the medallion with confidence, ensuring a secure and clean installation. Avoiding excessive adhesive will help you achieve a polished and professional look that enhances the overall aesthetic appeal of your room. Now that you’re equipped with the knowledge of how to apply adhesive to the back of a ceiling medallion, you’re ready to move on to the next step of the installation process.

Positioning And Securing The Medallion On The Ceiling
Once you have selected the perfect ceiling medallion to enhance your space, it’s time to install it. Proper positioning and securing of the medallion on your ceiling are crucial for a successful installation. In this section, we will guide you through the steps to ensure your medallion is aligned correctly and securely attached to the ceiling.
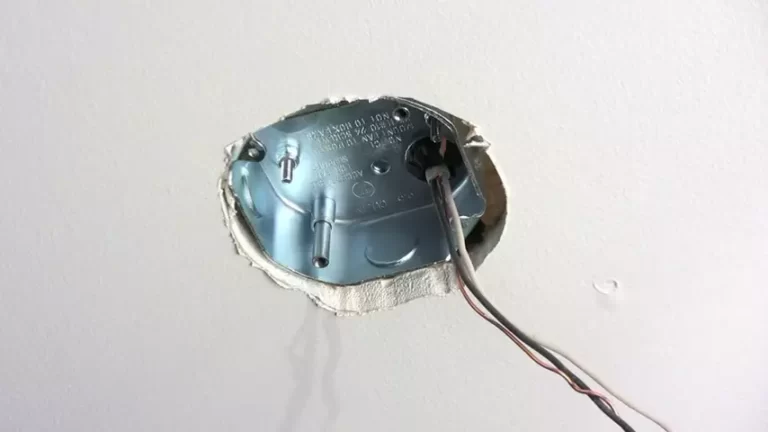
Aligning the Center Hole with the Electrical Box
The first step in positioning your ceiling medallion is to align the center hole of the medallion with the electrical box on your ceiling. This hole allows the medallion to fit snugly around the electrical wires and provide a seamless integration with your light fixture. To align the center hole, follow these steps:
- Turn off the power to the light fixture at the circuit breaker.
- Remove the light fixture cover and expose the electrical box.
- Hold the medallion against the ceiling, ensuring the center hole is aligned with the electrical box.
- Make any necessary adjustments to ensure a perfect alignment.
By aligning the center hole with the electrical box, you ensure that the medallion fits properly and provides a professional finish to your ceiling.
Holding the Medallion in Place for Adhesive to Set
With the medallion aligned correctly, the next step is to secure it to the ceiling using adhesive. The adhesive ensures that the medallion remains in place and does not shift or fall off over time. To hold the medallion in place for the adhesive to set, follow these steps:
- Apply a generous amount of adhesive to the back of the medallion, following the manufacturer’s instructions.
- Hold the medallion against the ceiling, aligning the center hole with the electrical box.
- Press firmly on the medallion to create a strong bond between the medallion and the ceiling.
- Use temporary supports, such as clamps or tape, to hold the medallion in place while the adhesive sets. Make sure the supports do not damage or leave marks on the medallion.
- Allow the adhesive to set according to the manufacturer’s instructions before removing the temporary supports.
By following these steps and holding the medallion in place for the adhesive to set, you ensure a secure installation that will withstand the test of time.
Making Adjustments And Leveling The Medallion
Installing a ceiling medallion can add an elegant and eye-catching touch to any room. However, to achieve a professional-looking result, it is essential to ensure that the medallion is straight and level. In this section, we will explore the steps to make adjustments and achieve a perfectly positioned ceiling medallion.
Ensuring the Medallion is Straight and Level
Once the medallion is positioned at the desired location on the ceiling, it’s important to check if it is straight and level. A crooked medallion can detract from the overall visual appeal of the room. Follow these steps to ensure everything is aligned correctly:
- Use a level: Place a level on top of the medallion to determine if it is perfectly straight or if adjustments are needed. The level should be positioned in different directions to ensure accuracy.
- Check for gaps: Inspect the perimeter of the medallion to see if there are any noticeable gaps between the medallion and the ceiling. If there are gaps, it indicates that the medallion is not level and may require adjustments.
Adjusting the Position if Necessary
If your ceiling medallion is not straight and level, fear not. Here are some steps to help you adjust its position:
- Remove the medallion: Carefully and gently remove the medallion from the ceiling. Be cautious not to damage the ceiling or the medallion during this process.
- Reposition the medallion: Identify the areas where the medallion requires adjustment. You may need a second person to hold the medallion in place while you make the necessary changes.
- Use adhesive or screws: Depending on the medallion material and your preference, you can use adhesive or screws to secure the medallion to the ceiling. Ensure that you follow the manufacturer’s instructions for the adhesive or screws you are using.
- Recheck the level: Once the medallion is back in place, use the level again to confirm that it is straight and level. Make any further adjustments if necessary.
Remember, taking your time during this process will result in a perfectly mounted ceiling medallion. Ensuring it is straight and level will provide an aesthetically pleasing focal point in your room.
Finishing Touches And Enhancements
After successfully installing the ceiling medallion, it’s time to focus on those crucial finishing touches and enhancements that will make your installation truly stand out. Paying attention to details such as removing excess adhesive and caulking, as well as painting the medallion to match the ceiling, will ensure a seamless integration that brings the whole room together.
Removing Excess Adhesive and Caulking
Before you can proceed to the next step, it’s important to remove any excess adhesive and caulking that may have oozed out during the installation process. This is not only necessary for aesthetic purposes but also to prevent any potential damage to the medallion or the ceiling.
Here’s a step-by-step guide to help you with the removal process:
- Carefully inspect the area around the medallion for any visible adhesive or caulking.
- Using a putty knife or a similar tool, gently scrape off the excess adhesive and caulking. Be cautious not to apply too much pressure to avoid scratching the surface.
- Once the majority of the excess material is removed, use a damp cloth or sponge to wipe away any remaining residue. You can also use a mild cleaning solution if necessary.
By following these simple steps, you can ensure a clean and polished look for your ceiling medallion installation.
Painting the Medallion to Match the Ceiling
To achieve a seamless integration, painting the medallion to match the color of the ceiling is essential. Here’s how you can do it:
- Before painting, ensure that the medallion is clean and free from any dust or debris. You can use a soft cloth or a brush to gently remove any particles that may have accumulated.
- Apply a primer specifically designed for the materials used in your medallion. This will help the paint adhere better and provide a more even finish.
- Once the primer has dried, you can proceed to paint the medallion using a paint color that matches the ceiling. Take your time and apply multiple thin coats to achieve a professional-looking result.
- Allow the paint to dry completely before handling the medallion or reinstalling it on the ceiling. This will prevent smudges or smears and ensure a flawless finish.
Remember, taking the time to meticulously remove excess adhesive and caulking, as well as carefully painting the medallion, will result in a finished product that seamlessly blends with your ceiling, enhancing the overall aesthetics of the room.

Reattaching The Light Fixture Or Ceiling Fan
Wiring and Installing the Fixture
Once you have successfully attached the ceiling medallion, it’s time to reattach the light fixture or ceiling fan. This step-by-step guide will help you with the wiring and installation process.
- Ensure the power is turned off: Before you begin working on the electrical connections, be sure to turn off the power to the light fixture or ceiling fan. This can be done by flipping the corresponding switch in your electrical panel.
- Remove the old fixture: Carefully remove the old fixture or fan from the ceiling, taking note of how it was originally wired. Remember to disconnect the wires from the electrical box.
- Prepare the new fixture: If you are installing a new fixture, follow the manufacturer’s instructions to prepare it for installation. This may include attaching mounting brackets or removing any packaging materials.
- Connect the wires: With the old fixture removed and the new one ready, connect the wires from the electrical box to the corresponding wires on the fixture. Use wire connectors to secure the connections and ensure they are tight.
- Mount the fixture: Once the wiring is complete, carefully mount the fixture to the electrical box using the included screws or mounting hardware. Ensure that the fixture is secured tightly and flush against the ceiling.
Confirming Proper Functionality
After reattaching the light fixture or ceiling fan, it’s important to confirm that everything is functioning properly before completing the installation. Here’s what you should do:
- Turn on the power: Go back to your electrical panel and turn the power back on for the light fixture or ceiling fan.
- Test the switch: Flip the switch connected to the fixture to see if it turns on and off properly. If it doesn’t, double-check the wiring connections to ensure they are secure.
- Check the fan (if applicable): If you have installed a ceiling fan, test its various speeds and functions to ensure they are working correctly.
- Inspect for any issues: Carefully inspect the fixture and its connections for any signs of loose or exposed wires. Additionally, make sure the fixture is securely mounted and there are no visible defects.
By following these steps and confirming proper functionality, you can ensure a successful installation of your light fixture or ceiling fan.
Medallion Not Staying In Place
If you’ve recently installed a beautiful ceiling medallion in your home, but noticed that it’s not staying in place as securely as you’d like, don’t worry. This is a common issue that can be easily fixed with a few simple steps. In this section, we’ll discuss how to check for insufficient adhesive and how to add additional support if needed.
Checking for Insufficient Adhesive
The first thing you’ll want to do is ensure that your medallion is properly adhered to the ceiling. Sometimes, the adhesive used during installation may not be sufficient to hold the medallion in place. Here are a few steps you can take to address this issue:
- Inspect the adhesive: Carefully examine the adhesive used to attach the medallion to the ceiling.
- If the adhesive appears to be dry or cracked, it may not be effective in securing the medallion. In this case, you’ll need to remove the medallion and reapply fresh adhesive.
- Ensure that the adhesive is evenly spread and covers the entire back surface of the medallion. Any gaps or uneven application can lead to instability.
- Reapplying adhesive: If you find issues with the adhesive, carefully remove the medallion from the ceiling using a putty knife or a similar tool. Clean any excess adhesive from both the medallion and the ceiling surface.
- Apply a new layer of adhesive: Using a strong construction adhesive suitable for ceiling installations, apply a fresh layer of adhesive to the back of the medallion, ensuring even coverage.
- Reinstall the medallion: Press the medallion firmly against the ceiling, making sure to align it properly with any existing light fixtures or structural elements. Hold it in place for a few minutes to allow the adhesive to bond.
Adding Additional Support if Needed
In some cases, additional support may be necessary to ensure that your medallion stays securely in place. Here are a few options you can consider:
- Installing screws or nails: If your medallion has pre-drilled holes or if you feel that additional support is needed, you can secure the medallion to the ceiling using screws or nails. Make sure to use hardware that is appropriate for your ceiling type and follow proper installation techniques.
- Using a ceiling fan brace: If your medallion is meant to be installed in conjunction with a ceiling fan, a ceiling fan brace can provide additional support. Follow the manufacturer’s instructions to install the brace before attaching the medallion.
- Consulting a professional: If you’re unsure about the structural integrity of your ceiling or if you’re experiencing persistent issues with the medallion staying in place, it may be best to consult a professional contractor or installer who can assess the situation and provide expert advice.
By following these steps and ensuring proper adhesive application and additional support if necessary, you can enjoy your beautifully installed ceiling medallion without worrying about it coming loose.

Uneven Or Crooked Medallion
Verifying the Levelness of the Ceiling
Before installing a ceiling medallion, it is crucial to ensure that the ceiling is level. An uneven or crooked medallion can be an eyesore and may even affect the overall aesthetic appeal of the room. To verify the levelness of the ceiling, you can follow these simple steps:
- Start by using a spirit level to determine if the ceiling is level. Place the level at multiple points along the perimeter of the ceiling to get an accurate reading.
- If you notice any inconsistencies, such as a sloping or uneven surface, it is important to address these issues before proceeding with the installation.
- One way to rectify an uneven ceiling is by using leveling compound. Apply the compound to the areas that require adjustment, following the manufacturer’s instructions. This will help create a level surface for the medallion.
- After applying the leveling compound, allow it to dry completely before proceeding with the medallion installation. This step will ensure that the medallion adheres properly to the ceiling and remains securely in place for years to come.
Redoing the Installation with Proper Alignment
If you find that your ceiling medallion is uneven or crooked after installation, don’t panic. It is possible to rectify the issue and achieve a perfect alignment. Follow these steps:
- Start by carefully removing the medallion from the ceiling. Use a putty knife or a similar tool to gently pry it away without causing damage.
- Inspect the area where the medallion was attached. Clean up any residual adhesive or debris to ensure a clean surface for the new installation.
- If the medallion was misaligned due to an installation error, take this opportunity to identify and correct the problem. Make sure the medallion is aligned with the light fixture or the center of the ceiling for a visually pleasing result.
- Apply a fresh layer of adhesive to the back of the medallion, spreading it evenly to ensure proper adhesion. Carefully press the medallion back into place, aligning it correctly this time.
- Hold the medallion firmly against the ceiling for a few moments to allow the adhesive to bond properly. You can use masking tape to secure the medallion temporarily if needed.
- Finally, leave the medallion undisturbed for the recommended amount of time for the adhesive to fully cure. This will ensure a secure and perfectly aligned installation.
Installing a ceiling medallion can instantly transform the look of a room and add a touch of elegance. By following these steps to verify the levelness of the ceiling and redo the installation with proper alignment, you can ensure a seamless and visually pleasing result. Don’t let an uneven or crooked medallion dampen your interior design dreams; take the necessary steps to achieve a flawless installation.
Damaging The Medallion Or Ceiling
As you embark on installing a beautiful ceiling medallion to add a touch of elegance to your space, it’s essential to be mindful of the potential of damaging the delicate medallion or the ceiling itself. In this section, we’ll explore two crucial aspects – being gentle and careful during installation and seeking professional assistance if any damage occurs.
Being Gentle and Careful during Installation
One of the primary factors to consider when installing a ceiling medallion is the need to be gentle and careful throughout the process. Whether you’re a seasoned DIY enthusiast or a novice, following these guidelines can ensure a successful installation without causing any harm:
- Secure the medallion properly: Before even starting the installation process, ensure you have the necessary tools and materials handy. It’s vital to secure the medallion with appropriate adhesives and follow the manufacturer’s instructions carefully.
- Handle with care: Medallions are often made of delicate materials like plaster or polyurethane, so it’s crucial to treat them gently. Avoid dropping or mishandling the medallion to prevent any cracks or chips.
- Protect the ceiling surface: To prevent any damage to the ceiling, make sure to clear the area and cover it with a drop cloth or plastic sheet. This simple step can safeguard the ceiling from accidental scratches or paint marks.
- Use the right tools: Ensure that you’re using the appropriate tools for the installation process. A steady ladder, measuring tape, adhesive, and screws may be required, depending on the type of medallion and the installation method.
Seeking Professional Assistance if Damage Occurs
Despite taking all the necessary precautions, accidents can happen, and damage to the medallion or ceiling may occur. In such cases, it’s crucial to consider seeking professional assistance to rectify the situation. Here are a few reasons why calling in the experts is a wise decision:
- Expert knowledge and experience: Professional installers have the expertise and experience to handle delicate materials, ensuring minimal damage during repair or replacement.
- Specialized tools and techniques: Professionals often possess specialized tools and techniques to repair or replace medallions and fix any ceiling damage caused during installation.
- Time and cost-efficiency: While it may be tempting to try and fix the damage yourself, hiring a professional can save both time and cost in the long run. They can quickly assess the situation and provide the most suitable solution without inconveniencing you further.
A ceiling medallion can transform the look of a room, but it’s essential to give due consideration to the installation process. By being gentle and careful during installation and seeking professional help if any damage occurs, you can safeguard both your medallion and ceiling, ensuring a flawless and visually appealing outcome.
Frequently Asked Questions For How To Install Ceiling Medallion
What Kind Of Adhesive For Ceiling Medallion?
The best adhesive for a ceiling medallion is a strong construction adhesive, such as a polyurethane adhesive or a heavy-duty adhesive caulk. These types of adhesives provide a secure and long-lasting bond on various surfaces, including plaster, drywall, and wood.
How Do You Install A Two Piece Ceiling Medallion?
To install a two-piece ceiling medallion, follow these steps:
1. Locate the center of the ceiling and mark it.
2. Apply adhesive to the back of the medallion and press it on the ceiling.
3. Secure it further with screws or nails if needed.
4. Attach the second half of the medallion by repeating the process.
5. Paint or finish the medallion as desired.
Should the Ceiling Medallion Be Wider Than the Light Fixture?
Yes, the ceiling medallion should be wider than the light fixture.
How Do You Cut A Hole In A Ceiling Medallion?
To cut a hole in a ceiling medallion, mark the desired location carefully. Then, using a sharp utility knife or a jigsaw, carefully cut along the marked outline. Make sure to take your time and apply gentle pressure to prevent any damage to the medallion.
Conclusion
Installing a ceiling medallion can add a touch of elegance to any room. By following the step-by-step instructions provided in this blog post, you can easily transform your ceiling into a stunning focal point. Remember to gather all the necessary tools and materials beforehand, measure accurately, and secure the medallion firmly in place.
With a little patience and effort, you’ll achieve a beautifully adorned ceiling that will leave your guests in awe. Let your creativity shine through as you take on this DIY project and enjoy the rewarding results.