How to Install Ceiling Hook?
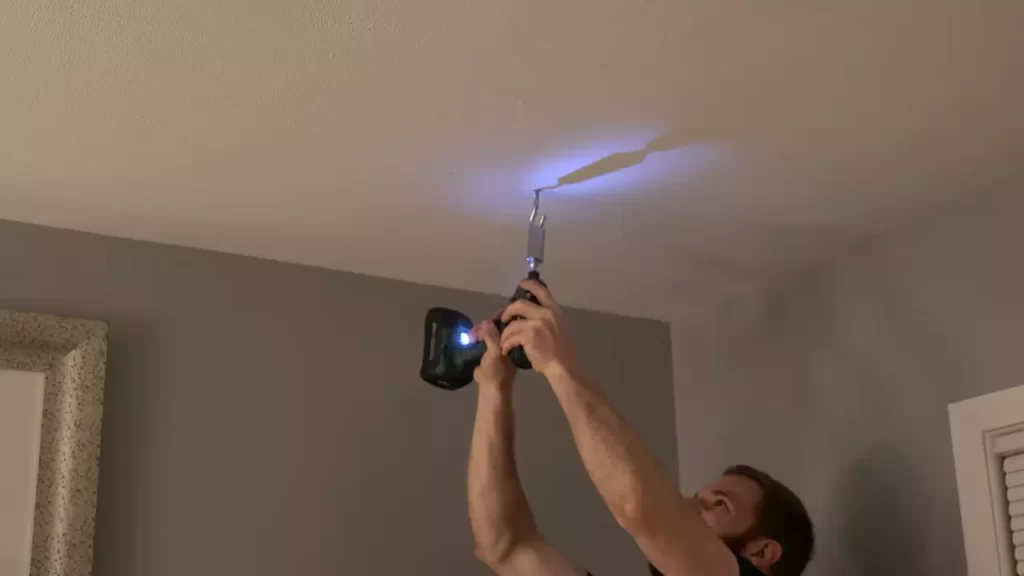
To install a ceiling hook, locate a suitable spot on the ceiling and mark it. Then, drill a hole using a power drill, screw the hook into the hole, and secure it tightly.
What Is A Ceiling Hook?
Definition and Purpose of Ceiling Hooks
A ceiling hook is a small device designed to be attached to the ceiling surface. It is typically made of durable materials such as metal or plastic. The purpose of a ceiling hook is to provide a secure and convenient way to hang items from the ceiling. These hooks come in various sizes, shapes, and weight capacities to meet different needs.
Different Types of Ceiling Hooks
There are several types of ceiling hooks available, each designed for specific applications. Here are some of the most common types:
| Type | Description |
|---|---|
| Traditional Ceiling Hooks | These hooks have a simple design and are suitable for hanging lightweight items such as plants, small decorations, or light fixtures. |
| Screw-In Ceiling Hooks | These hooks have a screw-like design that allows them to be easily twisted into the ceiling surface. They provide a more secure attachment for heavier items such as hanging chairs or storage racks. |
| Swivel Ceiling Hooks | These hooks have a rotating mechanism that allows the attached item to swivel in any direction. They are ideal for hanging items that require frequent rotation or adjustment, such as wind chimes or hanging plants. |

Common Uses of Ceiling Hooks
Ceiling hooks have a wide range of practical uses in both residential and commercial settings. Here are some common applications:
- Hanging plants or flower baskets to add a touch of greenery and beauty to a room.
- Installing light fixtures or pendant lamps to illuminate a specific area or create ambient lighting.
- Hanging curtains or drapes to add privacy or divide a room into separate sections.
- Creating storage solutions by hanging shelves, racks, or hooks to maximize vertical space and organize items.
- Displaying artwork, mirrors, or decorative items to enhance the aesthetic appeal of a space.
These are just a few examples of how ceiling hooks can be utilized in various ways to enhance the functionality and visual appeal of any space.
In conclusion, a ceiling hook is a versatile and practical accessory that can be used for hanging various items from the ceiling. With different types available, you can choose the right hook to suit your specific needs. Whether it’s adding greenery with hanging plants or creating additional storage space, ceiling hooks offer endless possibilities for enhancing your living or working environment.
Materials Needed For Installing A Ceiling Hook
Installing a ceiling hook is a straightforward task that can add functionality and aesthetic appeal to your living space. To get started, you will need a few essential materials and tools. This section will guide you through the necessary items and their purpose in the installation process.
List of Tools and Equipment
Before you begin the installation process, it is essential to have the right tools at your disposal. Here is a list of tools and equipment you will need:
- A stud finder: This tool helps you locate the ceiling joists and ensures a secure installation.
- A measuring tape: Accurate measurements are crucial for determining the ideal placement of the ceiling hook.
- A pencil or marker: Use a pencil or marker to mark the spot where the hook will be installed.
- A power drill: You will need a power drill to create the pilot hole for the anchor.
- A screwdriver: A screwdriver is necessary to secure the anchor and the hook in place.
- Ceiling anchor: Choosing the right type of ceiling anchor is vital for adequate weight support. Refer to the next section for more information.
- A ladder or step stool: Depending on the height of your ceiling, you may require a ladder or step stool to reach the installation area safely.
- Safety goggles: Protect your eyes from any debris or dust that may be generated during the installation process.
- A mask: Wearing a mask is recommended to prevent inhalation of any dust particles or insulation materials.
Types of Ceiling Anchors
Ceiling anchors are crucial components of a secure installation. There are several types of ceiling anchors available, each offering different levels of strength and weight support. Here are some commonly used types of ceiling anchors:
| Anchor Type | Features |
|---|---|
| Toggle bolt anchors | Can support heavy loads and ideal for mounting heavy objects on ceilings. |
| Plastic anchors | Simple and affordable, suitable for lightweight objects. |
| Metal anchors | Durable and strong, designed for heavy-duty applications. |
| Expansion anchors | Provide excellent support for ceilings with drywalls. |
Safety Precautions to Consider
While installing a ceiling hook, it is crucial to prioritize safety. Here are some safety precautions to observe during the installation process:
- Ensure that the ladder or step stool is stable and placed on a level surface before climbing up.
- Wear safety goggles to protect your eyes from any potential hazards.
- Use caution when operating power tools and always follow the manufacturer’s instructions.
- Keep the installation area clear of any obstacles or debris that may cause accidents.
- If you are unsure about any step of the installation process, seek advice from a professional.
By carefully considering these safety precautions, you can ensure a smooth and accident-free installation process.

Step-By-Step Guide To Installing A Ceiling Hook
Installing a ceiling hook is a simple yet effective way to add convenience and versatility to your space. Whether you want to hang plants, decorative items, or even a hammock, a ceiling hook provides the perfect solution. In this step-by-step guide, we will walk you through the process of installing a ceiling hook, from finding the ideal location to attaching the hook securely.
Finding the Ideal Location
The first step in installing a ceiling hook is to find the ideal location. Take a moment to envision where you want the hook to be and consider the weight of the item you will be hanging. You need to ensure that the ceiling has enough support to hold the hook and the item securely.
Start by using a stud finder to locate the ceiling joists. These are the horizontal wooden beams that provide the necessary support. Mark the position of the joists using a pencil or masking tape.
Measuring and Marking the Spot
Once you have identified the joists, measure and mark the spot where you want to install the ceiling hook. Use a measuring tape to ensure accuracy.
Next, decide on the height at which you want the hook to be installed. It is essential to choose a height that allows easy access to the item you will hang. Consider the dimensions of the item and any space limitations, such as furniture or doorways.
With a pencil, mark the spot on the ceiling where the center of the hook will be. Double-check your measurements to ensure accuracy.
Preparing the Ceiling
Before installing the ceiling hook, you need to prepare the ceiling to ensure a secure installation. Start by using a stepladder to reach the marked spot.
Using a drill and the appropriate drill bit, create a pilot hole at the marked spot. The size of the hole will depend on the type of ceiling anchor you will be using.
Once the pilot hole is created, clear away any excess debris, such as dust or wood chips, from the hole and the surrounding area.
Installing the Ceiling Anchor
Now it’s time to install the ceiling anchor. Insert the anchor into the pilot hole, ensuring that it is flush with the ceiling surface.
Depending on the type of anchor, you may need to use a screwdriver or a wrench to tighten it securely. Follow the manufacturer’s instructions for the specific anchor you are using.
Once the anchor is tightened, give it a gentle tug to ensure that it is securely in place and able to hold the weight of the item you will be hanging.
Attaching the Ceiling Hook
Finally, it’s time to attach the ceiling hook to the anchor. Insert the hook into the anchor and twist it clockwise until it is securely fastened.
Give the hook a gentle tug to ensure that it is firmly attached. If necessary, make any adjustments to ensure that the hook is level.
Now, you are ready to hang your desired item from the ceiling hook. Take caution to evenly distribute the weight and avoid exceeding the weight limit specified by the manufacturer.
Installing a ceiling hook provides endless possibilities for organizing and enhancing your space. By following this step-by-step guide, you can securely and confidently install a ceiling hook to meet your needs.
Tips And Tricks For Installing A Ceiling Hook
Introduction: Tips and Tricks for Installing a Ceiling Hook
Installing a ceiling hook can be a simple and effective way to hang various items in your home or office. However, proper installation is essential to ensure that the hook can support the weight of the object you intend to hang. In this section, we will explore some valuable tips and tricks for installing a ceiling hook with maximum safety and efficiency.
Ensuring Proper Weight Capacity
Before installing a ceiling hook, it is crucial to determine the weight capacity required for your intended use. Ceiling hooks come in different sizes and weight capacities, so choosing the right one is essential. To ensure proper weight capacity, follow these steps:
- Identify the weight of the object you wish to hang from the ceiling hook. You can usually find this information on the product packaging or by checking the object’s manual.
- Choose a ceiling hook that has a weight capacity well above the weight of the object. It is always better to err on the side of caution and choose a hook with a higher weight capacity than necessary.
- If you are unsure about the weight of the object or unable to find the information, consider using a ceiling hook with a high weight capacity, such as a heavy-duty hook, to ensure maximum safety.
Additional Reinforcement Techniques
While ceiling hooks are designed to support a certain weight capacity, you may want to incorporate additional reinforcement techniques for added security. Here are some options to consider:
- Install a ceiling anchor or stud finder to locate a ceiling joist for added stability. This will ensure that your ceiling hook is securely fastened in a structurally sound area.
- Use a toggle bolt or an anchor bolt for extra support. These types of fasteners distribute weight more evenly and provide stronger reinforcement.
- If you’re hanging particularly heavy items, consider using multiple ceiling hooks instead of relying on a single hook. This will help distribute the weight more evenly and reduce the strain on each individual hook.
Creative Uses for Ceiling Hooks
While ceiling hooks are commonly used for hanging plants, light fixtures, or artwork, there are several creative ways in which you can utilize them. Here are a few unique ideas:
- Create a hanging storage solution by using S-hooks to suspend baskets or containers, providing stylish and convenient organization options for your kitchen, bathroom, or other areas of the house.
- Hang a curtain or a room divider from the ceiling using ceiling hooks. This can be particularly useful in open-concept spaces or for creating temporary privacy in shared living areas.
- Transform your outdoor space by hanging string lights or lanterns from ceiling hooks, creating a cozy and inviting atmosphere for evening gatherings.
By following these tips and tricks, you can confidently install a ceiling hook that meets your needs and guarantees the safety of your hanging items. Remember to choose the right weight capacity, reinforce as necessary, and explore the various creative uses of ceiling hooks to optimize their functionality in your living or workspace.
Common Mistakes To Avoid When Installing A Ceiling Hook
When it comes to installing a ceiling hook, it’s important to do it correctly to ensure safety and stability. However, many people make common mistakes that can lead to problems down the line. In this section, we’ll explore the common mistakes to avoid when installing a ceiling hook, and how to prevent them.
Choosing the Wrong Ceiling Anchor
One of the most crucial steps in installing a ceiling hook is choosing the right anchor. Using the wrong anchor can lead to a weak connection that may not hold the weight. This can result in the hook loosening or even falling out of the ceiling.
When selecting a ceiling anchor, consider the weight capacity and the type of ceiling material. Different anchors work best for different ceiling types, such as drywall, concrete, or wood. It’s essential to choose an anchor that matches both the weight you plan to hang and the material of your ceiling.
One common mistake is using a light-duty anchor for a heavy-duty application. This can lead to the anchor pulling out of the ceiling, causing damage and potential harm. Always ensure you choose an anchor that can support the weight you intend to hang.
Incorrect Installation Techniques
Another common mistake is using incorrect installation techniques. Installing a ceiling hook requires following the proper procedure to ensure a secure attachment. Here are a few mistakes to avoid:
- Failure to pre-drill: Pre-drilling the hole before installing the anchor is essential as it helps prevent the ceiling from cracking or splitting. Without this step, the anchor may not secure properly.
- Incorrect anchor placement: Placing the anchor too close to the edge of the ceiling can weaken the structure and make it more prone to damage. Always follow the manufacturer’s instructions to ensure proper placement.
- Use of wrong tools: Using the wrong tools for installation can lead to improper attachment and a weak connection. Ensure you have the correct tools, such as a drill and the appropriate drill bit size, to ensure a secure installation.
Overloading the Ceiling Hook
One more mistake to avoid is overloading the ceiling hook. Each ceiling hook comes with a weight capacity recommendation, and exceeding this limit can lead to structural damage and potential accidents.
Before hanging anything from the ceiling hook, determine the weight of the object you plan to hang. Make sure it does not exceed the weight capacity of the hook. This includes everything attached to the hook, such as decorations, plants, or light fixtures.
Overloading the ceiling hook not only compromises its stability but also puts stress on the surrounding ceiling material, which can lead to cracks or even collapse.
By avoiding these common mistakes when installing a ceiling hook, you can ensure a safe and secure attachment. Remember to choose the right anchor for your ceiling, follow proper installation techniques, and never exceed the weight limits. This way, you can enjoy your ceiling hook without any worries.
Maintenance And Safety Considerations For Ceiling Hooks
When it comes to installing ceiling hooks, it’s crucial to prioritize maintenance and safety. By regularly inspecting and cleaning the hooks, following safety tips, and understanding weight limits and load capacity, you can ensure the longevity and durability of the hooks while keeping yourself and others safe. Let’s delve into the key considerations for maintaining and using ceiling hooks.
Regular Inspection and Cleaning
Regularly inspecting and cleaning your ceiling hooks is essential to ensure their proper functioning and prevent any potential issues. Here are a few steps to follow:
- Inspect the hooks for any signs of wear and tear, such as rust, corrosion, or loose parts. Replace any damaged hooks immediately to avoid accidents.
- Clean the hooks regularly using a mild cleaning solution and a soft cloth. Ensure that the hooks are completely dry before reattaching any hanging items.
- Inspect the surrounding area for any accumulated dust, dirt, or debris that may affect the hooks’ stability. Clean the area around the hooks as needed.
Safety Tips for Hanging Items
Properly hanging items from ceiling hooks not only requires careful consideration but also ensures the safety of everyone in the vicinity. Here are a few safety tips to keep in mind:
- When hanging heavy items, make sure to use sturdy hooks with appropriate weight capacity and always refer to the manufacturer’s recommendations.
- Ensure that the hanging items are securely fastened to the hooks, using reliable methods such as knots or clips.
- Keep a safe distance from electrical wires, ceiling fans, and other potential hazards when installing and hanging items from ceiling hooks.
- Avoid excessive swaying or swinging of hanging items, as it may strain the hooks and compromise their stability.
Understanding Weight Limits and Load Capacity
Understanding the weight limits and load capacity of your ceiling hooks is crucial for maintaining safety and preventing damage. Each ceiling hook comes with its own specified weight capacity, which should never be exceeded. Here are a few important points to consider:
| Weight Capacity | Guidelines |
|---|---|
| Maximum Weight Capacity | The maximum weight that a ceiling hook can safely bear without compromising its integrity. |
| Distribute Weight Evenly | When hanging multiple items, distribute the weight evenly among the hooks to prevent overloading a single hook. |
| Account for Dynamic Loads | Consider any potential dynamic loads caused by movement or swinging of the hanging items, which may exert additional strain on the hooks. |
By adhering to these maintenance and safety considerations, you can ensure the proper installation, usage, and longevity of your ceiling hooks while prioritizing the safety of yourself, your loved ones, and those around you.
Frequently Asked Questions Of How To Install Ceiling Hook
Can I Just Screw A Hook Into My Ceiling?
No, it’s not recommended to just screw a hook into your ceiling. It may damage the ceiling or not provide sufficient support. It’s advisable to use appropriate hardware like ceiling anchors or studs for secure installation.
How Do You Install Ceiling Swing Hooks?
To install ceiling swing hooks, follow these steps:
1. Locate a sturdy ceiling joist or beam for secure attachment.
2. Use a stud finder or tap on the ceiling to find the joist’s position.
3. Drill pilot holes into the joist for the hooks.
4. Insert the hooks into the holes and tighten them.
5. Test the hooks to ensure they’re secure before using them for a swing.
Do You Need An Anchor For Ceiling Hook?
Yes, you need an anchor for a ceiling hook to ensure it is securely mounted and can bear the weight without causing damage to the ceiling. The anchor provides stability and prevents the hook from falling or pulling out of the ceiling.
Can You Put A Hook In The Ceiling Without A Drill?
Yes, you can hang a hook in the ceiling without a drill. Use adhesive hooks specifically designed for ceilings to avoid drilling. They are easy to apply, strong, and can be removed without causing damage.
Conclusion
To sum up, installing a ceiling hook is a simple task that can greatly enhance your space’s functionality and aesthetics. With the step-by-step guide provided in this blog post, you can easily hang plants, lights, or other decorative items from the ceiling.
Remember to choose appropriate hooks, locate a suitable spot, and follow safety precautions to ensure a successful installation. So go ahead and add some style and functionality to your space with a ceiling hook today!