How to Install Ceiling Fan Mounting Bracket?
To install a ceiling fan mounting bracket, you need to follow a few simple steps. This includes identifying the proper location on the ceiling for the bracket, marking the spot accurately, securing the bracket onto the ceiling using screws, and ensuring it is level.
Once the bracket is securely attached, you can proceed with installing the ceiling fan. Installing a ceiling fan mounting bracket is a straightforward process that can be done with a few simple steps. Whether you’re replacing an old fixture or adding a new fan to your home, a mounting bracket is essential for securely attaching the fan to the ceiling.
In this guide, we will walk you through the process of installing a ceiling fan mounting bracket, providing you with the know-how to get the job done efficiently and safely. So let’s dive in and learn how to install a ceiling fan mounting bracket correctly.
Understanding The Importance Of A Ceiling Fan Mounting Bracket
When it comes to installing a ceiling fan, one vital component that often goes unnoticed is the ceiling fan mounting bracket. Despite its small size, this bracket plays a significant role in ensuring a secure and stable installation. Its main purpose is to provide a strong foundation for the fan, allowing it to function properly without any safety risks. In this section, we will delve into the reasons why a ceiling fan mounting bracket is essential for installation and explore the different types available in the market.

Why a Ceiling Fan Mounting Bracket is Essential for Installation
A ceiling fan relies on a solid and stable base to operate effectively. This is where a ceiling fan mounting bracket comes into play. Here are the key reasons why it is crucial for a successful installation:
- Security and Stability: A ceiling fan mounting bracket ensures that the fan is securely attached to the ceiling, minimizing the risk of it falling or becoming loose over time. With a reliable bracket, you can enjoy your ceiling fan without worrying about any potential accidents.
- Vibration Reduction: Ceiling fans generate vibrations as they rotate, and without a sturdy mounting bracket, these vibrations can become amplified and result in an unpleasant wobbling motion. A well-designed mounting bracket absorbs and reduces these vibrations, enabling the fan to operate smoothly and quietly.
- Weight Distribution: Ceiling fans can be quite heavy, especially with additional accessories such as lights or remote control systems. A mounting bracket helps distribute the weight of the fan evenly across the ceiling joists, preventing any strain or damage to the structure.
- Proper Electrical Connection: The mounting bracket provides a convenient location to connect the electrical wiring to the fan. It ensures that the wiring remains secure and organized, reducing the risk of electrical hazards.
Exploring Different Types of Ceiling Fan Mounting Brackets
Now that we understand the significance of a ceiling fan mounting bracket, let’s explore the various types available in the market. Manufacturers offer a range of mounting brackets to suit different ceiling types and fan models. Here are a few common options:
| Bracket Type | Description |
|---|---|
| Standard Mounting Bracket | This is the most common type of ceiling fan mounting bracket. It is designed to fit standard or flat ceilings with ample space for the electrical wiring and other hardware. |
| Sloped Ceiling Mounting Bracket | For homes with angled or sloped ceilings, a sloped ceiling mounting bracket is essential. It allows the fan to be installed securely on an inclined surface while maintaining stability. |
| Low-Profile Mounting Bracket | Also known as a flush mount bracket, this type is ideal for spaces with low ceilings. It enables the fan to be installed close to the ceiling surface, providing an aesthetically pleasing look and maximizing headroom. |
| Universal Mounting Bracket | A universal mounting bracket offers versatility and compatibility with various ceiling types. It can be adjusted to fit different angles, ensuring a secure installation in any space. |
Each type of ceiling fan mounting bracket serves a specific purpose and is designed to accommodate different installation requirements. Before purchasing a ceiling fan or mounting bracket, it is essential to consider the ceiling type and the fan model to ensure compatibility.
Tools And Materials Required For Installing A Ceiling Fan Mounting Bracket
Ensuring You Have the Right Tools
Before you begin installing a ceiling fan mounting bracket, it’s crucial to ensure you have all the necessary tools at your disposal. Having the right tools on hand not only makes the installation process smoother but also ensures your safety. Here are some essential tools you’ll need for the job:
- Step ladder or stepladder: A sturdy ladder that allows you to reach the ceiling safely.
- Tape measure: To accurately measure the distance between the ceiling joists and mark the exact position for the mounting bracket.
- Pencil: To mark the spot where the mounting bracket will be installed.
- Screwdriver: Depending on the type of screws used, you may need a Phillips or flathead screwdriver to secure the mounting bracket.
- Adjustable wrench: To tighten any screws or bolts that may be included with the mounting bracket.
- Wire strippers: If your ceiling fan requires electrical wiring, wire strippers will come in handy to remove the insulation from the wires.
- Electric drill: Necessary for drilling pilot holes into the ceiling joists before inserting the screws.

Gathering the Necessary Materials
In addition to the right tools, you’ll also need to gather the necessary materials for installing a ceiling fan mounting bracket. These materials ensure the stability and proper mounting of your ceiling fan. Here’s a list of materials you should have:
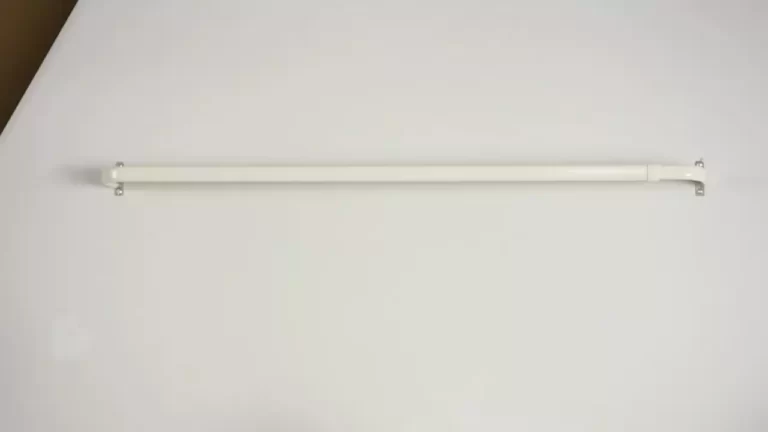
- Ceiling fan mounting bracket: This is the main component that attaches the ceiling fan to the ceiling.
- Screws and bolts: These are typically included with the mounting bracket, but you may need additional screws depending on the weight and size of your ceiling fan.
- Wire nuts: If you’re installing a ceiling fan with electrical wiring, wire nuts are used to securely connect the wires.
- Electrical tape: To insulate and protect the electrical connections.
- Ceiling fan canopy: The canopy covers the wiring and provides a finished look to your ceiling fan installation.
- Ceiling fan blades: The blades are usually sold separately from the fan motor and are available in various styles and finishes.
- Optional ceiling medallion: A decorative piece that can be installed between the ceiling and the ceiling fan.
Once you have gathered all the necessary tools and materials, you’ll be ready to embark on the installation process of your ceiling fan mounting bracket. With the right tools and materials at hand, you’ll be able to tackle this project with confidence and enjoy the comfort and functionality of your new ceiling fan.
Step 1: Preparing The Ceiling For Installation
Before you start installing your ceiling fan, it’s important to prepare the ceiling properly to ensure a secure and hassle-free installation process. This step involves assessing the ceiling structure and locating the ideal spot for mounting the ceiling fan. Let’s dive into the details of each subheading.
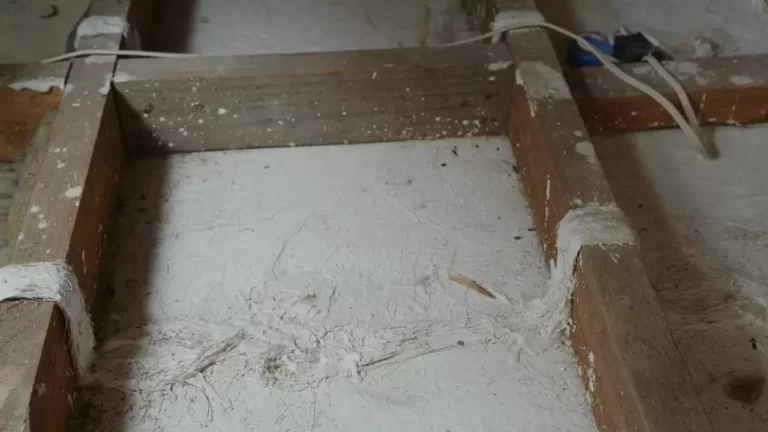
Assessing the Ceiling Structure
The first step in preparing the ceiling for the installation of a ceiling fan is to assess its structure. This is crucial to determine if the ceiling can support the weight and movement of the fan. A ceiling fan can be quite heavy, ranging from 15 to 50 pounds, depending on the model. Therefore, it’s essential to ensure that the ceiling structure is sturdy enough to handle the weight.
Here are a few things you can do to assess the ceiling structure:
- Look for any visible signs of damage or weakness in the ceiling, such as cracks, sagging, or water stains. These could indicate structural issues that need to be addressed before installing the ceiling fan.
- Check for any existing electrical boxes or wiring in the ceiling. Make sure they are securely attached and in good condition. If there are any concerns, it’s best to consult a professional electrician.
- If possible, access the attic or crawl space above the ceiling and examine the ceiling joists or support beams. Look for any signs of damage or inadequate support.
- If you’re unsure about the structural integrity of the ceiling, it’s recommended to seek professional assistance. A licensed contractor or structural engineer can assess the ceiling and provide guidance on any necessary repairs or reinforcements.
Locating the Ideal Spot for Mounting the Ceiling Fan
Once you’ve assessed the ceiling structure and ensured its stability, the next step is to locate the ideal spot for mounting the ceiling fan. This involves finding the best position that provides optimal airflow and aesthetic appeal.
Consider the following factors when choosing the ideal spot for your ceiling fan:
- Identify the center of the room: Measure the dimensions of the room and mark the center point. This will serve as your starting point for locating the ideal spot.
- Consider the clearance: Make sure there is enough clearance between the fan blades and any nearby objects such as walls, furniture, or lights to prevent any obstruction or accidents.
- Optimal height: Ideally, the fan blades should be at least 7 feet above the floor and 8 to 9 feet for optimal air circulation and safety.
- Balance the room: Take into account the layout and furniture placement in the room. The ceiling fan should be installed in a way that provides balanced airflow to all areas of the room.
Once you’ve determined the ideal spot, mark it using a pencil or tape measure for reference during the installation process.
By following these steps of assessing the ceiling structure and locating the ideal spot for mounting the ceiling fan, you’re now ready to proceed with the installation process. Stay tuned for the next steps in our installation guide!

Step 2: Removing The Existing Ceiling Fixture
Once you have prepared the area and gathered the necessary tools, it’s time to remove the old fixture and electrical box. This step is crucial before installing a new ceiling fan mounting bracket. In this section, we will go through the process of safely disconnecting power and removing the old fixture.
Safely Disconnecting Power
Your safety is of utmost importance, so before you start working on removing the existing ceiling fixture, it’s vital to ensure the power is switched off. Follow these steps to safely disconnect power:
- Locate the electrical panel in your home.
- Open the electrical panel door.
- Look for the circuit breaker that controls the power supply to the fixture you’re working on.
- Turn off the corresponding circuit breaker by flipping the switch to the “off” position.
- Double-check that the power is indeed off by testing the light switch or using a voltage tester. Safety should always come first.
By taking the necessary precautions to disconnect power, you can proceed with the removal process with peace of mind.
Removing the Old Fixture and Electrical Box
Once the power is safely turned off, you can begin removing the old fixture and electrical box. Follow these steps:
- Begin by inspecting the fixture for any visible screws or fasteners holding it in place.
- Using a screwdriver or appropriate tool, carefully remove the screws or fasteners securing the old fixture. Remember to keep track of them as you’ll need them later.
- Once the screws or fasteners are removed, gently lower the fixture from the ceiling and set it aside.
- Once the fixture is out of the way, inspect the electrical box it was attached to. Look for any screws or bolts securing it in place.
- Remove any screws or bolts found, taking caution not to damage or disconnect any wiring.
- If the electrical box is fastened to a ceiling joist, you may need to use a drill or appropriate tool to unscrew it or cut through any observed sealant.
- Once the old electrical box is detached, carefully remove it from the ceiling. Pay attention to any remaining wires and ensure they are not strained or damaged during the process.
With the old fixture and electrical box successfully removed, you’re one step closer to installing the new ceiling fan mounting bracket.
Step 3: Assembling The Ceiling Fan Mounting Bracket
Installing a ceiling fan mounting bracket may seem like a daunting task, but with the right instructions and a little bit of patience, you can have your ceiling fan up and running in no time. In this step, we will guide you through the process of assembling the ceiling fan mounting bracket. By following these clear instructions, you will be able to install the bracket in a hassle-free manner, ensuring a secure and sturdy base for your ceiling fan.
Familiarizing Yourself with the Parts
Before you begin the assembly process, it is essential to familiarize yourself with the various parts of the ceiling fan mounting bracket. This will help you understand how everything fits together and make the assembly process much smoother. The exact parts may vary depending on the specific model of your ceiling fan, but the common parts you can expect to find include:
- Mounting bracket
- Screws
- Nuts and washers
- Screwdriver or drill
Take a moment to thoroughly examine these parts and ensure you have everything you need for the assembly. This step will prevent any delays or confusion during the installation process. Once you are familiar with the parts, you are ready to move on to the next step.
Following the Manufacturer’s Instructions for Assembly
To ensure a proper and secure installation, it is crucial to follow the manufacturer’s instructions for assembling the ceiling fan mounting bracket. These instructions are specifically designed for your ceiling fan model, ensuring a seamless fit and operation.
Typically, the instructions will provide a step-by-step guide with visual diagrams for easy comprehension. Follow these instructions carefully, ensuring you pay attention to the correct placement of each part, the order of assembly, and the recommended fastening techniques.
It is essential to use the appropriate screws, nuts, and washers provided by the manufacturer. Using incorrect or incompatible hardware may compromise the stability of the bracket and the overall performance of the ceiling fan.
Troubleshooting and Tips
If you encounter any difficulties during the assembly process or have questions regarding the manufacturer’s instructions, do not hesitate to contact the customer support of the ceiling fan brand. Their knowledgeable representatives will be able to provide guidance and resolve any concerns you may have.
Remember to tighten all the screws securely to ensure the bracket is stable and capable of supporting the weight of the ceiling fan effectively. Using a screwdriver or drill with the correct size bit will make this process easier.
Lastly, double-check your work and ensure that all the parts are securely fastened before proceeding to the next step in installing your ceiling fan. Taking the time to assemble the ceiling fan mounting bracket correctly will contribute to the overall performance and longevity of your ceiling fan.

Step 4: Installing The Ceiling Fan Mounting Bracket
Securing the Mounting Bracket to the Ceiling
Now that you have prepared the ceiling for installing your ceiling fan, it’s time to securely attach the mounting bracket. The mounting bracket is an essential component that holds the fan in place, ensuring stability and safe operation. Here’s how you can secure the mounting bracket to the ceiling:
- Start by aligning the holes on the mounting bracket with the electrical box in the ceiling. Ensure that the bracket is centered and level. To achieve this, you can use a carpenter’s level and adjust the bracket as needed.
- Once the bracket is properly aligned, get the screws provided with your ceiling fan kit. These screws are specifically designed for attaching the mounting bracket to the electrical box.
- Insert the screws through the holes on the mounting bracket and into the holes on the electrical box. Use a screwdriver or a power drill to tighten the screws, but be careful not to over-tighten them as it can damage the bracket or the electrical box.
- Ensure that the bracket is securely fastened to the ceiling by giving it a gentle tug. It should not move or wobble. If the bracket feels loose, double-check the screws and tighten them further if necessary.
Securing the mounting bracket is a crucial step in the installation process as it forms the foundation for the entire ceiling fan. Taking the time to align it properly and ensuring a secure attachment will prevent any potential damage or accidents in the future.
Ensuring Proper Alignment and Leveling
Proper alignment and leveling of the ceiling fan mounting bracket are essential for the fan’s smooth operation and longevity. Follow these steps to ensure proper alignment:
- Use a carpenter’s level to check the alignment of the mounting bracket. Place the level across the top of the bracket and adjust it until it is perfectly level. This step is crucial as an incorrectly aligned bracket can lead to an imbalanced fan, causing noise and decreased performance.
- Once you have achieved a level alignment, check for any gaps between the bracket and the ceiling. There should be no visible gaps, as they can indicate an uneven installation. If you notice any gaps, adjust the bracket and screws accordingly until it sits flush against the ceiling.
- Lastly, double-check the alignment by standing back and visually inspecting the fan from multiple angles. The fan should appear straight and symmetrical in relation to the ceiling and the room. Adjust the bracket if necessary to achieve the desired alignment.
By taking the time to properly align and level the mounting bracket, you ensure that your ceiling fan operates efficiently, quietly, and without any issues. This seemingly small step can make a significant difference in the overall performance and aesthetics of your ceiling fan.
Remember, a secure and properly aligned mounting bracket is the foundation for your ceiling fan installation. It provides the stability and balance necessary for optimal operation. Take your time and pay attention to detail during this step to ensure a successful and hassle-free installation.
Step 5: Wiring The Ceiling Fan
Once you have successfully mounted the ceiling fan bracket, it’s time to wire the fan. Proper wiring is crucial for the safe and efficient operation of your ceiling fan. In this step, we will guide you through the process of identifying and connecting the wires, as well as using wire nuts and connectors for proper connections.
Identifying and Connecting the Wires
Before you start wiring, it’s important to identify the different wires coming out of the ceiling and the fan. Typically, there are three wires: black, white, and green or bare copper.
The black wire is the hot wire and should be connected to the black or blue wire from the fan. The white wire is the neutral wire and should be connected to the white wire from the fan. The green or bare copper wire is the ground wire and should be connected to the grounding wire from the fan.
Once you have identified the wires, strip about half an inch of insulation from the ends of each wire. Twist the exposed ends of the wires together, ensuring a secure connection. You can use wire nuts to cover the twisted ends and provide insulation.
Using Wire Nuts and Connectors for Proper Connections
Wire nuts are indispensable when it comes to making proper electrical connections. These small plastic caps provide a secure and insulated connection between wires. To use wire nuts, follow these simple steps:
- Gather the wires you want to connect.
- Twist the stripped ends of the wires together in a clockwise direction.
- Place the wire nut over the twisted ends of the wires.
- Hold the wire nut and twist it further clockwise until it is snug and secure.
- Give the wires a gentle tug to make sure they are tightly connected.
Once you have used wire nuts to connect the wires, it’s essential to cover them properly. You can use electrical tape to secure the wire nuts and provide an extra layer of insulation. Be sure to wrap the electrical tape tightly around the connection, covering the wire nuts completely.
Furthermore, you should also check for any exposed or loose wires before proceeding. If you notice any issues, make sure to fix them before moving on.
Now that you have successfully wired the ceiling fan, you can proceed to install the fan blades and other components as per the manufacturer’s instructions.
Remember, if you are unsure or uncomfortable working with electrical wiring, it’s always best to consult a professional electrician to ensure a safe and proper installation.

Step 6: Mounting The Ceiling Fan Onto The Bracket
Now that you have successfully installed the mounting bracket, it’s time to mount the ceiling fan onto it. This is a critical step in the installation process, as it ensures that your fan is secure and properly aligned. In this step, we will guide you through two important sub-steps: lifting and aligning the fan onto the mounting bracket and securing the fan to the bracket with screws.
Lifting and Aligning the Fan onto the Mounting Bracket
Before you begin, make sure you have someone to assist you with this step, as ceiling fans can be heavy and cumbersome to handle on your own. Here’s how you can lift and align the fan onto the mounting bracket:
- Carefully lift the ceiling fan and position it above the mounting bracket. Make sure to align the holes on the fan canopy with the holes on the mounting bracket.
- Slowly lower the fan onto the bracket, ensuring that the fan’s downrod or extension rod goes through the hole in the bracket.
- While holding the fan in place, rotate it slightly to ensure that it is properly aligned with the mounting bracket. Use a level to make any necessary adjustments and ensure that the fan is straight.
- Once the fan is aligned, continue to hold it in place while you secure it to the mounting bracket with screws.
Securing the Fan to the Bracket with Screws
Now that the fan is properly aligned with the mounting bracket, it’s time to secure it in place using screws. Follow these steps to ensure that your fan is securely fastened:
- Locate the screw holes on the fan canopy and the corresponding holes on the mounting bracket.
- Insert the screws provided with your ceiling fan into the holes on the canopy and tighten them using a screwdriver or a drill-driver. Be careful not to overtighten the screws, as this can damage the fan housing.
- Repeat this process for all the screw holes, ensuring that each screw is securely fastened.
- Once all the screws are tightened, give the fan a gentle shake to ensure that it is stable and securely mounted.
- If the fan wobbles or feels loose, double-check the alignment and tighten the screws as needed.
Congratulations! You have successfully mounted your ceiling fan onto the bracket. In the next step, we will guide you through the process of wiring your ceiling fan.
Step 7: Testing And Final Adjustments
Step 7: Testing and Final Adjustments
After successfully installing the ceiling fan mounting bracket, it is time to test the fan and make any necessary adjustments to ensure optimal performance. This step is crucial to ensure that the fan operates smoothly and safely. By following a few simple steps, you can ensure that your ceiling fan functions properly and provides an ideal cooling experience.
Switching on the Power to Test the Fan
Once you have installed the ceiling fan mounting bracket, it’s time to test the fan’s functionality. Before switching on the power, make sure to follow these steps:
- Double-check that all the electrical connections are securely tightened and properly connected. Safety should always be a priority.
- Turn on the circuit breaker or flip the switch to restore power to the fan. Be cautious during this step as electrical currents are involved.
- Use the fan’s control switch or remote control to turn it on. Observe if the fan is starting smoothly and there are no unusual sounds or vibrations.
- If everything appears to be working well, test the different fan speeds to ensure that they function correctly. The fan should run smoothly at each speed setting without any issues.
Testing the fan thoroughly reassures you that the installation has been done correctly and helps identify any potential problems that might need attention.
Making Any Necessary Adjustments for Optimal Performance
Once you have tested the fan and identified any issues during the operation, you may need to make some adjustments for optimal performance. Here are some areas to focus on:
- Balancing: If the fan is wobbly or off balance, you may need to balance it using a ceiling fan balancing kit. Follow the instructions provided with the kit to make the necessary adjustments and eliminate any unwanted vibrations.
- Blade angle: Check the blade angle to ensure that it is appropriate for your room. Adjusting the angle can optimize the airflow and improve the cooling effect. You can refer to the fan’s user manual for specific instructions on adjusting the blade angle.
- Light fixture alignment: If your ceiling fan comes with a built-in light fixture, ensure that it is properly aligned and positioned. Make any necessary adjustments to ensure the light shines where it is intended without any obstructions.
- Remote control setup: If your ceiling fan has a remote control, follow the instructions to set it up properly. Ensure that the remote control is synchronized with the fan and that all the functions work accordingly.
By addressing these adjustments, you can optimize the performance of your ceiling fan and enhance your overall comfort.
Frequently Asked Questions On How To Install Ceiling Fan Mounting Bracket
Do You Need A Mounting Bracket For Ceiling Fan?
Yes, a mounting bracket is necessary for installing a ceiling fan.
What Is The Ground Wire On A Ceiling Fan Mounting Bracket?
The ground wire on a ceiling fan mounting bracket ensures electrical safety by providing a path for stray electrical current to be safely directed into the ground. It helps protect against electrical shocks and potential damage to the fan or other electrical components.
How Do I Know If My Junction Box Will Hold A Ceiling Fan?
To determine if your junction box can support a ceiling fan, check for a fan-rated box capable of holding the weight and vibrations. Ensure the box is securely fastened to a ceiling joist or brace. Follow the manufacturer’s instructions and consult a professional if uncertain.
What Are The Different Mounting Types For Ceiling Fans?
Ceiling fans can be mounted in different ways. There are three types of mounting options: standard mount, flush mount, and angled mount. The standard mount is best for average ceiling heights. Flush mount fans are ideal for low ceilings. Angled mount fans are suitable for sloped or vaulted ceilings.
Conclusion
Installing a ceiling fan mounting bracket is a simple and practical way to enhance the comfort and appearance of your home. By following the step-by-step instructions provided in this blog post, you can easily complete the installation process. Remember to gather the necessary tools and materials, turn off the power, and maintain safety precautions throughout the installation.
With the correct bracket in place, your ceiling fan will be securely mounted, ensuring optimal performance and enjoyment for years to come. So, what are you waiting for? Get started on your ceiling fan installation project today!