How to Install Cedar Shake Siding Panels
To install cedar shake siding panels, start by preparing the surface and making sure it is clean and smooth. Then, fasten the panels to the wall using nails or screws, starting from the bottom and working your way up, leaving a small gap between each panel for expansion and contraction.
Preparing For Installation
Before you can start installing cedar shake siding panels, it is important to properly prepare for the process. This includes choosing the most suitable cedar shake siding panels, gathering all the necessary tools and materials, as well as accurately measuring and calculating the amount of cedar shake siding needed. By following these steps, you can ensure a successful and efficient installation of cedar shake siding that will enhance the aesthetic appeal and durability of your home.
Choosing the Right Cedar Shake Siding Panels
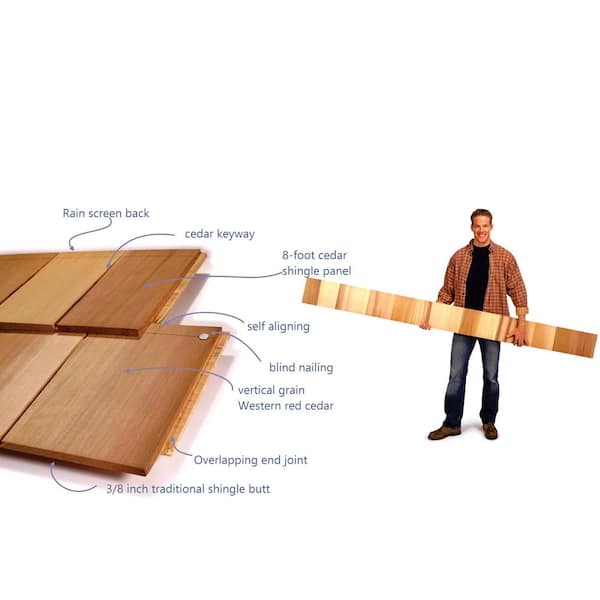
One of the crucial aspects of preparing for the installation of cedar shake siding panels is selecting the appropriate type of panels for your project. Cedar shake siding panels are available in various sizes and styles, so it is important to choose the one that suits your personal preferences and complements the architectural style of your home. Look for high-quality panels that are made from durable cedar wood, as this will ensure longevity and resistance to weather conditions.
Gathering the Necessary Tools and Materials
Before initiating the installation process, it is essential to gather all the tools and materials required. This will save you time and prevent any interruptions during the installation. Here is a list of the necessary tools and materials you will need:
| Tools | Materials |
|---|---|
|
|
Measuring and Calculating the Amount of Cedar Shake Siding Needed
Precise measurement and calculation of the required cedar shake siding is crucial to avoid any shortage or excess of materials. The following steps will guide you through this process:
- Start by measuring the height of each side of your house, excluding doors and windows. Measure from the bottom of the wall to just below the eaves or the bottom of the soffit.
- Measure the width of each wall, excluding the width of doors and windows. Add these measurements together to determine the total length of siding needed.
- Account for waste by multiplying the total length by 10% or more, depending on the complexity of your project.
- Divide the total length by the coverage width of the cedar shake siding panels you have chosen. This will give you the total number of panels required for your project.
By carefully following these steps and accurately measuring and calculating the required amount of cedar shake siding, you can minimize wastage while ensuring you have enough material to complete the installation process smoothly.
With the right panels, tools, and measurements in hand, you are now ready to commence the installation of cedar shake siding panels. In the next section, we will guide you through the step-by-step process of installing cedar shake siding panels, ensuring a professional and visually appealing outcome for your home.
Credit: www.homedepot.com
Preparing The Exterior Surface
Before installing cedar shake siding panels, it is crucial to properly prepare the exterior surface of your home. This step ensures that the siding will be able to adhere correctly and provide long-lasting protection. There are a few important tasks to complete during this preparation stage.
Inspecting and Repairing Any Damage
Start by thoroughly inspecting the current condition of your home’s exterior. Look for any signs of damage, such as rot, cracks, or loose boards. It is important to address these issues before installing the cedar shake siding panels.
Repair or replace any damaged areas to ensure a solid and stable base for your new siding. Pay particular attention to areas prone to moisture exposure, such as around windows, doors, and junctions between different building materials.
Cleaning and Removing Existing Siding (if applicable)
If your home already has siding, it will need to be removed before installing cedar shake panels. This step ensures a clean and smooth surface for the new siding.
Begin by cleaning the existing siding thoroughly. Remove any dirt, debris, or mold using a power washer or a mixture of mild soap and water. Ensure that the surface is completely dry before proceeding with the removal process. Cleanliness is vital for the proper adhesion of the new siding.
To remove the existing siding, use a pry bar or a siding removal tool. Carefully detach the panels, starting from the top down. Take care not to damage the underlying sheathing or insulation during this process.
Applying a Moisture Barrier to the Sheathing
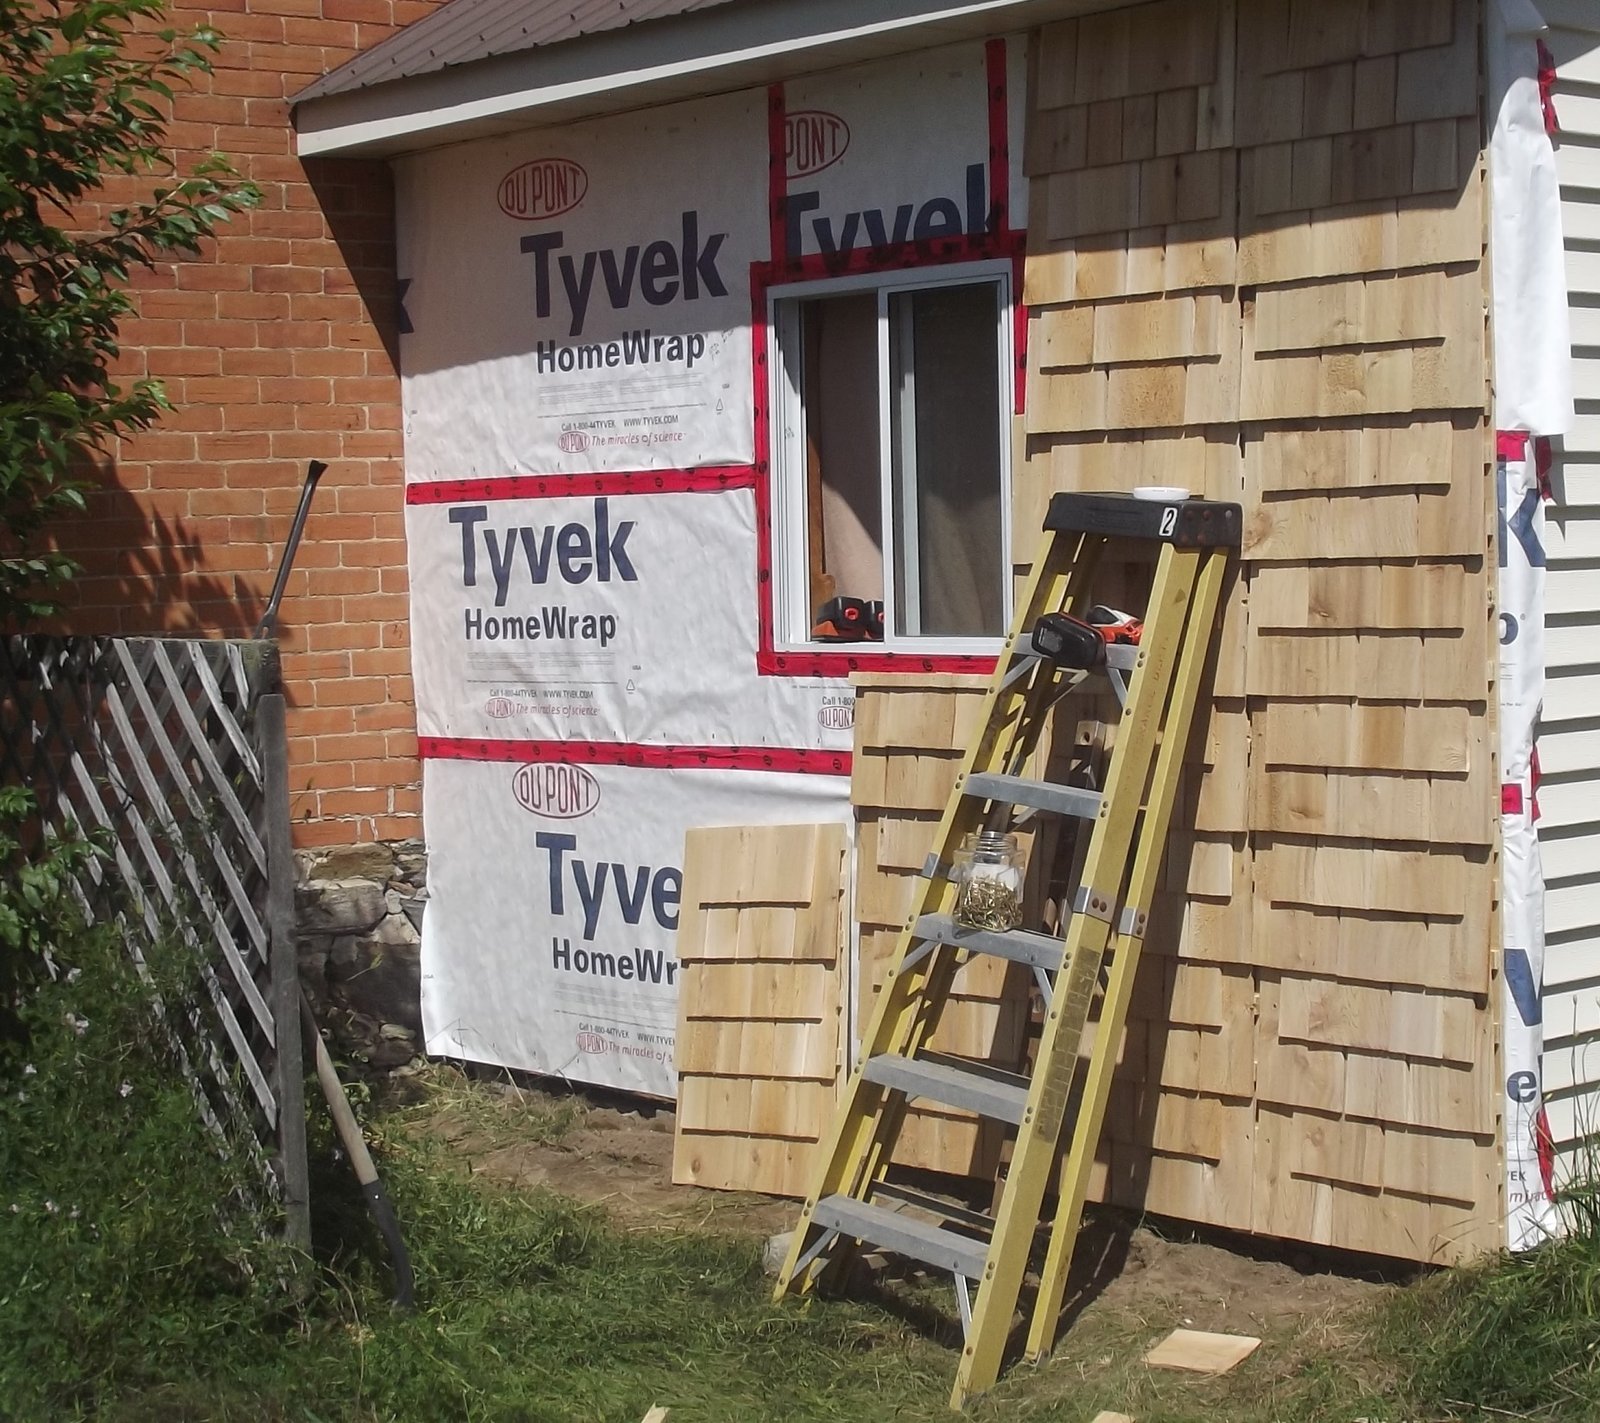
After inspecting, repairing, and cleaning the exterior surface, it is essential to apply a moisture barrier to the sheathing. This step helps prevent water infiltration and protects the integrity of the structure.
Choose a high-quality moisture barrier that is suitable for cedar shake siding installation. Roll out the barrier onto the prepared surface, ensuring it covers the entire area. Overlap the seams by at least six inches and secure them with an appropriate adhesive tape.
Be sure to follow the manufacturer’s instructions for proper installation of the moisture barrier. This step will help ensure the longevity of your cedar shake siding and improve energy efficiency.
Installing Cedar Shake Siding Panels
When it comes to enhancing the curb appeal of your home, few things can make a bigger impact than installing cedar shake siding panels. Not only do they provide a timeless, natural aesthetic, but they also offer durability and protection against the elements. If you’re considering installing cedar shake siding panels on your home, this guide will walk you through the process, step by step.
Starting at the Bottom: Installing the First Row
The first step in installing cedar shake siding panels is to start at the bottom and work your way up. To begin, you’ll want to create a level and sturdy foundation for the panels. This can be achieved by attaching a starter strip, which acts as a base for the first row of panels. The starter strip should be securely attached to the sheathing or furring strips of the wall.
Once the starter strip is in place, you can begin installing the first row of cedar shake siding panels. It’s important to ensure that each panel is securely fastened to the starter strip and to follow the manufacturer’s guidelines for nailing techniques and spacing. This will help ensure a secure attachment and prevent any potential issues down the line.
Nailing Techniques and Spacing for Secure Attachment
When it comes to nailing cedar shake siding panels, there are a few key techniques and considerations to keep in mind for a secure attachment. It’s recommended to use stainless steel or galvanized nails to prevent rusting and deterioration over time. Nails should be driven flush with the surface of the panel, ensuring a tight and secure fit.
Proper spacing between each nail is also important to prevent any potential splitting or warping of the panels. Generally, nails should be spaced according to the manufacturer’s guidelines, typically around 6 to 8 inches apart. This spacing ensures a secure attachment while allowing for natural expansion and contraction of the panels due to temperature and humidity changes.
Overlapping and Aligning Subsequent Rows
Once the first row of cedar shake siding panels is securely in place, you can begin overlapping and aligning subsequent rows. Overlapping ensures proper water drainage and prevents any potential moisture penetration. Each panel should overlap the one below it by the recommended amount, typically around 1.5 to 2 inches, depending on the manufacturer’s specifications.
Aligning the panels horizontally and vertically is also crucial for a professional and visually appealing installation. Make sure each panel is straight and level, using a level or straightedge as needed. This will help create a cohesive and uniform appearance for your cedar shake siding panels.
Trimming and Cutting Cedar Shake Panels for Corners and Edges
When installing cedar shake siding panels around corners and edges, special care and attention are required. It’s important to accurately measure and carefully cut the panels to ensure a precise fit. This can be done using a circular saw or a utility knife, depending on the thickness of the panels.
In addition to cutting, trimming the panels may be necessary to create a seamless finish. This can be achieved by using a chisel or a fine-toothed saw to carefully remove any excess material or create smooth edges. Taking your time during the trimming and cutting process will help ensure a professional and polished look for your cedar shake siding installation.
Adding Starter Strip and Furring Strips for Better Installation
To further enhance the installation of your cedar shake siding panels, it’s recommended to add a starter strip and furring strips. The starter strip, as mentioned earlier, provides a level and sturdy foundation for the first row of panels. Furring strips, on the other hand, create an additional air gap between the siding and the wall, promoting better ventilation and moisture management.
Both the starter strip and furring strips should be securely attached to the wall, following the manufacturer’s guidelines. The addition of these strips not only improves the overall installation process but also helps protect your home from potential moisture damage and increases the lifespan of your cedar shake siding.
Sealing And Protecting Cedar Shake Siding
Applying a Quality Finish to Enhance Durability
Applying a quality finish to your cedar shake siding is essential in enhancing its durability and maintaining its natural beauty over time. A high-quality finish not only protects the wood from moisture and UV damage but also helps to prevent rot and insect infestation. Before applying any finish, make sure to clean the siding thoroughly to remove dirt, debris, and any existing finish that may interfere with the new coating.
When choosing a finish, opt for one that specifically mentions its suitability for cedar shake siding. Look for products that offer weather resistance, UV protection, and easy application. A good finish will penetrate the wood, providing a protective barrier while allowing it to breathe.
Before starting the application process, carefully read and follow the manufacturer’s instructions. Apply the finish evenly using a brush or sprayer, making sure to reach all areas of the siding. Pay special attention to the end grains and butt joints, as these areas are more prone to moisture penetration. Allow the finish to dry before moving on to the next step.
Treating Cedar Shake Siding to Resist Rot and Insect Infestation
Proper treatment of cedar shake siding is crucial in preventing rot and insect infestation. Cedar naturally contains oils and extracts that make it resistant to decay, but over time, these properties can diminish, leaving the wood vulnerable. Treating your cedar shake siding with a wood preservative or a specialized rot-inhibiting product will help replenish these protective qualities and prolong the lifespan of your siding.
Prior to treatment, ensure that the siding is clean and free from any loose or damaged pieces. Start by applying a wood preservative to the entire surface, paying close attention to the end grains and butt joints. Allow the preservative to soak into the wood for the recommended time, typically a few hours.
Next, apply a specialized rot-inhibiting product as an additional layer of protection. These products typically contain fungicides and insecticides that deter wood-decaying organisms and pests. Again, make sure to follow the manufacturer’s instructions and cover all areas of the siding. Allow sufficient drying time before moving on to the final step.
Regular Maintenance and Cleaning Tips to Prolong Lifespan
To prolong the lifespan of your cedar shake siding, regular maintenance and cleaning are essential. Here are some tips to keep your siding looking its best:
- Inspect the siding annually for any signs of damage, loose pieces, or areas that need repair.
- Clean the siding at least once a year using a mixture of mild detergent and water. Scrub gently with a soft brush or sponge, and rinse thoroughly.
- Trim back any vegetation that may be touching or growing near the siding, as this can promote moisture retention and potential damage.
- Keep gutters and downspouts clear of debris to ensure proper drainage and prevent water from seeping onto the siding.
- Reapply a protective finish every few years or as recommended by the manufacturer. This will help maintain the wood’s durability and resistance to the elements.
By following these maintenance and cleaning tips, you can extend the lifespan of your cedar shake siding and enjoy its natural charm for years to come.
Troubleshooting Common Issues
Installing cedar shake siding panels can enhance the beauty and durability of your home. However, like any other home improvement project, you may encounter some common issues along the way. In this section, we will discuss how to address warping or cupping of cedar shake siding panels, deal with moisture problems and prevent water damage, as well as repair or replace damaged panels.
Addressing Warping or Cupping of Cedar Shake Siding Panels
Warping or cupping of cedar shake siding panels can occur due to moisture absorption or improper installation. To address this issue:
- Inspect the affected panels for any signs of damage or deterioration.
- If the panels are still in good condition, you can attempt to fix the issue by gently flattening them using a heat gun. Be careful not to overheat the panels, as this can cause further damage.
- If the warping or cupping is severe or the panels are damaged beyond repair, it’s best to replace them with new ones.
- Ensure that the replacement panels are properly installed and adequately protected against moisture to prevent future warping or cupping.
Dealing with Moisture Problems and Preventing Water Damage
Moisture problems and water damage can significantly affect the lifespan and appearance of cedar shake siding panels. Here’s how you can deal with these issues:
- Regularly inspect your siding for any signs of moisture buildup, such as discoloration, mold, or mildew.
- Identify and address the source of the moisture, such as leaks in the roof, faulty gutters, or inadequate ventilation.
- Improve ventilation and airflow around the siding by trimming nearby trees and shrubs and using soffit vents or fans whenever necessary.
- Apply a high-quality water repellent or sealant to the cedar shake siding panels to create a protective barrier against moisture.
Repairing or Replacing Damaged Cedar Shake Siding Panels
Over time, cedar shake siding panels can suffer from wear and tear, requiring repairs or replacements. Follow these steps to restore the beauty and functionality of your siding:
- Carefully remove the damaged panels using a pry bar and a hammer.
- Inspect the underlying structure for any signs of rot or damage. If necessary, repair or replace any compromised areas.
- Measure and cut the replacement panels to fit securely into place.
- Attach the new panels using stainless steel nails, ensuring they are properly aligned and tightly secured.
- Apply a matching stain or sealant to the repaired or replaced panels to maintain a consistent appearance.
By addressing these common issues and effectively troubleshooting problems that may arise with your cedar shake siding panels, you can ensure their longevity and maintain the overall integrity of your home’s exterior. Regular inspections and proper maintenance are key to preserving the beauty and functionality of your siding for years to come.
Frequently Asked Questions For How To Install Cedar Shake Siding Panels
What Do You Put Behind Cedar Shake Siding?
When installing cedar shake siding, you typically use a layer of house wrap or building paper as a moisture barrier. This helps to protect the wooden siding from moisture, prolonging its lifespan and preventing damage.
What Kind Of Nails Do You Use For Cedar Shakes?
For cedar shakes, use stainless steel or hot-dipped galvanized nails to prevent rusting. These nails should have ring or spiral shanks for better holding power. Avoid using ordinary nails that can corrode and damage the cedar shakes over time.
What Is The Correct Way To Nail On Cedar Siding?
To nail on cedar siding correctly, follow these guidelines: 1. Use stainless steel or galvanized nails for longevity. 2. Place nails near the top of each board, but not on the top edge. 3. Drive nails flush with the surface, without overtightening.
4. Leave a small gap between boards to allow for expansion. 5. Pre-drill nail holes near the end of each board to prevent splitting.
Where Do You Nail Cedar Shakes?
Nail cedar shakes on the roof.
Conclusion
Installing cedar shake siding panels can transform the appearance of your home, adding natural beauty and timeless charm. With the step-by-step process provided in this blog post, you can confidently take on the installation yourself, saving both time and money.
Remember to prepare the surface, measure accurately, and secure the panels tightly. By following these guidelines, you will have a stunning cedar shake siding that enhances the curb appeal of your home while protecting it for years to come.

