How to Install Carpet Tiles With Adhesive?
To install carpet tiles with adhesive, apply the adhesive to the floor and press the tiles firmly into place. Carpet tiles are a great alternative to traditional carpeting as they are easy to install, convenient to replace, and come in a variety of styles and colors.
Whether you are a DIY enthusiast or a professional, this guide will walk you through the simple steps of installing carpet tiles with adhesive. By following these instructions, you can achieve a professional-looking carpet installation that adds warmth and comfort to any space.
So, let’s get started!
Assessing The Subfloor
Before installing carpet tiles with adhesive, it is important to assess the subfloor to ensure a smooth and long-lasting installation. By checking for levelness and identifying any damage or imperfections, you can address these issues before laying the carpet tiles. In this section, we will explore the steps involved in assessing the subfloor for a successful carpet tile installation.
Checking for Levelness
One of the crucial aspects of preparing the subfloor is checking for levelness. An uneven subfloor can lead to unsightly gaps or bulges in the carpet tiles and affect the overall appearance of your flooring. To determine the levelness of your subfloor, follow these steps:
- Clear the subfloor from any debris or obstructions that may affect your assessment.
- Using a level, place it on various spots across the subfloor, including the edges and center.
- Observe the level for any significant gaps or differences.
- Make a note of any areas that require additional attention or leveling.
If you identify any uneven spots on the subfloor, you can address them before proceeding with the installation. Applying self-leveling compound or using plywood to create a level surface can help rectify any irregularities.
Identifying any Damage or Imperfections
Inspecting the subfloor for damage or imperfections is crucial to avoid future issues with the carpet tiles. Here’s how you can identify any problem areas:
- Look for signs of water damage, such as discoloration or soft spots, which can compromise the stability of the flooring.
- Check for cracks, chips, or holes in the subfloor, which may need to be repaired.
- Examine the subfloor for any protrusions or bumps that could hinder the installation.
By carefully identifying these issues, you can take the necessary steps to repair and prepare the subfloor for an optimal carpet tile installation.
Repairing Cracks and Uneven Areas
Repairing cracks, uneven areas, and imperfections in the subfloor is essential to ensure a smooth and durable carpet tile installation. Here are the steps to follow:
- Fill any cracks or holes in the subfloor using a suitable filler or compound.
- Smooth out uneven areas using a floor sander or sandpaper.
- Remove any protrusions or bumps that may disrupt the carpet tile installation.
By addressing these repairs, you can create a solid and stable surface for the adhesive to bond with, ensuring a seamless carpet tile installation.
Cleaning The Subfloor
Cleaning the subfloor is an essential step when installing carpet tiles with adhesive. Properly preparing the subfloor ensures a smooth and durable installation. This process involves removing any debris or dust, vacuuming the surface, and sweeping if necessary. By following these simple steps, you can create a clean and stable foundation for your carpet tiles.
Removing any debris or dust
Before you begin installing carpet tiles, it’s important to remove any debris or dust from the subfloor. This ensures that the adhesive can bond properly and prevents any bumps or unevenness under the tiles. Begin by visually inspecting the subfloor for any loose particles or dirt. Use a broom or dustpan to sweep away any larger debris. Consider wearing a dust mask to protect yourself from inhaling any dust particles.
Vacuuming the surface
Once you’ve removed the larger debris, it’s time to thoroughly vacuum the subfloor. This step is crucial for eliminating smaller dust particles that may not be visible to the naked eye. Use a high-powered vacuum cleaner with a brush attachment to effectively remove any dirt or dust from the surface. Be sure to vacuum the entire area, paying special attention to corners and edges. This will create a clean and smooth surface for the carpet tiles to adhere to.
Sweeping if necessary
In some cases, sweeping the subfloor may be necessary to remove stubborn dirt or debris that cannot be easily vacuumed. Sweeping can also help to eliminate any loose particles that may have been missed during the vacuuming process. Use a broom with stiff bristles to sweep the subfloor, working in a back-and-forth motion. Be thorough in your sweeping to ensure that the surface is free of any loose debris.
Choosing The Right Carpet Tiles And Adhesive
When it comes to installing carpet tiles with adhesive, choosing the right tiles and adhesive is essential for a successful and aesthetically pleasing outcome. This article will guide you through the factors to consider when selecting your carpet tiles and adhesive.
Considering the Desired Style and Color
The first step in choosing carpet tiles is to consider the desired style and color. Carpet tiles offer a wide range of choices, allowing you to create a custom look that matches your unique taste and complements your existing décor. Whether you prefer a bold, vibrant design or a more subdued and neutral color, there are carpet tiles available to suit every preference.
In addition to the color, think about the style of the carpet tiles. Are you looking for a sleek and modern design, or do you prefer a more traditional and timeless look? By considering these factors, you can narrow down your options and choose carpet tiles that align with your desired aesthetic.
Checking for Durability and Wear Resistance
Another important aspect to consider when selecting carpet tiles is the durability and wear resistance. Since carpet tiles are typically used in high-traffic areas, it is crucial to choose tiles that can withstand daily wear and tear.
Look for carpet tiles that are made from high-quality materials and have a high tuft density. These features contribute to the overall durability and longevity of the tiles. Additionally, consider the pile height and weight of the carpet tiles, as they can also indicate their ability to withstand heavy foot traffic without showing signs of wear.

Selecting the Appropriate Adhesive
Once you have chosen the carpet tiles that match your style and offer the desired durability, it is essential to select the appropriate adhesive for installation. Using the right adhesive will ensure that your carpet tiles stay firmly in place and maintain their appearance for an extended period.
There are different types of adhesives available, such as pressure-sensitive adhesives and permanent adhesives. Pressure-sensitive adhesives are easy to use and allow for repositioning of the tiles during installation, whereas permanent adhesives provide a stronger bond and are ideal for areas with heavy foot traffic.
When selecting the adhesive, consider the specific requirements of your carpet tiles and the installation area. Some carpet tiles require a specific type of adhesive for proper adhesion, so be sure to check the manufacturer’s guidelines. It is also important to follow the adhesive manufacturer’s instructions for application and drying time to ensure optimal results.
Acquiring The Necessary Tools
Before you begin the process of installing carpet tiles with adhesive, it is essential to have all the necessary tools at hand. Having the right tools will not only make the installation process easier but also ensure that the end result is professional and long-lasting. Here are some essential tools that you will need:
Measuring tape
A measuring tape is an indispensable tool when it comes to installing carpet tiles. It allows you to accurately measure the dimensions of the room and determine how many tiles you will need. When measuring, ensure that you take into account any corners, angles, or protrusions in the area.
Utility knife
A sharp utility knife is crucial for cutting the carpet tiles to fit the room. Make sure you have a good quality knife with replaceable blades to ensure clean and precise cuts. Remember to always work on a self-healing mat or a protected surface when cutting the carpet tiles.
Notched trowel
A notched trowel is used to spread the adhesive evenly on the subfloor, providing a secure bond for the carpet tiles. The size of the notches on the trowel will depend on the thickness of the tiles and the adhesive manufacturer’s recommendations. It’s important to choose a trowel with the correct size notches to ensure proper adhesive coverage.
Roller for adhesive application
A roller is an essential tool for applying pressure to the carpet tiles after installation. This ensures proper bonding between the tiles and the adhesive, reducing the risk of any tiles coming loose over time. You can either use a handheld roller or a larger one that you can attach to a handle for easier application.
Chalk line or straight edge
Using a chalk line or a straight edge is essential for maintaining straight lines during installation. You can use a chalk line to create reference lines on the subfloor, which will guide you in uniformly placing the tiles. Alternatively, a straight edge can also be used to ensure precise alignment of the tiles.
By acquiring these essential tools, you’ll be well-prepared to tackle the installation of carpet tiles with adhesive. The right tools, coupled with careful attention to detail, will help you achieve a professional-looking result that will enhance the aesthetics and comfort of your space.
Planning The Layout
When it comes to installing carpet tiles with adhesive, proper planning and layout are crucial for a successful installation. Planning the layout involves determining the starting point, ensuring proper alignment and symmetry, and marking guidelines with a chalk line or straight edge.
Determining the starting point
The first step in planning your carpet tile installation is to determine the starting point. This is the position from which you will begin laying the tiles. It’s important to choose a starting point that will result in a visually appealing layout. Consider the main focal point of the room, such as a fireplace or a large window, and start from there.
Once you have chosen the starting point, you need to decide the orientation of the tiles. You can lay them in a traditional square pattern, or get creative and try different patterns like herringbone or diagonal. Remember, the starting point and orientation will influence the entire layout, so make sure to take your time and decide wisely.
Ensuring proper alignment and symmetry
To achieve a professional-looking carpet tile installation, it’s important to ensure proper alignment and symmetry. This means that each tile should be positioned correctly in relation to the adjacent tiles.
One way to ensure alignment is by using a straight edge or a carpenter’s square. Place the straight edge against the edge of the starting tile and make sure it lines up perfectly with the adjacent wall or another reference point. This will serve as a guide for the rest of the installation, ensuring that each tile is aligned properly.
In addition to alignment, symmetry is also important for an aesthetically pleasing layout. Symmetry can be achieved by adjusting the starting point or by making small adjustments to the placement of the tiles. Take the time to step back and assess the overall layout as you go, making any necessary adjustments to maintain symmetry.
Marking guidelines with chalk line or straight edge
Once you have determined the starting point and ensured proper alignment and symmetry, it’s time to mark guidelines for the carpet tile installation. This step is important to ensure that the tiles are installed in straight lines.
A common method for marking guidelines is to use a chalk line. Simply stretch the chalk line across the room, making sure it aligns with the starting point. Snap the line against the floor to leave a straight guideline. Alternatively, you can use a straight edge and a pencil or marker to mark the guidelines.
By marking guidelines, you can easily follow the layout plan and avoid any mistakes or inconsistencies in the installation. It provides a precise reference for each row of tiles, allowing for a clean and professional-looking result.

Applying Adhesive
When it comes to installing carpet tiles, applying adhesive is a critical step in ensuring a secure and long-lasting installation. In this section, we will walk you through the process of applying adhesive to your carpet tiles. Follow these steps to achieve a professional and clean finish.
Mixing the adhesive according to manufacturer’s instructions
- Start by carefully reading the manufacturer’s instructions on the adhesive packaging. Different adhesives may have specific mixing ratios and instructions that need to be followed for optimal results.
- Gather all the necessary materials, including a clean bucket, measuring tools, and the adhesive itself.
- Pour the required amount of adhesive into the bucket, following the instructions provided. Measure the adhesive accurately to ensure consistency in the mixture.
- Using a mixing paddle or a drill with a mixing attachment, blend the adhesive thoroughly until you achieve a smooth and uniform consistency.
Spreading adhesive evenly using the notched trowel
- Once the adhesive is mixed, it’s time to start spreading it onto the floor. Begin by selecting a corner of the room as your starting point.
- Hold the notched trowel at an angle, of roughly 45 degrees, and spread a thin layer of adhesive onto the floor. Apply pressure to ensure that the adhesive makes good contact with the surface.
- Continue spreading the adhesive in small sections, working your way across the room. Use the notched edge of the trowel to create ridges in the adhesive. These ridges will help the carpet tiles adhere properly and prevent any air pockets from forming.
- Keep in mind that it’s crucial to spread the adhesive evenly to avoid any lumps or inconsistencies that may affect the final appearance of your carpet tiles. Take your time and make sure each section is covered adequately.
Waiting for the recommended tacky stage
- After applying the adhesive, it’s essential to wait for the recommended tacky stage before installing the carpet tiles. The tacky stage refers to the point where the adhesive has dried enough to form a tacky surface.
- Consult the manufacturer’s instructions to determine the required waiting time. This waiting period allows the adhesive to set properly and ensures a strong bond with the carpet tiles.
- During this waiting time, avoid stepping on the adhesive or placing any objects on the floor to prevent any disturbance.
By following these steps and adhering to the manufacturer’s instructions, you will be able to apply adhesive correctly when installing carpet tiles. Taking the time to mix the adhesive accurately, spread it evenly with a notched trowel, and wait for the recommended tacky stage will result in a successful and durable installation.
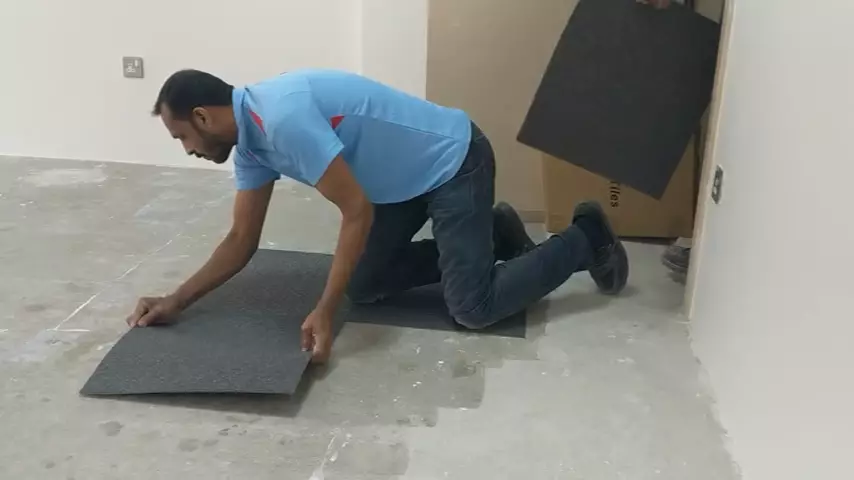
Placing The Carpet Tiles
Starting at the designated starting point
When it comes to installing carpet tiles with adhesive, it’s essential to start at the right point. Begin by identifying the designated starting point of your space. This is usually the corner farthest from the entrance or the center of the room. By starting at the right spot, you ensure a seamless and visually appealing installation.
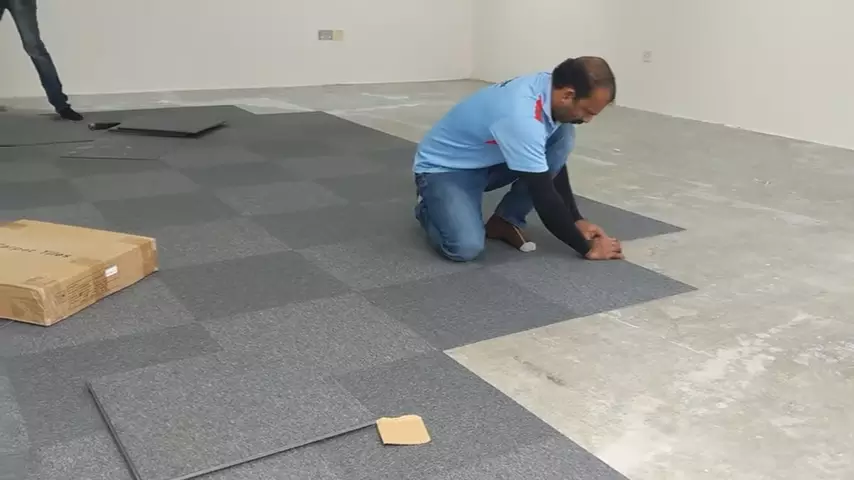
Aligning the edges of the tile with the guidelines
Once you’ve determined the starting point, it’s time to align the edges of the carpet tiles with the guidelines. Whether you’re working with adhesive-backed tiles or applying adhesive manually, aligning the edges correctly is crucial for a professional-looking finish. Make sure the edges are parallel to the walls and any existing patterns in the room. This will create a consistent and visually pleasing result.
Pressing down firmly to ensure adhesion
After aligning the edges, it’s time to press down firmly on the tiles to ensure proper adhesion. If you’re working with adhesive-backed tiles, this step is relatively straightforward. Simply apply pressure evenly across the entire surface of each tile. This helps to eliminate any air bubbles and ensures a strong bond between the tile and the floor. Using a roller or applying pressure with your hands can both be effective methods.
If you’re manually applying adhesive, make sure to follow the manufacturer’s instructions for the specific adhesive you’re using. Apply the adhesive smoothly and evenly, ensuring complete coverage beneath each tile. Once the adhesive is applied, press down firmly on each tile to promote adhesion. This step is essential for maximizing the durability and longevity of your carpet tile installation.
Trimming And Fitting
Once you have prepared the floor and applied the adhesive, it’s time to start trimming and fitting the carpet tiles. This step is crucial to achieve a professional-looking installation. Trimming tiles to fit around edges and obstacles, using a straight edge and utility knife for precision, and installing edge tiles or borders are the key factors to focus on in this stage.
Trimming tiles to fit around edges and obstacles
When installing carpet tiles, you are likely to come across edges and obstacles that require special attention. Whether it’s a wall, door frame, or other fixtures, trimming the tiles to fit neatly around them is essential for a seamless finish. Here’s how to do it:
- Place a carpet tile next to the edge or obstacle that needs trimming.
- Using a straight edge, align it with the straight edge of the tile.
- Mark the tile’s cutting line along the straight edge, ensuring it is the correct size and shape to fit around the edge or obstacle.
- Take a utility knife and carefully cut along the marked line, applying enough pressure to slice through the carpet backing but avoiding any damage to the subfloor.
- Once cut, place the trimmed tile back in position, ensuring it fits snugly against the edge or obstacle. Repeat this process for any additional tiles that need trimming.
Using a straight edge and utility knife for precision
To achieve clean and precise cuts when trimming carpet tiles, using a straight edge and utility knife is highly recommended. Here’s how to ensure precision:
- Place the straight edge along the cutting line you have marked or aligned with an edge or obstacle.
- Hold the straight edge firmly in place to maintain a straight cutting path.
- With a sharp utility knife, carefully score the surface of the carpet tile along the straight edge, applying steady pressure.
- Repeat the scoring motion several times until the cut is deep enough.
- Once you have scored the tile, gently bend it at the score line to break it along the cut.
- Ensure the cut is clean and smooth before placing the tile back in position.
Installing edge tiles or borders
Adding edge tiles or borders to your carpet tile installation not only enhances the aesthetics but also provides durability and acts as a finishing touch. Follow these steps to install them:
- Measure the length and width of the area where you intend to install the edge tiles or borders.
- Cut the edge tiles or borders to the desired size, ensuring they fit perfectly along the edges or borders of the carpet tile installation.
- Apply adhesive to the back of the edge tiles or borders and press them firmly onto the carpet tiles, ensuring they align precisely with the edges.
- Secure the tiles or borders in place by using a weighted object or applying gentle pressure until the adhesive has set.
- Allow sufficient time for the adhesive to dry completely before walking on or using the carpet tile installation.
By following these steps, you can easily trim and fit carpet tiles with adhesive, achieving a professional and visually appealing result. Remember to prioritize precision and take your time to ensure each tile fits perfectly around edges and obstacles.
Completing The Installation
Now that you have successfully prepared the subfloor, laid out the adhesive, and installed the carpet tiles, it’s time to complete the installation process. This final step ensures that your carpet tiles adhere securely to the subfloor and provides a finished look to your flooring. In this section, we will discuss rolling the tiles with a roller to enhance adhesion, checking for any gaps or loose tiles, and allowing the adhesive to cure completely.
Rolling the tiles with a roller to enhance adhesion
Once you have installed all the carpet tiles, it is essential to use a roller to enhance the adhesion between the tiles and the subfloor. This step helps to smooth out any air bubbles and ensures that the tiles are firmly attached. To roll the tiles, follow these steps:
- Step 1: Start at one end of the room and slowly roll the roller over the surface of each tile.
- Step 2: Apply even pressure as you roll, making sure to cover every part of the tile.
- Step 3: Repeat this process for all the tiles, ensuring that you have rolled over each tile at least once.
By rolling the tiles, you create better contact between the adhesive and the tiles, minimizing the chances of them coming loose over time.
Checking for any gaps or loose tiles
After rolling the tiles, it is essential to check for any gaps or loose tiles. This step ensures that the installation is neat and complete. To check for gaps or loose tiles, follow these steps:
- Step 1: Carefully examine the entire floor for any visible gaps between the tiles.
- Step 2: Gently press each tile with your hands to ensure that they are securely attached to the floor.
- Step 3: If you find any loose tiles or gaps, gently lift the affected tile and apply additional adhesive.
By checking for gaps or loose tiles, you can address any issues before they become a bigger problem and maintain the overall quality of your carpet tile installation.
Allowing adhesive to cure completely
Once you have checked for gaps or loose tiles, it is crucial to allow the adhesive to cure completely. This step ensures a strong bond between the tiles and the subfloor, providing long-lasting durability. To allow the adhesive to cure properly, follow these guidelines:
- Step 1: Read the adhesive manufacturer’s instructions to determine the curing time required.
- Step 2: Avoid walking on the newly installed carpet tiles for the recommended curing period.
- Step 3: Maintain a suitable temperature and humidity level in the room during the curing process.
- Step 4: Avoid moving heavy furniture or applying excessive pressure on the carpet tiles until the adhesive is fully cured.
By allowing the adhesive to cure completely, you ensure that the carpet tiles are securely bonded to the subfloor and avoid any potential damage to the installation.
Regular Maintenance
Regular maintenance is essential to keep your carpet tiles looking beautiful and ensuring their longevity. By following a few simple tips, you can easily maintain the cleanliness and appearance of your carpet tiles. Vacuuming regularly, spot cleaning spills and stains immediately, and using carpet tile specific cleaning products will help to keep your carpet tiles in top condition for years to come.
Vacuuming regularly to remove dirt and debris
Vacuuming your carpet tiles on a regular basis is the most effective way to remove dirt, dust, and debris. This helps to prevent the accumulation of particles that can make your carpet tiles look dull and worn out. Set aside some time each week to vacuum your carpet tiles thoroughly, paying extra attention to high-traffic areas.
Make sure to use a vacuum cleaner with adjustable height settings to ensure it is at the right level for your carpet tiles. Use slow, overlapping strokes to thoroughly clean the entire surface, and don’t forget to vacuum under furniture and along baseboards.
Spot-cleaning spills and stains immediately
Accidents happen, and when they do, it’s important to act fast to prevent spills and stains from setting into your carpet tiles. Whether it’s a glass of red wine or a muddy footprint, the key is to respond quickly. Start by blotting up as much of the spill or stain as possible with a clean white cloth or paper towel. Avoid scrubbing, as this can spread the stain and damage the carpet fibers.
Once you’ve absorbed as much liquid as possible, apply a small amount of carpet tile stain remover, following the manufacturer’s instructions. Blot the area again until the stain is removed, and then rinse with clean water. Finally, blot the area dry to prevent any remaining moisture from attracting dirt.
Using carpet tile specific cleaning products
When it comes to cleaning your carpet tiles, it’s important to use products specifically designed for this purpose. Regular household cleaners may contain harsh chemicals that can damage or discolor your carpet tiles. Look for carpet tile specific cleaning products that are safe to use and gentle on the fibers. These products are formulated to remove stains and restore the appearance of your carpet tiles without causing any harm. Follow the instructions on the packaging and test the product in an inconspicuous area before applying it to the entire carpet tile.
Deep Cleaning
Hiring Professional Carpet Cleaners Periodically
To keep your carpet tiles looking fresh and vibrant for years to come, it is recommended to hire professional carpet cleaners periodically. Professionals have the necessary expertise and equipment to deep clean your carpet tiles, removing stubborn stains and deeply embedded dirt. They use high-quality cleaning products and methods that are safe and effective, ensuring a thorough and efficient cleaning process.
Using Steam or Dry Extraction Methods
When it comes to deep cleaning your carpet tiles, two popular methods are steam cleaning and dry extraction. Steam cleaning involves using hot water and a cleaning solution to extract dirt and stains from the carpet fibers. It penetrates deep into the pile, eliminating bacteria and allergens, and leaving your carpet tiles refreshed and sanitized.
Dry extraction, on the other hand, uses a dry cleaning compound that is spread onto the carpet and then agitated to loosen dirt and stains. The compound is then vacuumed up, taking the dirt and stains with it. This method is ideal for sensitive carpet tiles or areas that require minimal drying time.
Following Manufacturer Guidelines for Cleaning Frequency
Each carpet tile manufacturer provides guidelines on how often you should deep clean your carpets to maintain their quality and longevity. It is crucial to follow these guidelines to ensure that the cleaning process does not damage the carpet fibers or adhesive.
Manufacturer guidelines may vary depending on factors such as carpet material, traffic levels, and specific cleaning products to be used. By adhering to these recommendations, you can prevent premature wear and tear, extend the lifespan of your carpet tiles, and maintain a clean and healthy indoor environment.
Hiring professional carpet cleaners periodically, using steam or dry extraction methods, and following manufacturer guidelines for cleaning frequency are essential steps to deep clean your carpet tiles. These actions will not only revitalize the appearance of your carpet but also improve its durability and maintain a hygienic living or working space. By investing in regular deep cleaning, you can enjoy the comfort and beauty of your carpet tiles for years to come.
Frequently Asked Questions For How To Install Carpet Tiles With Adhesive
How Do I Prepare The Floor Before Installing Carpet Tiles?
Before installing carpet tiles with adhesive, make sure the floor surface is clean, dry, and free of any debris. Remove any old adhesive or carpet padding and repair any cracks or uneven areas. It’s important to have a smooth and level surface for proper installation.
Can I Install Carpet Tiles Over Existing Carpet?
It is not recommended to install carpet tiles over existing carpet. The adhesive needs to bond directly with the floor surface for proper installation. Installing carpet tiles over existing carpet can result in an unstable and uneven surface, leading to poor performance and durability of the carpet tiles.
How Long Does It Take For The Adhesive To Dry?
The drying time for the adhesive used to install carpet tiles can vary depending on factors such as humidity, temperature, and the specific adhesive being used. It is generally recommended to allow 24 to 48 hours for the adhesive to fully dry before placing heavy furniture or traffic on the carpet tiles.
Do I Need To Use Adhesive On All Four Sides Of Each Carpet Tile?
Using adhesive on all four sides of each carpet tile is not necessary. Generally, applying adhesive on the corner and center of each tile is sufficient for proper adhesion. However, it’s important to follow the manufacturer’s instructions for the specific adhesive being used to ensure proper installation and longevity of the carpet tiles.
Conclusion
Installing carpet tiles with adhesive is a simple and cost-effective way to add warmth and comfort to any space. By following the step-by-step process outlined in this post, you can ensure a successful installation. Remember to properly prepare the floor, measure and cut the tiles accurately, apply the adhesive evenly, and secure the tiles firmly in place.
With a little patience and attention to detail, you’ll have a beautiful carpeted floor in no time. So, take the plunge and enjoy the benefits of carpet tiles in your home or office today!