How to Install a Roof Boot?
To install a roof boot, first, remove the shingles around the affected area. Then, slide the boot over the pipe and secure it using roofing nails or screws.
Make sure to seal any gaps with roofing cement for waterproofing. Roof boots are essential components in preventing leaks around pipes and vents on the roof. As time passes, these boots can become worn out or damaged, necessitating replacement. Installing a new roof boot may seem like a daunting task, but with the right guidance, you can easily complete the process without professional assistance.
This article will provide you with a step-by-step guide to installing a roof boot, ensuring proper functioning, and preventing potential water damage. By following these instructions, you can restore the integrity of your roof and maintain a dry and insulated home. So, let’s dive into the installation process and get started on improving the durability of your roof.

Understanding The Importance Of A Roof Boot
A roof boot is an essential component of a roofing system that plays a crucial role in protecting your home from the elements. It is a type of flashing designed to seal the junction where the roof meets the vent pipe, chimney, or other protrusions. Although the roof boot may seem like a small and insignificant part, it serves as a line of defense against water leaks and ensures the integrity of your roof.
What is a Roof Boot and Why is it Important?
A roof boot, also known as a pipe boot or pipe flashing, is a waterproof covering that fits around the vent pipe on your roof. Its primary function is to create a watertight seal between the pipe and the roof, preventing water from entering your home. Without a properly installed roof boot, water can seep into the roof underlayment, leading to structural damage, mold growth, and costly repairs.
Roof boots are typically made of durable materials such as rubber or thermoplastic and are designed to withstand weathering, UV exposure, and temperature fluctuations. Their flexible nature allows them to accommodate the movement of the vent pipe due to temperature changes or settling of the roof. A well-maintained and properly installed roof boot can last for many years, providing reliable protection for your roof.
Signs that Your Roof Boot Needs to be Replaced
Over time, roof boots can deteriorate due to exposure to sunlight, harsh weather conditions, and general wear and tear. It is essential to monitor the condition of your roof boot regularly and look out for any signs of damage or deterioration. Here are some signs that indicate your roof boot needs to be replaced:
- Cracks or splits: Inspect the roof boot for any visible cracks or splits. These can allow water to infiltrate and compromise the integrity of your roof.
- Missing or damaged parts: Check if there are any missing or damaged parts, such as sections of the roof boot or the rubber collar. These defects can lead to water leaks.
- Loose or lifted edges: Pay attention to any loose or lifted edges of the roof boot. This can create gaps where water can enter.
- Rust or corrosion: If you have a metal roof boot, inspect for any signs of rust or corrosion. These can weaken the roof boot and reduce its effectiveness.
- Water stains or leaks: Inside your home, look for any water stains or evidence of leaks near the vent pipe. These can indicate a faulty roof boot that needs to be replaced.
Regularly inspecting your roof boot and addressing any signs of damage promptly can help prevent water infiltration and extend the lifespan of your roof. If you notice any of the aforementioned signs, it is advisable to consult a professional roofer to assess the situation and determine if a roof boot replacement is necessary.
Preparing For Installation
Before you begin installing a roof boot, it is essential to make the necessary preparations. This will ensure that the installation process goes smoothly and that your roof boot is properly secured. In this section, we will discuss two important aspects of preparation: gathering the necessary tools and materials, and ensuring proper safety measures.

Gathering the necessary tools and materials
Before you start the installation process, it’s crucial to gather all the tools and materials you will need. This will save you time and frustration during the installation process, allowing you to complete the job efficiently. Here are the essential tools and materials you should have on hand:
| Tools | Materials |
|---|---|
|
|
Ensuring proper safety measures
Your safety should always be your top priority when working on your roof. Before you begin the installation process, take the necessary precautions to ensure your safety. Here are some important safety measures to keep in mind:
- Wear appropriate safety gear, including a hard hat, safety goggles, and non-slip boots.
- Disconnect any power lines or electrical connections near the installation area.
- Use a sturdy ladder and make sure it is positioned correctly and securely.
- Work in pairs if possible, with one person holding the ladder while the other person performs the installation.
- Avoid working on the roof during extreme weather conditions, such as strong winds or heavy rain.
- Be cautious of any potential hazards on the roof, such as loose shingles.
- If you are unsure about any aspect of the installation process, it is recommended to seek professional assistance.
By following these safety measures, you can minimize the risk of accidents and ensure a safe installation process.
Installing A Roof Boot
A roof boot is an essential component of your roofing system, designed to provide a watertight seal around pipes and vents that pass through the roof. Installing a roof boot correctly is crucial in preventing water leaks and ensuring the long-term durability of your roof. In this guide, we will walk you through the step-by-step process of installing a roof boot.
Step 1: Removing the old roof boot
Begin by removing the old roof boot. Use a utility knife to carefully cut away any shingles or roofing materials that are covering the boot. Once you have exposed the old boot, remove any nails or screws that are securing it to the roof. Take caution not to damage the surrounding roofing materials during this process.
Step 2: Preparing the area for installation
Once the old roof boot is removed, inspect the area for any damage or deterioration. Replace any damaged or rotted wood. Clean the area and ensure it is free from debris and dust. It is important to have a clean and smooth surface for the new roof boot to adhere to.
Step 3: Fitting the new roof boot in place
Take the new roof boot and carefully position it over the pipe or vent protruding through the roof. Ensure that the boot covers the opening completely and allows for a proper seal. Adjust the boot if needed to ensure a snug fit.
Step 4: Fastening the roof boot securely
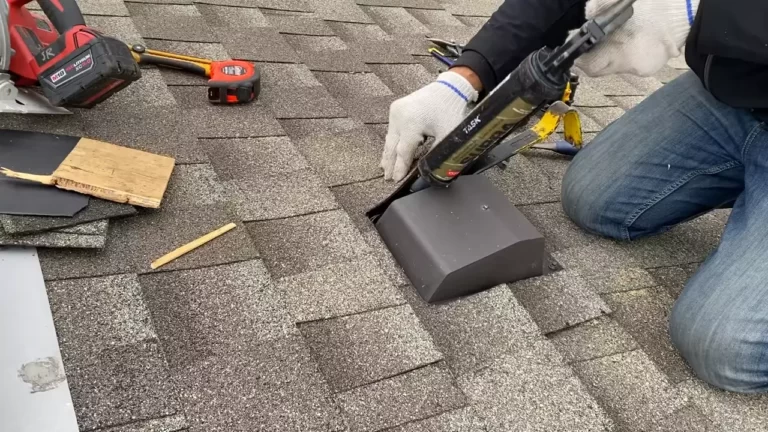
Secure the roof boot in place by using roofing nails or screws. Make sure to fasten the boot directly onto the roof deck to ensure a secure attachment. Use the appropriate fasteners according to the type of roof you have, whether it is asphalt shingles, metal, or another type of roofing material.
Step 5: Sealing the roof boot for optimal protection
To provide optimal protection against water leaks, it is crucial to seal the roof boot. Apply a generous amount of roofing sealant or caulk around the base of the boot, ensuring a watertight seal. Smooth out the sealant with a putty knife to create a uniform and tidy finish.
Following these steps will help you install a roof boot correctly, providing a watertight seal and ensuring the longevity of your roof. Remember to always prioritize safety and consult a professional if you are unsure about any step of the installation process.

Tips For Proper Roof Boot Installation And Maintenance
When it comes to installing a roof boot, proper installation and maintenance are key to ensuring its effectiveness and longevity. In this section, we will discuss some important tips to keep in mind during the installation process as well as regular inspection and maintenance practices to prolong the lifespan of your roof boot.
Ensuring a Proper Fit for Maximum Effectiveness
A roof boot acts as a protective seal between the roof and any protrusions such as pipes, vents, or cables. To ensure maximum effectiveness, it is crucial to ensure a proper fit during installation. Here are some tips to help you achieve a secure and watertight seal:
- Measure and select the correct size roof boot for your specific needs. An ill-fitting boot can compromise its ability to prevent water leakage.
- Clean the area where the boot will be installed, removing any debris or old sealant to create a clean surface for the boot to adhere to.
- Apply a layer of roofing cement around the area where the boot will be placed. This will provide additional waterproofing and help secure the boot in place.
- Fit the boot over the protrusion, ensuring that it sits snugly and covers the necessary area.
- Tighten the boot’s adjustable collar or fasteners, making sure it is firmly attached to the roof and provides a tight seal.
- Inspect the boot visually, ensuring there are no gaps or areas where water could enter. If necessary, add additional roofing cement or sealant to reinforce the seal.
Regular Inspection and Maintenance of the Roof Boot
To ensure the longevity and effectiveness of your roof boot, regular inspection and maintenance are essential. Here are some practices to incorporate into your routine:
- Inspect the roof boot at least once a year, or after any severe weather events, to check for signs of wear, damage, or deterioration.
- Look for cracks, gaps, or tears in the boot’s material, as these can lead to water penetration and potential roof leaks.
- Check the condition of the boot’s collar or fasteners, ensuring they are secure and not showing signs of corrosion or loosening.
- Remove any debris or buildup around the boot, as these can impede proper water drainage and cause pooling.
- If any issues are found during inspection, promptly repair or replace the roof boot to maintain its integrity.
Common Mistakes to Avoid During Installation
Although installing a roof boot may seem straightforward, there are some common mistakes to avoid to ensure a successful installation:
- Avoid using excessive force or over-tightening the collar or fasteners, as this can damage the boot or compromise its effectiveness.
- Do not overlook cleaning the area before installation, as debris or old sealant can hinder the boot’s ability to adhere properly.
- Ensure that the boot is positioned correctly and covers the necessary area, without leaving any gaps or exposed sections.
- Do not use incompatible materials or adhesives during installation, as this can lead to premature failure of the roof boot.
- Double-check the manufacturer’s instructions and guidelines for the specific roof boot you are installing, as different products may have slight variations in installation requirements.
By following these tips for proper roof boot installation and maintenance, you can ensure a secure and watertight seal, prolonging the lifespan of your roof boot and protecting your roof from potential leaks.
Frequently Asked Questions Of How To Install A Roof Boot
How Do You Install A Roof Boot Properly?
To install a roof boot properly, start by removing the old flashing and cleaning the area around the pipe. Apply roofing cement around the pipe and slide the roof boot over it. Secure the boot with roofing nails or screws and seal any gaps with roofing cement.
What Is A Roof Boot Used For?
A roof boot is used to seal the area around a pipe that protrudes from the roof. It prevents water from leaking into the roof through the pipe penetration, ensuring the roof remains watertight.
Can I Install A Roof Boot Myself?
Yes, installing a roof boot can be a DIY project. However, it does require some skill and knowledge of roofing techniques. If you are confident in your abilities and have the necessary tools, you can install a roof boot yourself.
However, it’s always best to consult a professional if you are unsure.
Conclusion
Installing a roof boot may seem like a daunting task, but with the right knowledge and tools, it can be done smoothly. By following the step-by-step guide outlined in this blog post, you’ll be able to protect your roof from water leaks and prevent damage to your home.
Remember to prioritize safety and take your time during the installation process. With proper techniques, you’ll have a secure and durable roof boot that will last for years to come. So, what are you waiting for? Get started on installing your roof boot today and enjoy a leak-free home!