How to Install a Roof Anchor?
To install a roof anchor, follow these steps: First, locate the desired anchor location on the roof. Then, drill holes into the roof and install the base plate using screws.
Are you in need of installing a roof anchor? Roof anchors are essential for providing safety and security while working at heights. Whether you are a professional contractor or a DIY enthusiast, knowing how to properly install a roof anchor is crucial.
By following a few simple steps, you can ensure that your anchor is securely attached and ready to use whenever you need it. We will guide you through the process of installing a roof anchor, providing you with the necessary knowledge to complete the task with confidence. So, let’s begin!
Understanding The Different Types Of Roof Anchors
When it comes to ensuring safety while working at heights, roof anchors play a crucial role. These devices are designed to provide a secure attachment point for personal fall protection systems, allowing workers to move freely without the risk of a fall. However, it is important to choose the right type of roof anchor based on your specific needs and requirements. In this article, we will discuss the two main types of roof anchors: permanent roof anchors and temporary roof anchors.

Permanent Roof Anchors
Permanent roof anchors are designed to be installed once and can provide long-term fall protection solutions. These anchors are typically made from durable materials such as stainless steel or galvanized steel to withstand harsh weather conditions. They are usually installed during the initial construction phase of a building or as part of a roof retrofitted for fall protection. Permanent roof anchors are a cost-effective solution for buildings that require frequent access to the roof for maintenance or inspections.
There are different types of permanent roof anchors available, including:
- Bolt-On Anchors: These anchors are securely fastened to the structure using bolts and are ideal for concrete or metal roofs.
- Weld-On Anchors: These anchors are welded directly onto the structure and are suitable for steel roofs or structures.
- Roof Strap Anchors: These anchors consist of a strap that is secured to the roof structure using nails or screws. They are commonly used for residential buildings or temporary construction sites.
Temporary Roof Anchors
Temporary roof anchors, as the name suggests, are designed to be easily installed and removed as required. These anchors are ideal for short-term projects or areas where frequent attachment points are needed. Temporary roof anchors are versatile and can be attached to various roof types, including metal, concrete, and wood. They are commonly used in construction, roofing, or maintenance work where workers need to access different areas of the roof.
Some examples of temporary roof anchors include:
- Hinged Roof Anchors: These anchors can pivot to accommodate different roof slopes while providing a secure attachment point.
- Cable Tie-Offs: These anchors rely on a cable or rope that is connected to a secure point on the roof, providing flexibility in terms of attachment location.
- Rail Systems: These systems consist of rails installed along the roofline, allowing workers to move freely while remaining securely attached.
Understanding the different types of roof anchors is essential for selecting the right fall protection solution for your specific needs. Whether you require a permanent roof anchor for long-term use or a temporary roof anchor for a short-term project, there is a wide range of options available to ensure the safety of workers at heights.
Safety Equipment
When it comes to installing a roof anchor, safety should be your top priority. It’s crucial to have the right safety equipment to protect yourself from potential accidents or falls. In this section, we will discuss the essential safety equipment you need to ensure a safe and secure installation.
Safety Harness
A safety harness is a must-have when working at heights. It is designed to distribute the force of a fall throughout the body, reducing the risk of injury. Make sure to choose a harness that fits properly and is adjustable to provide a snug fit. It should have wide and padded shoulder straps for added comfort during long hours of work. Before you start the installation process, put on your safety harness and double-check that it is properly secured.
Safety Lanyard
A safety lanyard is an essential component of your fall protection system. It is a connecting device that attaches your safety harness to the roof anchor. When attached correctly, it allows you to move freely while still being securely tethered to the anchor. Opt for a lanyard with a shock-absorbing feature to minimize the impact of a fall. Before using the lanyard, inspect it for any signs of wear or damage to ensure optimal safety.
Helmet
A helmet is another important piece of safety equipment that should not be overlooked. It protects your head from injury in case of a fall or any object falling from above. Choose a helmet that meets the industry standards and has proper impact resistance. Ensure that it fits securely and does not obstruct your vision. Wearing a helmet is a simple yet effective way to mitigate the risks associated with working at heights.

Installation Tools
Before you begin installing a roof anchor, there are several tools that you will need to ensure a successful installation. These tools not only make the installation process easier but also play a crucial role in ensuring the safety and security of the anchor. Below are the essential tools you will need:
Anchorage Connector
The anchorage connector is a critical component of the roof anchor system. It serves as the link between the anchor point and the personal fall arrest system. When selecting an anchorage connector, consider the type of roof you have and the specific requirements of the job. There are various types of anchorage connectors available, including straps, brackets, and D-rings. Choose the one that is most suitable for your needs.
Screws or Bolts
The proper screws or bolts are necessary to securely attach the roof anchor to the roof structure. The selection of the right size, length, and material of screws or bolts depends on the type of roof material and the load requirements. Consult the manufacturer’s guidelines or a structural engineer to determine the appropriate screws or bolts for your specific roof anchor installation.
Drill
A drill is an essential tool for creating holes in the roof structure to accommodate the screws or bolts. It is recommended to use a high-quality drill with sufficient power and torque to penetrate the roof material effectively. Make sure to use the appropriate drill bit size for the screws or bolts you are using to ensure a proper fit and secure attachment.
Hammer
A hammer may be needed for certain types of roof anchors that require nails or other fasteners for installation. Ensure that the hammer you use is suitable for the specific type of fasteners recommended by the manufacturer. Use the hammer with controlled force to avoid damaging the roof material and to ensure a secure attachment of the roof anchor.
By having these essential installation tools on hand, you are well-prepared to install a roof anchor with confidence. Remember to follow the manufacturer’s instructions and safety guidelines throughout the installation process to ensure a safe and reliable anchor for your fall protection needs.
Inspecting The Roof
Inspecting the roof is an essential step when installing a roof anchor. This process ensures that the roof is suitable for the installation and helps identify any potential hazards or obstacles. By thoroughly checking the structural integrity and taking note of any obstacles, you can ensure a safe and successful installation. In this section, we will discuss the importance of checking for structural integrity and identifying obstacles and hazards.
Checking for Structural Integrity
Before installing a roof anchor, it is crucial to assess the structural integrity of the roof. This step helps determine if the roof is strong enough to support the anchor and withstand the weight and forces it will be subjected to. To do this, carefully examine the following:
- Roof materials: Inspect the condition of the roof materials, such as shingles, tiles, or metal panels. Look for any signs of damage, deterioration, or loose sections. Ensure that the roof is in good condition and capable of supporting the anchor.
- Roof framework: Check the underlying framework of the roof, including the rafters or trusses. Look for any signs of sagging, rot, or structural damage. Ensure that the framework is sturdy and can provide the necessary support for the anchor.
- Fasteners: Examine the fasteners used to secure the roof materials. Ensure that they are intact and properly installed. Loose or missing fasteners can compromise the structural integrity of the roof and should be addressed before installing the anchor.
Identifying Obstacles and Hazards
Identifying obstacles and hazards on the roof is crucial to ensure a safe and effective installation of the roof anchor. By doing so, you can mitigate potential risks and make any necessary adjustments. Consider the following factors when identifying obstacles and hazards:
- Roof slope: Take note of the slope or pitch of the roof. Steep slopes may require additional precautions or specialized anchors to ensure the safety of workers.
- Roof penetrations: Look for any roof penetrations, such as vents, chimneys, or skylights. These can pose potential obstacles in the path of the anchor installation. Plan accordingly and determine the best placement of the anchor to avoid any obstructions.
- Electrical hazards: Be aware of any nearby electrical equipment or power lines that may pose a hazard during the installation process. Take appropriate precautions to ensure the safety of workers and prevent any electrical accidents.
- Environmental factors: Consider environmental factors such as weather conditions and nearby trees or branches. High winds, heavy rain, or overhanging branches can affect the stability of the anchor and should be taken into account during the inspection.
By thoroughly inspecting the roof for structural integrity and identifying potential obstacles and hazards, you can ensure a safe and successful installation of the roof anchor. Taking the time to assess these factors will provide peace of mind knowing that the anchor is installed in a secure and stable manner, providing optimum safety for workers.

Measuring And Marking
Measuring and marking is a crucial first step when installing a roof anchor. It ensures proper placement and accurate installation, ultimately ensuring the safety of those who will be using the anchor. In this section, we will guide you on determining the placement of anchors and marking the layout. Let’s dive in!
Determining the Placement of Anchors
Determining the placement of anchors requires careful consideration of various factors. Firstly, you need to identify the specific areas of the roof where the anchors will be installed. These areas should be accessible and strategically located to provide maximum safety and coverage.
Next, you should assess the roof’s structural integrity to ensure it can support the weight and forces exerted on the anchor. Consider the roof material, pitch, and any potential obstructions that may affect the anchor’s effectiveness. Consulting a professional or referring to local building codes can provide valuable guidance in determining the appropriate anchor placement.
Additionally, it is crucial to consider the specific regulations and guidelines set forth by relevant authorities, such as OSHA (Occupational Safety and Health Administration). These regulations provide essential information on anchor installation requirements and can vastly contribute to the overall safety of the system.
Marking the Layout
Once you have determined the placement of the anchors, marking the layout accurately ensures a precise installation process. Here’s a step-by-step guide to marking the layout:
- Start by identifying the exact locations where the anchors will be positioned. Use a measuring tape to measure and mark these points on the roof surface. Be sure to use a permanent marker or similar tool to make clear and lasting marks.
- Consider the required spacing between anchors. This spacing may vary depending on your specific application and safety regulations. Measure and mark these distances accordingly.
- Next, mark the location for any additional components or attachments, such as lifelines or lanyard connection points. These components should be strategically placed to optimize safety and accessibility for users.
- Double-check and review your markings before proceeding with the installation. Ensure that they align with your initial plan and adhere to the necessary regulations and guidelines.
By following these steps, you can guarantee an accurate and reliable layout for your roof anchor system. This will contribute to a smooth installation process and, most importantly, a safe working environment for those using the system.
Positioning The Anchors
Ensuring Proper Spacing and Alignment
When it comes to installing a roof anchor, proper positioning is crucial for ensuring maximum safety and effectiveness. Positioning the anchors correctly involves two key considerations: ensuring proper spacing and alignment. In this section, we will discuss these factors in detail to help you install your roof anchors with precision and accuracy.
Ensuring Proper Spacing
To provide adequate support and coverage, it is essential to maintain proper spacing between each roof anchor. The specific spacing requirements may vary depending on the manufacturer and the type of anchor you are installing. It is always recommended to refer to the manufacturer’s instructions for the recommended spacing guidelines.
Here are a few general tips to ensure proper spacing of roof anchors:
- Measure the distance between each anchor and mark the positions accordingly. This will help you maintain uniform spacing throughout the installation process.
- Consider the weight capacity of the anchors and the intended use when determining the spacing. Heavier loads may require closer spacing for enhanced stability.
- If you are unsure about the optimal spacing, consult with a professional or contact the manufacturer for guidance.
By adhering to the recommended spacing guidelines, you can maximize the structural integrity of your roof anchor system, providing a safe working environment.
Alignment is Crucial
In addition to proper spacing, aligning the anchors correctly is essential for optimal performance and safety. Proper alignment ensures that the roof anchor system functions as intended and can withstand the specified loads.
To achieve proper alignment, follow these steps:
- Measure and mark the desired locations for the anchors using a plumb line or a level. This will help you maintain a straight and aligned setup.
- Check the alignment periodically throughout the installation process to ensure everything remains straight and in line.
- Verify that the anchors are aligned with the relevant structural components of the roof, such as beams or trusses.
Maintaining proper alignment will not only enhance the performance of your roof anchor system but also minimize the risk of accidents and damage.
Remember, following the manufacturer’s instructions is crucial when positioning your roof anchors. By adhering to their guidelines and considering proper spacing and alignment, you can ensure a safe and reliable roof anchor installation.
Securing The Anchors
Securing the anchors is a crucial step in the process of installing a roof anchor. It ensures the stability and safety of the anchor, allowing it to effectively hold the weight of individuals or equipment. In this section, we will cover the steps involved in securing the anchors, which include drilling holes, installing anchors with screws or bolts, and checking for stability.
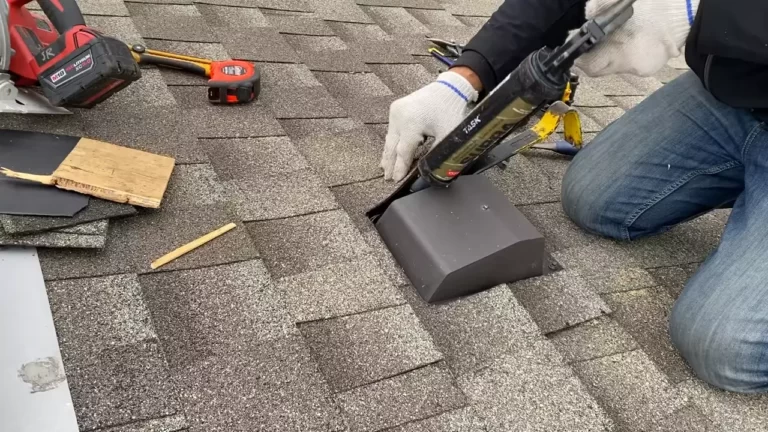
Drilling Holes
To begin securing the roof anchors, the first step is to drill holes in the desired location on the roof. These holes will provide a secure anchor point for the entire system. When drilling the holes, it is important to choose the correct size of drill bit that is suitable for the specific type of anchors being used. The size of the drill bit will depend on the diameter of the anchor.
It is essential to ensure that the holes are drilled at exactly the right position and angle for maximum strength and stability. To achieve this, it may be helpful to use a template or marking tool to guide the drilling process. Once the holes are drilled, make sure to remove any debris or loose material to ensure a clean and secure fit for the anchors.
Installing Anchors with Screws or Bolts
The next step in securing the anchors involves using screws or bolts to fasten them to the roof. Depending on the type of anchors being used, the appropriate fasteners should be selected. It is important to choose high-quality screws or bolts that are specifically designed for securing anchors to roofs. This will ensure their durability and reliability.
When installing the anchors, make sure to tighten the screws or bolts securely to provide a strong connection between the anchor and the roof. It is advisable to use a torque wrench to ensure that the fasteners are tightened to the recommended torque specification. This will prevent over-tightening, which could damage the anchor or the roof, or under-tightening, which could compromise the stability of the anchor.

Checking for Stability
After the anchors have been installed, it is crucial to thoroughly check for stability before using them. This involves conducting a visual inspection to ensure that the anchors are securely fastened to the roof and that there are no visible signs of damage or loose connections.
Additionally, it is recommended to perform a stability test by applying a downward force on the anchor to assess its strength and ability to withstand weight. This can be done by using a suitable load-testing equipment or applying pressure gradually and monitoring for any signs of movement or failure.
If any issues or concerns are identified during the stability check, it is important to address them immediately. This may involve repositioning or reinstalling the anchors, or seeking professional assistance to ensure that they are properly secured and safe to use.
Securing the anchors is a critical aspect of roof anchor installation. It involves drilling holes with the correct size and angle, installing anchors with high-quality screws or bolts, and conducting a thorough stability check. By following these steps, you can ensure that the anchors are securely fastened and provide a reliable anchor point for your safety needs.
Load Testing
When it comes to installing a roof anchor, load testing is an essential step to ensure the stability and strength of the anchor. Load testing involves applying an appropriate load to assess the durability and performance of the anchor. This verification process is crucial to protect workers who will be using the anchor and to comply with safety regulations.
Applying an Appropriate Load
In order to accurately test the roof anchor, it is important to apply an appropriate load. This involves determining the maximum load capacity of the anchor and conducting tests to ensure it can withstand that load. The load should be applied gradually to simulate real-world conditions and to measure the anchor’s capacity to support both static and dynamic loads.
To apply an appropriate load, follow these steps:
- Understand the Maximum Load Capacity: Before conducting the load test, thoroughly read the manufacturer’s instructions for the specific roof anchor you are installing. Familiarize yourself with the maximum load capacity recommended by the manufacturer and any other load-related specifications.
- Use Suitable Weights: Determine the weight needed to apply the desired load to the roof anchor. It is important to use suitable weights that will evenly distribute the load. This may require using multiple weights, such as sandbags, concrete blocks, or specially designed load bags.
- Securely Attach the Weights: Once you have the suitable weights, securely attach them to the roof anchor. Ensure that the weights are properly fastened to prevent them from shifting or falling during the load testing.
- Gradually Apply the Load: Begin applying the load gradually to the roof anchor. This can be done by hoisting the weights or using a forklift or crane, depending on the size and location of the anchor. As you increase the load, closely monitor the anchor for any signs of stress, deflection, or failure.
Verifying Stability and Strength
Load testing is not just about applying the load, but also about verifying the stability and strength of the roof anchor. This step ensures that the anchor can handle the load without compromising the safety of workers.
To verify the stability and strength of the anchor, follow these steps:
- Inspect for Deflection: As you apply the load, closely inspect the anchor for any signs of deflection. This refers to any bending, sagging, or displacement of the anchor. If deflection is observed, it may indicate that the anchor is not strong enough to support the load.
- Check for Cracks or Damage: During the load testing, carefully examine the roof anchor for any cracks or damage. Inspect the welds, bolts, and other connections for signs of stress or failure. If any cracks or damage are detected, it is essential to address these issues before using the anchor.
- Assess Stability and Security: Evaluate the stability and security of the roof anchor during the load test. Ensure that the anchor remains securely attached to the roof structure and does not shift or move excessively. Any movement or instability could compromise the safety of workers using the anchor.
By following these load testing guidelines, you can verify the stability and strength of the roof anchor, ensuring its reliability and safety for workers. It is important to record the results of the load testing and document any issues or concerns that arise. Conducting load testing not only protects the individuals using the roof anchor but also helps you comply with safety regulations and standards. So, take the time to properly load test your roof anchor before putting it into service.
Fall Arrest Testing
In order to ensure the safety and reliability of a roof anchor installation, fall arrest testing is essential. This testing process involves simulating a fall and assessing the performance of the anchors to determine their effectiveness in preventing falls and protecting workers.
Simulating a Fall
When it comes to fall arrest testing, simulating a fall is a crucial step. This involves subjecting the anchor and the entire fall protection system to a controlled and realistic fall scenario to evaluate their durability and functionality.
To simulate a fall, specialized equipment is used to create a fall force that mimics the impact of an actual fall. This force is applied to the anchor and the surrounding structure to assess their ability to withstand the load and limit the fall distance.
During the simulation, important factors such as the angle of the fall, the weight of the individual, and the condition of the anchor are taken into consideration to ensure accurate testing results.
Assessing the Performance of Anchors
Once the fall is simulated, the performance of the roof anchor is thoroughly assessed. This evaluation involves analyzing various factors to determine the anchor’s effectiveness in preventing falls and protecting workers.
One of the key aspects assessed is the maximum load capacity of the anchor. This involves determining the maximum weight the anchor can support without failure. It is crucial to ensure that the anchor has a sufficient load capacity to handle the weight of the worker and provide adequate fall protection.
In addition to load capacity, the fall arrest testing also examines the anchor’s ability to limit fall distances. It is important for the anchor to have mechanisms in place to minimize the distance a worker falls in order to prevent severe injuries or fatalities.
Furthermore, the testing evaluates the durability and structural integrity of the anchor. The anchor should be capable of withstanding multiple falls and adverse weather conditions, ensuring its long-term reliability.
By conducting fall arrest testing and assessing the performance of anchors, you can ensure the safety and effectiveness of your roof anchor installation. It provides peace of mind knowing that your workers are protected from falls and that your fall protection system is up to industry standards.

Regular Visual Inspections
Regular visual inspections are crucial for ensuring the ongoing safety and effectiveness of your roof anchor. By examining your roof anchor on a regular basis, you can identify any signs of damage or wear before they escalate into more serious issues. Additionally, you can clean and remove debris that may have accumulated to maintain the optimal functioning of the anchor. In this section, we will discuss two essential aspects of regular visual inspections: checking for signs of damage or wear and cleaning and removing debris.
Checking for Signs of Damage or Wear
To ensure the reliability and safety of your roof anchor, it is essential to check for signs of damage or wear. Regular inspections enable you to detect potential issues early on and address them promptly. Here are some key areas to focus on during your visual inspection:
- Inspect the anchor point itself for any visible cracks, breaks, or other signs of damage.
- Examine the attachment hardware, including screws, bolts, and brackets, to ensure they are secure and intact.
- Check the anchor straps or cables for any fraying, corrosion, or loose strands.
- Inspect the supporting structure around the roof anchor, such as the roof membrane or other roof components, for any signs of deterioration.
If you notice any of these signs of damage or wear during your inspection, it is crucial to take immediate action. This may involve contacting a professional to assess the situation and perform any necessary repairs or replacements. Ignoring these issues can compromise the integrity of the roof anchor and pose a significant safety hazard.
Cleaning and Removing Debris
In addition to checking for signs of damage or wear, regular visual inspections should also include cleaning and removing any debris that may have accumulated around the roof anchor. Over time, leaves, dirt, and other debris can accumulate on the roof, potentially obstructing the anchor or compromising its effectiveness. To ensure optimal functioning, follow these steps to clean and remove debris:
- Clear away any loose debris, such as leaves or twigs, using a broom or brush.
- Inspect the area for any stubborn or stuck debris and use a hose or pressure washer to remove it.
- Ensure that the drainage systems around the roof anchor are clear and functioning properly.
Regularly cleaning and removing debris from your roof anchor not only helps maintain its functionality but also prevents any potential issues that may arise due to blockages or reduced performance. By incorporating this step into your regular visual inspections, you can ensure the longevity and safety of your roof anchor.
Periodic Load Testing
One crucial aspect of roof anchor installation is periodic load testing. Load testing helps ensure the durability and effectiveness of a roof anchor system in withstanding weight and various forces. By conducting regular load tests, you can identify any potential issues or weaknesses in the system and take necessary action. In this section, we will discuss the schedule for load testing and how to conduct load tests effectively.
To maintain the safety and reliability of your roof anchor system, it is essential to establish a schedule for load testing. This schedule will depend on various factors, such as the type of roof anchor, the frequency of use, and the regulations governing your industry. Generally, it is recommended to conduct load tests annually or as prescribed by the manufacturer’s guidelines.
When it comes to conducting load tests, there are a few important steps to follow. Here is a step-by-step guide to help you through the process:
- Inspect the roof anchor: Before proceeding with the load test, thoroughly inspect the roof anchor for any signs of damage or wear. Pay close attention to the attachment points, hardware, and connections. If any issues are identified, address them before conducting the load test.
- Prepare the test load: The test load should be representative of the maximum load the roof anchor system is designed to handle. Consult the manufacturer’s specifications to determine the appropriate weight and configuration for the test load. Ensure that the load is evenly distributed and securely attached to the anchor points.
- Conduct the load test: Attach the test load to the roof anchor system as per the manufacturer’s instructions. Apply the load gradually, allowing the system to adjust and stabilize. Observe the system’s response and measure any deflection or movement. Keep in mind that the load should be applied slowly and steadily to avoid sudden impacts or shocks.
- Evaluate the results: After applying the test load, carefully assess the system’s performance. Look for any signs of stress, deformation, or failure. Measure the deflection and compare it to the acceptable limits set by the manufacturer or industry standards. If the system meets the requirements, it can be deemed safe for use. However, if any issues are detected, further inspection and corrective action may be necessary.
By following a systematic approach to load testing, you can ensure the ongoing safety and effectiveness of your roof anchor system. Remember to document the load test results for future reference and keep a record of all maintenance and inspections performed on the system.
Frequently Asked Questions Of How To Install A Roof Anchor
How Can I Install A Roof Anchor?
Installing a roof anchor is a simple process. First, locate a suitable position on your roof and mark it. Then, drill holes for the anchor bolts and attach the anchor base using the provided hardware. Finally, secure the anchor point to the base and test its stability before using it.
What Tools Do I Need To Install A Roof Anchor?
To install a roof anchor, you will need a few basic tools. These include a drill with the appropriate drill bit, a wrench or socket set, a tape measure, a marking pen or chalk, and safety equipment such as gloves and safety glasses.
Having these tools ready will make the installation process much easier.
Can I Install A Roof Anchor Myself?
Yes, you can install a roof anchor yourself, provided you have the necessary tools and equipment, as well as a basic understanding of roofing and safety procedures. However, if you are not confident in your abilities or have a complex roof design, it is advisable to hire a professional installer to ensure the anchor is installed correctly and safely.
Do I Need Any Special Equipment For Roof Anchor Installation?
In addition to the basic tools mentioned earlier, you may need some additional equipment depending on the specific requirements of your roof anchor installation. This may include a ladder or scaffolding to access the roof, safety harnesses and lanyards, and specialized roof anchors or brackets for certain types of roofs.
Be sure to consult the manufacturer’s instructions for any specific equipment requirements.
Conclusion
Installing a roof anchor is a crucial step in ensuring safety while working at heights. By following the detailed steps outlined in this blog post, you can confidently install a roof anchor and provide yourself or your team with a secure anchoring point.
Remember to always prioritize safety and carefully follow the manufacturer’s instructions for optimal results. With the knowledge gained from this guide, you can approach your next roofing project with confidence. Stay safe!