How to Install a Ceiling Fan Mounting Bracket?
To install a ceiling fan mounting bracket, first, turn off the power to the circuit at the breaker box. Then, using a drill, attach the bracket to the ceiling with screws and anchor it if necessary.
Finally, the fan can be mounted onto the bracket following the manufacturer’s instructions. When it comes to enhancing air circulation and providing a stylish addition to any room, a ceiling fan is a popular choice. Installing the mount bracket for a ceiling fan is an essential step in the process.
By securely attaching the bracket to the ceiling, it ensures the fan’s stability and safety. However, it is crucial to follow proper installation steps to avoid potential hazards. This guide will cover the necessary steps to install a ceiling fan mounting bracket. It is essential to turn off the power at the breaker box before beginning the installation process. Once the power is off and precautions are taken, installation is relatively straightforward with the use of common tools such as a drill, screws, and anchors if needed. Let’s delve into the step-by-step instructions for installing a ceiling fan mounting bracket.
Understanding The Ceiling Fan Mounting Bracket Components
When it comes to installing a ceiling fan, it is crucial to have a clear understanding of the different components of the mounting bracket. This knowledge is essential for a successful installation that ensures the fan is secure and operates smoothly. In this section, we will explore the purpose of the mounting bracket, identify its different parts, and discuss the necessary tools and supplies needed for the installation.

Exploring the purpose of the mounting bracket
The mounting bracket plays a crucial role in securely attaching the ceiling fan to the ceiling. It acts as a support structure that holds the weight of the fan and ensures its stability. This component is typically made of metal and is designed to be strong and durable. Without a properly installed and sturdy mounting bracket, the fan could wobble, produce excessive noise, or even become a safety hazard.
Identifying the different parts of the mounting bracket
To successfully install a ceiling fan, it is important to familiarize yourself with the different parts of the mounting bracket. These components include:
- The ceiling plate: This is the component that attaches directly to the ceiling. It is usually circular in shape and has holes for mounting screws.
- The downrod mount: This is part of the mounting bracket that connects the fan’s downrod to the ceiling plate. It ensures stability and provides a secure attachment point.
- The canopy bracket: This component is located at the top of the fan and is used to secure the canopy, which covers the wiring and electrical components.
- The wire hook: This small hook is included with most mounting brackets and is used to temporarily hold the fan while wiring connections are made.
Ensuring you have the necessary tools and supplies
Before starting the installation, it is important to ensure you have all the necessary tools and supplies. This will make the process smoother and more efficient. Here are the essential items you will need:
- A ladder or step stool to reach the ceiling
- A screwdriver, preferably a Phillips-head or a flat-head screwdriver, depending on the type of screws used
- A wire stripper/cutter to strip and cut the electrical wires
- Wire connectors or wire nuts to securely connect the fan’s wires to the electrical wiring in your ceiling
- Electrical tape to insulate wire connections
- A voltage tester to ensure the power is turned off before working on the electrical connections
By understanding the purpose of the mounting bracket, identifying its various components, and making sure you have the necessary tools and supplies, you’ll be well-prepared to install your ceiling fan. Proper installation is essential for the fan’s functionality and safety. Now that we have covered the basics, let’s move on to the step-by-step installation process in the next section.
Preparing The Ceiling For Installation
Before you can begin installing your ceiling fan, there are a few important steps you need to take to ensure that your ceiling is ready for the mounting bracket. In this section, we will guide you through the process of selecting the ideal location for the ceiling fan, checking the ceiling for proper support, and measuring and marking the position for the mounting bracket.
Selecting the ideal location for the ceiling fan
The first step in preparing your ceiling for installation is to select the ideal location for your ceiling fan. When choosing a location, it’s important to consider both aesthetics and functionality. You’ll want to find a spot that complements the overall design of your room while also providing optimal airflow.
To determine the best location, consider the following factors:
- The center of the room: For optimal airflow, the ceiling fan should be installed in the center of the room.
- Ceiling height: Make sure there is sufficient clearance between the fan blades and the ceiling.
- Furniture placement: Ensure that the fan blades will not interfere with any furniture or other objects in the room.
- Electrical wiring: Locate a spot that is near an existing electrical box or wiring.

Checking the ceiling for proper support
Once you have selected the ideal location for your ceiling fan, the next step is to check the ceiling for proper support. The weight and movement of a ceiling fan can put stress on the ceiling, so it’s crucial to make sure it can support the fan’s weight.
To check the ceiling for proper support, follow these steps:
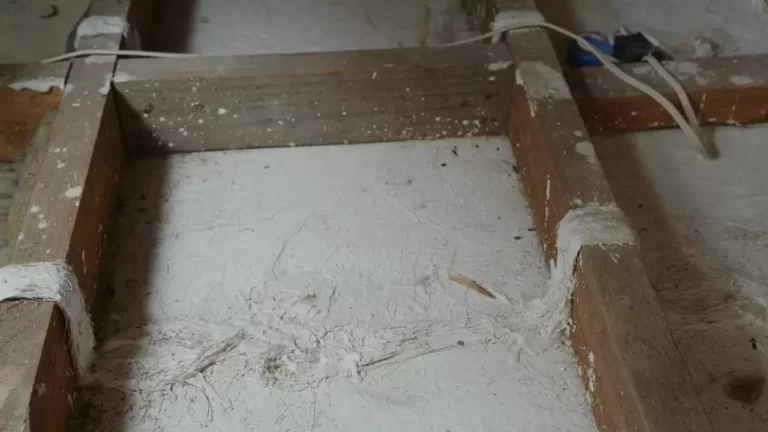
- Locate the ceiling joists: Use a stud finder or a tapping method to find the ceiling joists. Ceiling joists provide the necessary support for the fan.
- Measure the distance between the joists: Measure the distance between the joists to ensure that it matches the spacing requirements specified in the ceiling fan’s installation instructions.
- Inspect the ceiling for any signs of damage: Look for cracks, water damage, or other issues that could affect the stability of the ceiling.
Measuring and marking the position for the mounting bracket
After confirming that the ceiling has proper support, you can proceed with measuring and marking the position for the mounting bracket. The mounting bracket is the component that attaches the fan to the ceiling and provides stability.
To measure and mark the position for the mounting bracket, follow these steps:
- Hold the mounting bracket against the ceiling: Position the mounting bracket against the ceiling, aligning it with the selected location.
- Use a pencil to mark the screw holes: Mark the screw holes on the ceiling by inserting the pencil through each hole in the mounting bracket.
- Double-check the alignment: Ensure that the marked positions are symmetrical and aligned with the center of the room.
By following these steps to prepare your ceiling for installation, you will ensure that your ceiling fan is securely and properly installed, providing you with both comfort and style in your space.
Installing The Ceiling Fan Mounting Bracket
Installing a ceiling fan mounting bracket is an essential step in the process of installing a ceiling fan. The mounting bracket acts as the anchor, providing support and stability to the fan. It ensures that the fan is securely attached to the ceiling, allowing it to operate smoothly and without any wobbling or shaking. In this section, we will guide you through the process of attaching the mounting bracket to the ceiling, ensuring a secure and stable installation, and testing the stability of the bracket.
Attaching the mounting bracket to the ceiling
Before you begin the installation process, make sure you have all the necessary tools, including a screwdriver, pliers, and a ladder or step stool to reach the ceiling. Follow these steps to attach the mounting bracket:
- Start by turning off the power to the existing light fixture at the circuit breaker.
- Remove the existing light fixture, exposing the electrical box in the ceiling.
- Inspect the electrical box to ensure it is sturdy enough to support the weight of the ceiling fan. If not, you may need to replace it with a fan-rated box.
- Position the mounting bracket over the electrical box, aligning the screw holes with the holes in the box.
- Secure the mounting bracket to the electrical box using the screws provided, making sure it is firmly attached.

Ensuring a secure and stable installation
It is crucial to ensure that your ceiling fan is securely and stably installed to prevent any accidents or damage. Follow these tips to ensure a secure and stable installation:
- Double-check that the mounting bracket is securely attached to the electrical box before proceeding with the installation.
- Tighten all screws and bolts to ensure a tight and secure fit.
- Use a level to verify that the mounting bracket is straight and properly aligned.
- Ensure that the electrical wires are properly connected and secured, following the manufacturer’s instructions.
Testing the stability of the bracket
After completing the installation, test the stability of the bracket to ensure that it can support the weight and movement of the ceiling fan. Follow these steps to test the stability:
- Gently shake the bracket to see if there is any wobbling or movement. If you notice any instability, tighten the screws and bolts further.
- Turn on the fan and observe its operation. Make sure it operates smoothly and without any excessive noise or vibrations.
- If you notice any issues during the testing, refer to the manufacturer’s instructions or seek professional assistance for adjustments or further troubleshooting.
By following these steps and ensuring a secure and stable installation, you can enjoy the comfort and functionality of your ceiling fan with peace of mind.
Wiring The Ceiling Fan
Identifying the different wires of the ceiling fan
Before you start wiring your ceiling fan, it’s important to familiarize yourself with the different wires. Typically, a ceiling fan will have three main wires – a black wire, a white wire, and a green or copper wire. These wires serve different purposes in the overall electrical setup of the fan.
The black wire is often referred to as the “hot” wire and carries the electrical current. This wire is responsible for providing power to the fan’s motor. On the other hand, the white wire is known as the “neutral” wire and completes the circuit by carrying the return current.
The green or copper wire is the grounding wire and serves to protect the fan from electrical faults. It is important to ensure that each wire is correctly identified before proceeding with the wiring process.
Connecting the fan wires to the electrical supply
Once you have identified the different wires of your ceiling fan, you can begin the process of connecting them to the electrical supply. To do this, you will need to locate the electrical junction box in which the fan will be installed.
Start by removing the junction box’s cover plate and exposing the wires inside. Then, carefully connect the black wire from the ceiling fan to the black or live wire in the electrical junction box. Ensure a secure connection by twisting the wires together and then covering them with a wire nut.
Next, connect the white wire from the ceiling fan to the white or neutral wire in the junction box. Again, twist the wires together and secure them with a wire nut. This will complete the main electrical connection for the fan.
Securing the wires with wire nuts or electrical tape
After connecting the fan wires to the electrical supply, it is important to secure them properly to prevent any accidental disconnections or electrical hazards. To do this, you can use wire nuts or electrical tape.
If using wire nuts, simply place the connected wires inside the nut and twist it clockwise until it is tight and secure. Make sure the wire nut covers all exposed wire ends to eliminate any risk of electrical shock.
If you prefer to use electrical tape, carefully wrap it around the connected wires, ensuring that there are no exposed wire ends. Secure the tape by applying pressure and making sure it is firmly in place.
Remember, the goal is to create a secure and reliable electrical connection that will withstand the test of time. Take the necessary precautions to ensure each wire is properly secured, whether with wire nuts or electrical tape.
With the wiring process complete, you can now move on to the next steps in installing your ceiling fan, such as attaching the fan blades and mounting the fan to the bracket. By following these instructions and taking the time to properly wire your ceiling fan, you can enjoy a cool and well-ventilated space within your home.

Attaching The Ceiling Fan To The Mounting Bracket
Now that you have successfully installed the ceiling fan mounting bracket, it’s time to attach the fan to the bracket. This step is crucial as it ensures the stability and proper functioning of your ceiling fan. In this section, we will discuss two important steps: aligning the fan with the bracket and securing the fan to the bracket using screws.
Aligning the fan with the bracket
To begin, ensure that the power to the fan is turned off at the main electrical panel. This is essential for your safety during the installation process.
1. Start by holding the fan up to the mounting bracket. Make sure that the mounting holes on the fan line up with the holes on the bracket. You may need someone to help you hold the fan during this step.
2. Slowly rotate the fan until the keyhole slots on the fan bracket align with the screws on the mounting bracket. These keyhole slots allow you to easily secure the fan to the bracket.
3. Once the keyhole slots are aligned, lower the fan onto the bracket, making sure the screws fit securely into the slots.
4. Gently push the fan up against the ceiling to ensure a snug fit. This will help prevent any wobbling or unnecessary movement once the fan is in operation.
Securing the fan to the bracket using screws
1. Using a screwdriver, tighten the screws on the bracket through the keyhole slots. Start by tightening one screw partially, then move on to the next screw. Repeat this process until all screws are securely tightened.
2. Check to ensure that each screw is tight enough to hold the fan firmly in place, but be careful not to overtighten as it may damage the fan or bracket.
3. Once all the screws are tightened, give the fan a gentle shake to check its stability. If any wobbling or movement is detected, double-check the screws and make necessary adjustments.
4. Lastly, turn the power back on at the main electrical panel and test the fan to ensure it is working properly. If everything is functioning as expected, congratulations! You have successfully attached the ceiling fan to the mounting bracket.
In conclusion, attaching the ceiling fan to the mounting bracket is a crucial step in the installation process. By following the steps of aligning the fan with the bracket and securely tightening the screws, you can ensure the stability and proper functioning of your ceiling fan. Take your time and double-check everything for a safe and efficient installation. Now sit back, relax, and enjoy your cool and comfortable home!
Testing And Troubleshooting
Once you have successfully installed the ceiling fan mounting bracket, it’s time to test and troubleshoot any potential issues that may arise. By following these steps, you can ensure that your newly installed fan functions optimally and without any hitches.
Turning on the fan and testing its functionality
To test the functionality of your newly installed ceiling fan, you need to follow these simple steps:
- Ensure that the fan’s power switch is turned off before testing.
- Turn the fan on by flipping the power switch.
- Observe the fan blades to confirm if they are rotating smoothly or if there is any wobbling.
- Listen for any unusual noises such as rattling or grinding sounds.
- Check if the fan’s light, if applicable, turns on and off without any issues.
If your fan passes these initial tests, congratulations! Your ceiling fan is now functioning properly. However, if you notice any issues during this process, continue reading for troubleshooting tips.
Resolving any potential issues or noises
If you encounter any issues or noises while testing your ceiling fan, don’t worry. Here are some common problems and their possible solutions:
| Issue | Solution |
|---|---|
| The fan blades are wobbling excessively. | Ensure that all screws and bolts connecting the fan blades to the motor are tight. Use a balance kit to correct any imbalance in the blades. |
| The fan is making excessive noise. | Inspect the fan’s motor housing and ensure that there are no loose or damaged parts. Tighten all screws and check if any components need lubrication. |
| The fan’s light is flickering. | Check if the light bulb is tightly screwed into the socket. If it is, replace the bulb with a new one to rule out a faulty bulb as the cause. |
Adjusting fan settings and controls for optimal performance
To ensure optimal performance and comfort, it’s essential to adjust your fan’s settings and controls. Here are a few tips:
- Set the fan direction according to the season. In summer, set it to rotate counterclockwise for a cooling effect, and in winter, set it to rotate clockwise to circulate warm air.
- Adjust the fan speed to your preference. Most ceiling fans have multiple speed options, allowing you to customize the airflow.
- Test the fan’s remote control or wall switch to ensure they are working correctly. Replace batteries if needed or troubleshoot any wiring issues.
By following these steps, you can ensure that your ceiling fan not only looks great but also functions at its best, providing you with optimal comfort all year round.

Additional Tips And Safety Precautions
Following safety guidelines while installing the ceiling fan
When it comes to installing a ceiling fan mounting bracket, safety should always be your top priority. Taking the necessary precautions will not only ensure a smooth installation process but also prevent any potential accidents or injuries. Here are some key safety guidelines to follow:
- Before beginning the installation, make sure the power to the circuit is turned off. This can be done by switching off the circuit breaker that controls the fan’s electrical supply. Use a voltage tester to double-check that there is no electricity running through the wires.
- Always use proper personal protective equipment (PPE) such as gloves and safety goggles to protect yourself from any debris or electrical hazards.
- Ensure the stability of the ladder or step stool you are using to reach the installation area. Make sure it is on a level surface and securely positioned.
- Read and carefully follow the manufacturer’s instructions provided with the ceiling fan mounting bracket. Each model may have specific safety guidelines and installation steps that need to be adhered to.
- If you are unsure about any aspect of the installation process, do not hesitate to seek assistance from a professional electrician or experienced handyman. It’s always better to be safe than sorry.
Choosing the right size and style of ceiling fan for your space
Choosing the correct size and style of ceiling fan for your space is essential to ensure optimal performance and functionality. Here are some factors to consider when selecting a ceiling fan:
- Measure the dimensions of your room to determine the appropriate fan size. Ceiling fans typically range from 36 to 60 inches in diameter. For rooms with higher ceilings, consider purchasing a fan with a longer downrod for proper air circulation.
- Consider the ceiling height. For rooms with low ceilings, choose a flush-mount or hugger ceiling fan to maximize headroom. Rooms with higher ceilings can accommodate fans with longer downrods.
- Think about the style and décor of your room. Ceiling fans come in various designs, including contemporary, traditional, and rustic. Select a fan that complements your existing interior design and enhances the overall aesthetic appeal of the space.
- Take noise level into consideration. If you are installing a ceiling fan in a bedroom or a quiet area, opt for a model with a reputation for quiet operation. This will ensure a peaceful environment without any disturbance.
Consulting a professional if you encounter difficulties during installation
If you encounter difficulties or uncertainties during the installation process of the ceiling fan mounting bracket, it is highly recommended to consult a professional. A licensed electrician or experienced handyman will have the knowledge and expertise to handle any complex wiring or installation challenges that may arise. They can provide valuable guidance, troubleshoot any issues, and ensure the safe and successful installation of your ceiling fan. Remember, it’s important not to take any unnecessary risks when it comes to electrical installations.
Frequently Asked Questions On How To Install A Ceiling Fan Mounting Bracket
Do You Need A Mounting Bracket For Ceiling Fan?
Yes, a mounting bracket is needed for a ceiling fan. It ensures secure attachment to the ceiling and supports the weight of the fan.
What Are The Different Mounting Types For Ceiling Fans?
Ceiling fans can be mounted in different ways. The common mounting types include flush mount, standard mount, angled mount, and dual mount. Flush mount fans are directly attached to the ceiling without a downrod. Standard mount fans come with a downrod for proper height adjustment.
Angled mount fans are used for slanted or vaulted ceilings. Dual mount fans offer the flexibility to be installed as either a flush mount or a standard mount fan.
What Is The Ground Wire On A Ceiling Fan Mounting Bracket?
The ground wire on a ceiling fan mounting bracket is a safety feature that provides a path for electrical current to safely flow to the ground. It helps prevent electrical shocks by redirecting excess electricity away from the fan and into the ground.
What Is A Standard Mounting Option For A Ceiling Fan?
A standard mounting option for a ceiling fan is the downrod. It is a metal rod that connects the fan to the ceiling and allows for proper air circulation.
Conclusion
Installing a ceiling fan mounting bracket is a simple yet essential task for any homeowner. By following the step-by-step instructions provided in this blog post, you can confidently complete the installation process on your own. Remember to gather all the necessary tools and materials beforehand and carefully consider safety precautions.
With proper guidance and a little patience, you can enjoy the comfort and aesthetic appeal that a ceiling fan provides. Happy installing!