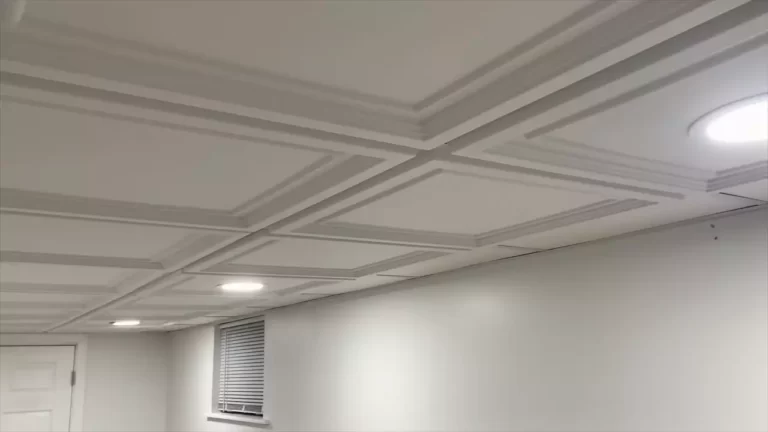
How to Install 12X12 Tongue And Groove Ceiling Tiles?
To install 12×12 tongue and groove ceiling tiles: measure and cut the tiles to fit the ceiling grid, apply adhesive to the back of each tile, and press them firmly into place.
Benefits Of 12X12 Tongue And Groove Ceiling Tiles
When it comes to upgrading your home or office space, installing 12X12 tongue and groove ceiling tiles is a smart choice. Not only do these tiles provide a clean and polished look, but they also offer a range of benefits that make them a popular choice among homeowners and interior designers. From easy installation to enhanced aesthetics and durability, these ceiling tiles are a versatile and practical solution for any space.
Easy Installation
Installing 12X12 tongue and groove ceiling tiles is a breeze, even for those with limited DIY experience. With their unique interlocking design, these tiles can be easily fitted together, eliminating the need for complicated tools or adhesives. Whether you are tackling the installation yourself or hiring a professional, the simplicity of these tiles means less time and effort required than other ceiling options.

Enhanced Aesthetics
One of the main benefits of 12X12 tongue and groove ceiling tiles is their ability to enhance the overall aesthetics of a space. These tiles are available in various designs, finishes, and colors, allowing you to create a customized look that complements your existing decor. Whether you prefer a classic, sophisticated look or a modern and trendy style, there’s a 12X12 tongue and groove ceiling tile to suit your taste and elevate the ambiance of your space.
Durability
When choosing ceiling tiles, durability is a crucial factor to consider. 12X12 tongue and groove ceiling tiles are known for their exceptional strength and longevity. Made from high-quality materials, these tiles are built to withstand the test of time. They are resistant to cracks, dents, moisture, and fading, ensuring that your ceiling will maintain its attractive appearance for years to come. Additionally, the tongue and groove construction provides extra stability, minimizing the risk of sagging or warping.
Compared to other ceiling options, such as traditional drywall or suspended ceilings, 12X12 tongue and groove ceiling tiles offer a practical and high-quality solution. With their easy installation, enhanced aesthetics, and superior durability, these tiles are a perfect choice for any space in need of a stylish and long-lasting upgrade.
Types Of 12X12 Tongue And Groove Ceiling Tiles
If you are looking to enhance the visual appeal of your interior space, installing 12X12 tongue and groove ceiling tiles can be a great option. These ceiling tiles are not only functional but also add a touch of elegance to any room. In this article, we will explore the different types of 12X12 tongue and groove ceiling tiles and their unique features. Let’s dive in!
Wood Tiles
Wood tiles are a popular choice when it comes to 12X12 tongue and groove ceiling tiles. They offer a natural and rustic look, perfect for creating a cozy and inviting atmosphere in your home. These tiles are typically made of solid wood or engineered wood, and they come in various styles, including pine, cedar, oak, and maple. The natural wood grain patterns add a touch of warmth and character to any space.
When installing wood tiles, it is essential to consider the moisture levels in the room. Wood is susceptible to expansion and contraction with changes in humidity, so make sure to acclimate the tiles to the room’s conditions before installation. Additionally, applying a suitable wood finish or sealant can help protect the tiles from moisture damage and maintain their beauty for years to come.
PVC Tiles
If you are looking for a budget-friendly and low-maintenance option, PVC tiles are worth considering. These tiles are made from durable and lightweight polyvinyl chloride (PVC) material, which offers excellent resistance to moisture, stains, and mold. PVC ceiling tiles are available in a wide range of designs, including faux tin, embossed patterns, and smooth finishes, allowing you to achieve various looks to complement your interior design.
PVC tiles are relatively easy to install, thanks to their lightweight nature. They can be glued directly to the ceiling or installed using a suspension system. With PVC tiles, you can enjoy a hassle-free installation process without compromising on the aesthetic appeal of your ceiling.
Metal Tiles
Metal tiles can instantly transform a room with their sleek and modern appearance. Made from materials such as aluminum, tin, or steel, these tiles offer durability, heat resistance, and easy maintenance. Whether you prefer a metallic finish or a decorative pattern, metal ceiling tiles can add a touch of sophistication to any space.
When installing metal tiles, it is essential to consider proper ventilation. Metal reflects heat, so ensuring adequate airflow between the tiles and the ceiling can prevent heat buildup. This can be achieved by using furring strips or adding insulation between the tiles and the ceiling. With the right installation techniques, metal ceiling tiles can not only elevate the aesthetic appeal of your space but also improve energy efficiency.
When it comes to 12X12 tongue and groove ceiling tiles, you have various options to suit your style and budget. Wood tiles offer a natural and warm ambiance, PVC tiles provide a cost-effective and low-maintenance solution, while metal tiles add a sleek and modern touch to your space. Choose the type of ceiling tiles that best align with your desired aesthetic and enjoy the enhanced beauty and functionality they bring to your home.

Measuring The Ceiling Area
When it comes to installing 12×12 tongue and groove ceiling tiles, one of the first steps is measuring the ceiling area. This ensures that you have the correct amount of tiles and that they will fit perfectly in your space. In this section, we’ll guide you through the process of gathering the necessary tools, followed by taking accurate measurements.
Gathering the necessary tools
Before you start measuring the ceiling area, it’s important to gather all the necessary tools. Having everything ready will save you time and make the process smoother. Here is a list of tools you’ll need:
- Tape measure
- Pencil or marker
- Ladder or step stool (if needed)
Taking accurate measurements
Now that you have your tools ready, it’s time to take accurate measurements of the ceiling area. Follow these steps:
- Start by measuring the length and width of the ceiling. Use the tape measure to carefully measure from one corner of the ceiling to the opposite corner, noting down the measurements as you go. Repeat this process for both the length and width.
- Once you have the measurements, multiply the length by the width to determine the square footage of the ceiling. For example, if the length is 10 feet and the width is 12 feet, the square footage would be 120 square feet.
- Next, consider any obstacles or openings in the ceiling area, such as light fixtures or air vents. Measure the dimensions of these obstacles and subtract them from the overall square footage. This will give you a more accurate measurement for the tiles required.
By taking accurate measurements and considering any obstacles, you can ensure that you purchase the correct amount of 12×12 tongue and groove ceiling tiles for your project. This will save you from any last-minute trips to the hardware store and make the installation process much smoother.
Choosing The Right Tiles
When it comes to installing a 12×12 tongue and groove ceiling, one of the most important decisions you’ll need to make is choosing the right tiles. The tiles you choose will not only impact the overall aesthetic of the space but also affect the functionality and longevity of your ceiling. In this section, we’ll explore the key factors to consider when selecting your tiles.
Considering the Material and Style
When it comes to tongue and groove ceiling tiles, there are various materials to choose from, each with its unique characteristics and benefits.
The most common materials for ceiling tiles are:
| Material | Description |
|---|---|
| Wood | Wooden ceiling tiles add warmth and natural beauty to any space. They are available in a range of wood types, including pine, cedar, and oak. Wood tiles can be stained, painted, or left unfinished for a rustic look. |
| PVC | PVC ceiling tiles are known for their durability and moisture resistance. They are easy to clean and maintain, making them a popular choice for bathrooms and kitchens. PVC tiles come in various designs, including faux tin and embossed patterns. |
| Metal | Metal ceiling tiles offer a sleek and modern look. They are often made of aluminum or tin and can be painted or finished for a customized appearance. Metal tiles are known for their durability and are suitable for both residential and commercial applications. |
In addition to the material, you’ll also want to consider the style of the ceiling tiles. The style you choose should complement the overall design aesthetic of the room. Some popular styles include:
- Beadboard: Beadboard ceiling tiles feature vertical grooves that mimic the look of traditional beadboard paneling. They add a touch of elegance and charm to any space.
- Classic: Classic ceiling tiles often have intricate patterns and designs, reminiscent of the Victorian era. These tiles are perfect for creating a timeless and sophisticated look.
- Contemporary: If you prefer a modern and minimalist aesthetic, contemporary ceiling tiles with clean lines and geometric patterns may be the best choice for your space.
Color and Design Options
Color and design play a crucial role in achieving the desired look for your tongue and groove ceiling. Luckily, you’ll find a wide range of options to suit your personal style and preferences.
When considering the color of your ceiling tiles, keep the following points in mind:
- Light colors can make a room appear more spacious and airy.
- Dark colors can create a sense of intimacy and warmth.
- Neutral colors provide versatility and can easily blend with different décor styles.
When it comes to design options, you’ll have the choice of various patterns, textures, and finishes. Some popular design options include:
- Faux Tin: Faux tin ceiling tiles replicate the look of tin without the cost and maintenance. They come in a variety of intricate designs and can be an excellent option for adding a touch of vintage charm to your space.
- Embossed: Embossed ceiling tiles feature raised patterns or textures, adding depth and visual interest to the ceiling. They are available in a range of styles, including floral, geometric, and abstract designs.
- Plain: If you prefer a clean and understated look, plain ceiling tiles with a smooth surface can create a sleek and modern aesthetic.
By carefully considering the material, style, color, and design options of your 12×12 tongue and groove ceiling tiles, you can create a stunning and functional ceiling that enhances the overall ambiance of your space.

Preparing The Ceiling
Before installing 12X12 tongue and groove ceiling tiles, it is vital to properly prepare the ceiling surface. This step ensures an even and secure installation, providing a polished and professional look. Here are the necessary steps to follow when preparing the ceiling:
Removing Existing Ceiling Tiles or Coverings
Start by removing any existing ceiling tiles or coverings. This may involve gently prying them off with a putty knife or using a pry bar for more stubborn attachments. Take care not to damage the underlying surface during this process. Dispose of the old tiles responsibly, following local regulations for waste disposal or recycling.
Cleaning and Inspecting the Surface
Once the old tiles are removed, thoroughly clean the surface of the ceiling. This can be done by using a soft cloth or sponge dampened with a mild detergent and warm water solution. Remove any dust, dirt, or grease that may have accumulated over time. Pay special attention to corners, edges, and any irregularities in the surface.
After cleaning, inspect the ceiling surface for any damage or imperfections. Look for cracks, holes, or other issues that may need to be repaired before the installation of the new tongue and groove ceiling tiles. Patch up any holes or cracks using an appropriate filler or compound, following the manufacturer’s instructions.
Ensuring a Smooth Surface
To ensure a smooth and flush installation of the tongue and groove ceiling tiles, it is essential to verify the evenness of the surface. Use a level to check for any uneven areas or dips. If unevenness is detected, it may be necessary to sand down the surface gently using fine-grit sandpaper. Always follow the proper safety precautions, such as wearing a mask and goggles, when sanding the ceiling.
Applying a Primer
For optimal adhesion and a professional finish, consider applying a primer to the prepared ceiling surface. A primer helps seal the surface and provides a smooth base for the installation of the tongue and groove ceiling tiles. Follow the primer manufacturer’s instructions for application and drying times.
Once the surface is adequately prepared and primed, you are now ready to move on to the installation of the 12X12 tongue and groove ceiling tiles. Following these steps will ensure a successful and visually appealing result.
Acclimating The Tiles
Allowing the tiles to adjust to the room’s temperature and humidity
Before starting the installation process, it is essential to acclimate the 12×12 tongue and groove ceiling tiles to the room’s temperature and humidity. This crucial step ensures that the tiles adjust and expand or contract according to the environment in which they will be installed. By allowing the tiles to acclimate, you can prevent potential issues such as warping or buckling.
To acclimate the tiles properly, follow these steps:
- Remove the wrapping: Unpack the tiles from their packaging and remove any plastic or protective covering. This will allow the tiles to breathe and adjust more effectively.
- Place the tiles in the room: Find a well-ventilated area within the room where the ceiling tiles will be installed. Avoid areas with extreme temperatures or direct sunlight, as these conditions can affect the acclimation process.
- Distribute the tiles: Ensure that the tiles are spread out evenly in the acclimation area. This allows for proper airflow around each tile, promoting uniform adjustment.
- Leave the tiles undisturbed: Allow the tiles to rest undisturbed for at least 48 hours. During this time, they will adjust to the ambient temperature and humidity of the room.
By following these simple steps, you can ensure that the 12×12 tongue and groove ceiling tiles are properly acclimated before installation. This not only guarantees a smooth installation process but also contributes to the long-term durability and stability of your ceiling.
Applying Adhesive
When it comes to installing 12X12 tongue and groove ceiling tiles, applying adhesive is a crucial step that must be done correctly. Choosing the right adhesive for the tile material and applying it evenly are important factors to ensure a successful installation. In this section, we will guide you through these steps in detail, so you can achieve a beautiful and long-lasting ceiling.
Choosing the right adhesive for the tile material
Before applying adhesive, it is essential to choose the right type that suits the material of your 12X12 tongue and groove ceiling tiles. Different materials may require different adhesives for optimal adhesion and durability. Here are some common types of ceiling tile materials and the recommended adhesives:

Applying the adhesive evenly
Once you have selected the appropriate adhesive, it is crucial to apply it evenly on the back of each tile. This ensures proper adhesion between the tile and the ceiling surface, preventing any future issues such as loose or uneven tiles. The following steps will guide you through the process of applying adhesive evenly:
Step 1: Prepare the ceiling surface
- Before applying adhesive, make sure the ceiling surface is clean, dry, and free from any dust or debris. Use a broom or vacuum cleaner to remove any loose particles.
- If there are any rough areas or imperfections on the ceiling, consider sanding them down to create a smooth and even surface for better tile adhesion.
Step 2: Apply the adhesive
- Read the instructions on the adhesive packaging carefully to ensure proper application.
- Using a notched trowel, spread the adhesive evenly on the back of each tile. Ensure that the adhesive covers the entire surface, including the edges.
- Apply enough adhesive so that it creates a solid bond with the ceiling surface, but avoid applying it too thickly as it may cause the tiles to protrude or not fit properly.
Step 3: Position and press each tile
- Position each tile carefully on the ceiling, aligning the tongue and groove edges correctly.
- Press firmly on each tile after placement to ensure proper contact with the adhesive.
- Check periodically to ensure that the tiles remain aligned and that there are no gaps or unevenness.
By following these steps and applying the adhesive correctly, you can ensure a secure and visually appealing installation of your 12X12 tongue and groove ceiling tiles. Remember to read the manufacturer’s guidelines and take necessary safety precautions during the adhesive application process.
Installing The First Row
Installing the first row of 12X12 tongue and groove ceiling tiles is a crucial step in transforming your space into a stunning and elegant area. By following a few simple steps, you can ensure that the installation process goes smoothly and the end result is a visually appealing ceiling that will impress anyone who walks into the room. Let’s dive into the details of how to install the first row of tiles.
Starting with a level line
The key to a successful installation is starting with a level line. Before you begin, ensure that the area where you’ll install the ceiling tiles is clean and free from any debris. Using a level, draw a straight line across the entire length of the wall where you want to start installing the tiles. This line will serve as a guide to ensure that the first row is perfectly aligned and level.
For better visibility, you can use a chalk line or pencil to mark the line. Once you have the line in place, it’s time to move on to the next step – installing the first row of tiles.
Installing the first row of tiles
- Apply construction adhesive: Apply a generous amount of construction adhesive to the back of the first tile using a caulk gun. Make sure to evenly spread the adhesive so that it covers the entire backside of the tile.
- Position the tile: Carefully position the tile along the marked line, ensuring that the grooved edge is facing the wall. Press the tile firmly against the ceiling, applying slight pressure to ensure it adheres securely.
- Secure the tile: Use finishing nails to secure the tile in place. Insert the nails through the tongue of the tile at an angle, aiming towards the ceiling joists. Make sure the nails are not visible once the installation is complete.
- Continue with the next tiles: Repeat the process with the remaining tiles in the first row, ensuring each tile is securely attached to the ceiling and aligned with the level line. Be careful not to leave any gaps between the tiles, as this will compromise the overall appearance of the ceiling.
Once you have completed the installation of the first row, step back and admire your work. You’ve successfully installed the first row of 12X12 tongue and groove ceiling tiles, setting the foundation for a beautiful and sophisticated ceiling. Now it’s time to continue with the remaining rows and witness your space transform into a stunning masterpiece.
Installing The Subsequent Rows
Once you have successfully installed the first row of 12×12 tongue and groove ceiling tiles, it’s time to move on to the subsequent rows. This step is crucial to ensure a seamless and professional finish for your ceiling. In this section, we will walk you through the process of interlocking the tongue and groove edges and cutting tiles to fit around obstacles. Let’s dive in!

Interlocking the tongue and groove edges:
One of the key steps in installing 12×12 tongue and groove ceiling tiles is interlocking the tongue and groove edges. This ensures a snug and secure fit between the tiles, creating a solid surface. Here’s a step-by-step guide to help you:
- Start by applying adhesive to the tongue and groove edges of the first tile in the subsequent row. Make sure to use an adhesive that is recommended for ceiling tile installation.
- Position the tile at a slight angle and insert the tongue into the groove of the already installed tile.
- Press the tile firmly against the ceiling, ensuring that the tongue and groove edges interlock securely.
- Use a rubber mallet or a block of wood to gently tap the tile into place, further ensuring a tight fit.
- Continue this process for the remaining tiles in the row, interlocking the tongue and groove edges until the row is complete.
Cutting tiles to fit around obstacles:
Inevitably, you may come across obstacles such as light fixtures or vents that require you to cut tiles to fit around them. Here are the steps to help you achieve a precise and neat fit:
- Measure the dimensions of the obstacle and transfer those measurements onto the tile that needs to be cut.
- Use a straightedge or a square to create a guideline on the tile, marking the cutting line.
- Using a fine-toothed saw or a utility knife, carefully cut along the marked line. Take your time to ensure an accurate cut.
- Test the cut tile by holding it in place around the obstacle. Make any necessary adjustments by sanding or filing the edges until it fits seamlessly.
- Once you are satisfied with the fit, apply adhesive to the back of the cut tile and press it into place.
- Continue installing the subsequent tiles, repeating the cutting process whenever you encounter obstacles.
By following these steps, you can ensure that your 12×12 tongue and groove ceiling tiles are installed professionally. Remember to take your time and double-check your measurements for precise cuts. Happy installing!
Finishing Touches
After successfully installing your 12×12 tongue and groove ceiling tiles, it’s time to focus on the finishing touches. These final steps will not only enhance the overall aesthetics but also ensure a seamless and professional-looking installation. Paying attention to details is crucial as it can make a significant difference in the final outcome of your project.
Filling any gaps or seams with caulk or putty
Now that your ceiling tiles are in place, it’s essential to address any gaps or seams that may be present to achieve a flawless appearance. The first step is to identify any visible cracks or openings between the tiles or along the edges. To fix these gaps, you have two options: caulk or putty.
Using caulk, which is a flexible and waterproof material, is an ideal choice for filling gaps that may be susceptible to moisture or temperature changes. It provides a smooth and seamless finish while ensuring long-lasting durability. Applying caulk is a straightforward process:
- Prepare the caulk by cutting the tip of the tube at a 45-degree angle.
- Insert the tube into a caulk gun and press the trigger until the caulk starts to flow.
- Apply the caulk along the gaps or seams, making sure to fill them completely.
- Smooth out the caulk using a caulk smoothing tool or a wet finger, removing any excess material.
- Allow the caulk to dry completely, following the manufacturer’s instructions.
If you prefer a more traditional approach, you can use putty to fill in the gaps. Putty is a pliable material that can easily be shaped and manipulated to match the texture and color of the ceiling tiles. Here’s how you can use putty for filling gaps:
- Take a small amount of putty and knead it until it becomes soft and pliable.
- Apply the putty to the gaps, using your finger or a putty knife to press it in firmly.
- Gently smooth out the surface of the putty to ensure it blends seamlessly with the surrounding tiles.
- Allow the putty to dry completely, following the manufacturer’s instructions.
Adding trim for a polished look
Once you have filled any gaps or seams, the next step is to add trim to your 12×12 tongue and groove ceiling tiles. The trim serves both functional and decorative purposes, providing a clean and finished edge to the installation.
Before starting, make sure you have chosen the appropriate trim that matches the style and color of your ceiling tiles. The most common trim options for tongue and groove ceiling tiles are quarter round and cove molding. Follow these steps for a professional-looking trim installation:
- Measure and cut the trim pieces according to the length of each side of the ceiling tiles.
- Apply adhesive or construction adhesive to the back of the trim pieces.
- Press the trim firmly against the edges of the ceiling tiles, ensuring a snug fit.
- Secure the trim in place with finishing nails or brads, spaced evenly along the length.
- Fill any nail holes with wood putty and sand it smooth.
Once the trim is installed, step back and admire the polished look it brings to your 12×12 tongue and groove ceiling tiles. The combination of filled gaps and added trim guarantees a beautiful and professional finish while keeping your ceiling tiles secure in place.
Cleaning The Ceiling Tiles
Keeping your 12X12 tongue and groove ceiling tiles clean is essential to maintain their beauty and longevity. Regular cleaning not only helps remove dust and dirt but also prevents the buildup of harmful allergens and pollutants. This section will guide you through the proper cleaning techniques to ensure your ceiling tiles stay pristine and fresh.
Regular Dusting and Wiping
The first step in cleaning your tongue and groove ceiling tiles is regular dusting. Use a soft-bristle brush or a microfiber cloth to gently remove any loose dust or debris from the surface of the tiles. This will prevent dust from settling, allowing your ceiling to retain its clean and polished appearance. Make sure to dust each tile individually, paying attention to the edges and corners.
After dusting, proceed with wiping the ceiling tiles. Dampen a clean cloth with water or a mild cleaning solution specifically designed for ceiling tiles. Ensure the cloth is not dripping wet to avoid any water damage. Gently wipe each tile, following the grain of the wood or the direction of the texture. This process will eliminate any remaining dust and provide a deeper clean.
Using Proper Cleaning Solutions
When selecting a cleaning solution for your 12X12 tongue and groove ceiling tiles, it is crucial to choose one that is safe and suitable for the specific material of your tiles. Avoid using harsh chemicals, abrasive cleaners, or products with strong odors, as they may damage the finish or discolor the tiles.
Instead, opt for a gentle cleaning solution, such as a mixture of mild dish soap and warm water. Create a solution by diluting a small amount of dish soap in a bucket of warm water. Dip a clean cloth or sponge into this solution, wring out any excess liquid, and wipe the ceiling tiles in a circular motion. This will effectively clean the tiles without causing any harm.
In case of stubborn stains or grease marks, apply the cleaning solution directly to the affected area and gently scrub with a soft-bristle brush or sponge. Rinse the area with a clean cloth dampened in warm water to remove any residue. Remember to dry the tiles thoroughly to prevent water spots or damage.
Tip: Test any cleaning solution on a small inconspicuous area of your ceiling tiles before using it on the entire surface to ensure compatibility.

Dealing With Damage Or Wear
Although 12×12 tongue and groove ceiling tiles are durable and can withstand regular wear and tear, there may come a time when you notice some damage or wear on a few tiles. Whether it’s a cracked tile or one that has seen better days, it’s important to address these issues promptly to maintain the beautiful aesthetics and functionality of your ceiling. In this section, we will discuss two commonly encountered situations: repairing cracked or damaged tiles and replacing individual tiles if necessary.
Repairing cracked or damaged tiles
If you come across a cracked or damaged tile, there’s no need to panic. With a few simple steps, you can restore the tile to its original condition. Here’s what you need to do:
- Start by carefully removing the damaged tile. To do this, locate the nearest joints and gently pry the tile upwards using a putty knife or a similar tool. Be cautious not to damage the surrounding tiles.
- Once the tile is removed, assess the extent of the damage. If the crack is small, you can easily repair it using a quality adhesive. Apply the adhesive evenly to the crack, making sure to fill it completely.
- After applying the adhesive, gently press the cracked portions of the tile together. Use a clean cloth or a putty knife to remove any excess adhesive that may have squeezed out.
- Allow the adhesive to dry completely. Refer to the manufacturer’s instructions for the recommended drying time.
- Finally, place the repaired tile back in its original position. Apply gentle pressure to ensure it is securely attached to the ceiling. If necessary, use a rubber mallet or a block of wood to tap the tile into place.
Replacing individual tiles if necessary
In some cases, the damage may be beyond repair, or you may want to replace a tile for aesthetic reasons. Here’s how you can easily replace individual tiles:
- Start by removing the damaged tile using the same method mentioned earlier. Remember to be careful not to damage the surrounding tiles.
- Clean the area where the tile was removed by removing any adhesive residues or debris. Ensure the surface is smooth and ready for the new tile.
- If necessary, cut the replacement tile to fit the desired size using a sharp utility knife. Make sure to measure accurately to achieve a perfect fit.
- Apply a thin layer of adhesive to the back of the replacement tile, spreading it evenly using a putty knife.
- Insert the replacement tile into the vacant spot, making sure it fits snugly. Apply gentle pressure to ensure it is securely attached.
- Allow the adhesive to dry completely, following the manufacturer’s instructions.
- Once the adhesive has dried, inspect the replaced tile to ensure it blends seamlessly with the surrounding tiles.
By following these simple steps, you can effectively deal with damage or wear on your 12×12 tongue and groove ceiling tiles. Whether you choose to repair or replace, maintaining the integrity of your ceiling will ensure its long-lasting beauty and functionality.
Preventative Maintenance
Inspecting for signs of moisture or water damage
Regularly inspecting your 12×12 tongue and groove ceiling tiles is crucial for maintaining their longevity and preventing any potential water damage. By detecting signs of moisture or water damage early on, you can address the issue promptly and avoid costly repairs in the future.
Here’s a step-by-step guide for inspecting your ceiling tiles:
- Start by visually examining the ceiling for any discoloration, water stains, or mold growth. Be sure to check near windows, vents, and any areas susceptible to water leaks
- With a gentle touch, run your fingers along the tiles to feel for any dampness or soft spots. This can indicate water damage or leaks behind the ceiling
- If you have access to the attic or the space above the ceiling, take a look for any signs of water leaks or damage from above
- Inspect the surrounding walls and floors for any signs of water damage that may be impacting the ceiling
If you notice any signs of moisture or water damage during your inspection, it’s important to address the issue as soon as possible. Ignoring these signs can lead to further damage, compromised structural integrity, and even potential health risks from mold growth.
Maintaining proper humidity levels in the room
Proper humidity levels play a crucial role in preventing potential damage to your 12×12 tongue and groove ceiling tiles. Excessive moisture in the air can lead to warping, swelling, and even mold growth. On the other hand, low humidity levels can cause the tiles to dry out and crack. Maintaining a balanced humidity level is key to preserving the longevity and appearance of your ceiling.
Here are a few tips to help you maintain proper humidity levels:
- Use a hygrometer to regularly monitor the humidity levels in the room. The ideal range for indoor humidity is between 40-60%
- If the humidity levels are consistently high, consider using a dehumidifier to remove excess moisture from the air
- During the winter months when the air tends to be drier, use a humidifier to add moisture and maintain a balanced humidity level
- Avoid activities that generate excessive moisture, such as drying clothes indoors or leaving hot water running for extended periods
By maintaining proper humidity levels in the room, you can prevent any potential damage to your 12×12 tongue and groove ceiling tiles and ensure they stay in pristine condition for years to come.
Frequently Asked Questions Of How To Install 12X12 Tongue And Groove Ceiling Tiles
How Do You Staple Tongue And Groove Ceiling Tiles?
To staple tongue and groove ceiling tiles, follow these steps:
1. Start with a stable surface and ensure the tiles are securely in place.
2. Use a pneumatic stapler with staples specifically designed for ceiling tiles.
3. Position the stapler at a 45-degree angle and place the staple at the joint between two tiles.
4. Apply gentle pressure and staple the tiles together, ensuring they are aligned.
5. Repeat the process for each joint, maintaining a consistent and secure connection.
How Far Apart Should Furring Strips Be For Tongue And Groove Ceiling?
Furring strips for tongue and groove ceiling should be spaced about 16 inches apart.
How Do You Install Tongue And Groove Boards On A Ceiling?
To install tongue and groove boards on a ceiling, follow these steps:
1. Measure and mark the location of the joists on the ceiling.
2. Cut the first board to the appropriate length and secure it to the ceiling, perpendicular to the joists.
3. Slide the tongue of the next board into the groove of the first board and secure it. Repeat this process until the ceiling is covered.
4. Use a nail gun or screws to fasten the boards to the joists, making sure they are level and aligned.
5. Continue installing boards until the entire ceiling is covered.
Which Way Should the Tongue And Groove Ceiling Run?
Tongue and groove ceiling should run perpendicular to the floor joists to provide better support and stability. This helps prevent sagging and warping over time. It is important to follow this direction to ensure proper installation and a visually appealing result.
Conclusion
Installing 12×12 tongue and groove ceiling tiles is a straightforward process that can transform the look of any room. By following the step-by-step instructions outlined in this blog post, you can easily achieve a professional-looking installation. Remember to properly prepare the surface, measure accurately, and use the appropriate tools and materials.
Whether you’re a seasoned DIYer or a beginner, this guide will help you achieve stunning results. So, go ahead and give your ceiling a stylish upgrade with these easy-to-install tiles.