How to Install a Rivet Nut?
To install a rivet nut, first, select the appropriate rivet nut size and type for your application. Then, use a rivet nut tool to insert the rivet nut into the pre-drilled hole, ensuring it is secure.
Choosing The Right Rivet Nut: A Step-By-Step Guide
When it comes to installing a rivet nut, one of the most crucial steps is choosing the right type of rivet nut for your specific application. With a wide variety of options available, it’s important to consider certain factors and understand the different types of rivet nuts to ensure a successful installation. In this step-by-step guide, we will walk you through the process of choosing the right rivet nut for your project.
Factors to consider
Before delving into the types of rivet nuts available, it is important to take into account a few key factors that will influence your decision. These factors include:
- Material: Consider the material of the workpiece on which the rivet nut will be installed. Different materials may require specific types of rivet nuts, as certain nuts may provide better grip and durability on certain materials.
- Strength requirements: Determine the strength requirements of your application. The load-bearing capacity of the rivet nut should be sufficient to handle the expected level of stress and ensure a secure installation.
- Installation method: Consider the installation method you will be using. Some rivet nuts may require specialized tools or equipment, while others can be installed using more commonly available tools.
By considering these factors, you can narrow down your options and make an informed decision when it comes to choosing the right rivet nut for your project.

Types of rivet nuts available
There are several types of rivet nuts available, each with its own unique features and advantages. Let’s take a look at some of the most common types:
| Type | Description |
|---|---|
| Open-end rivet nuts | These rivet nuts have a single-threaded design and are typically used for lighter-duty applications. They are easy to install and provide a cost-effective solution. |
| Closed-end rivet nuts | These rivet nuts have a closed-end design, which prevents the penetration of liquids or gases. They are commonly used in applications where a seal is required. |
| Reduced-shank rivet nuts | These rivet nuts have a smaller shank diameter compared to their head diameter, making them ideal for applications with limited space. |
| Knurled rivet nuts | These rivet nuts have a knurled body that provides enhanced grip when installed into a workpiece. They are commonly used in applications where a strong hold is required. |
| Countersunk rivet nuts | These rivet nuts have a countersunk head that allows for a flush finish when installed. They are often used in applications where aesthetics are important. |
By familiarizing yourself with the different types of rivet nuts available, you can choose the one that best meets the specific requirements of your project.
Now that you have a step-by-step guide to choosing the right rivet nut, you can confidently move forward with your installation. Remember to consider the key factors and select the appropriate type of rivet nut for a successful and secure installation.
Tools And Materials Needed For Rivet Nut Installation
Tools and Materials Needed for Rivet Nut Installation
Rivet nut installation is a versatile and efficient way to join materials together. Whether you are working on a DIY project or professional applications, having the right tools and materials is essential for successful installation. In this section, we will discuss the essential tools and required materials you will need to install a rivet nut effectively.
Essential Tools
To install a rivet nut, you will need a few essential tools. These tools are designed to ensure proper installation and a strong connection. Here are the key tools you will need:
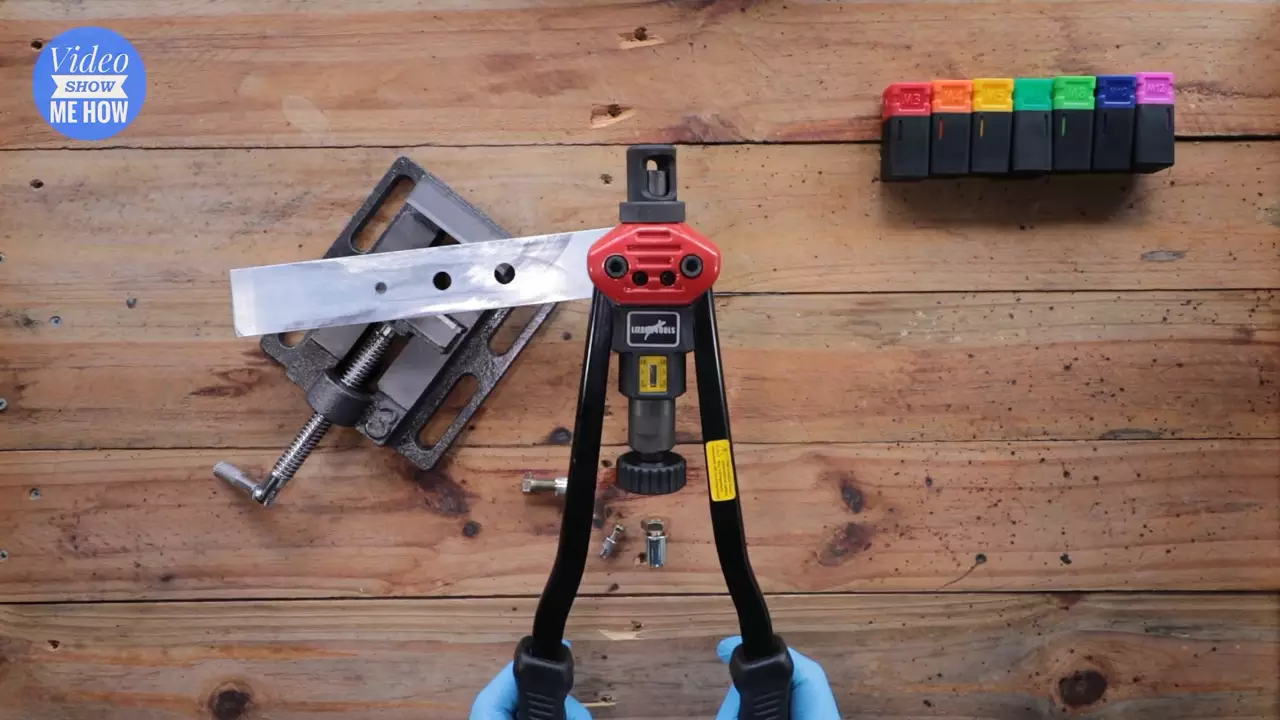
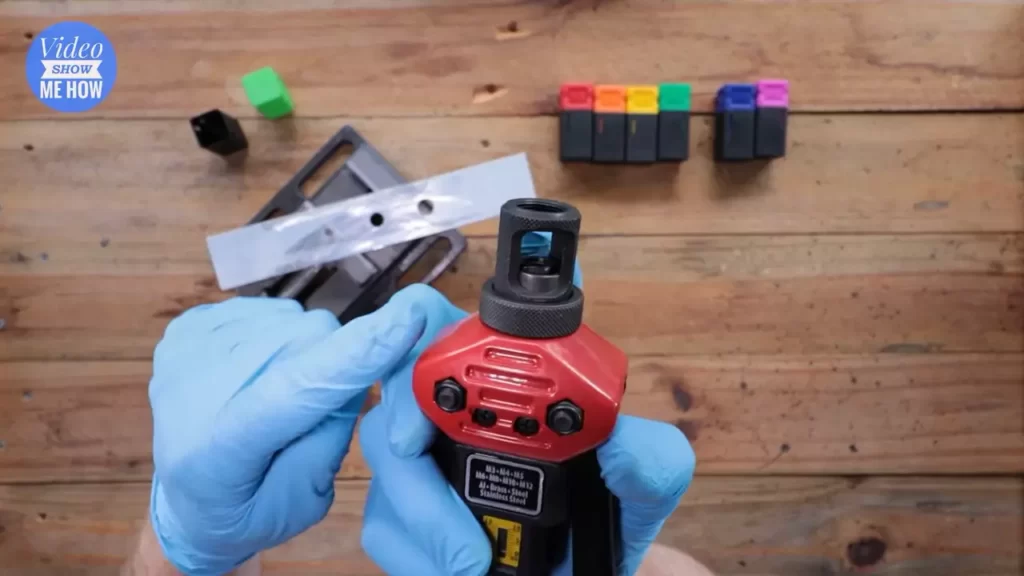
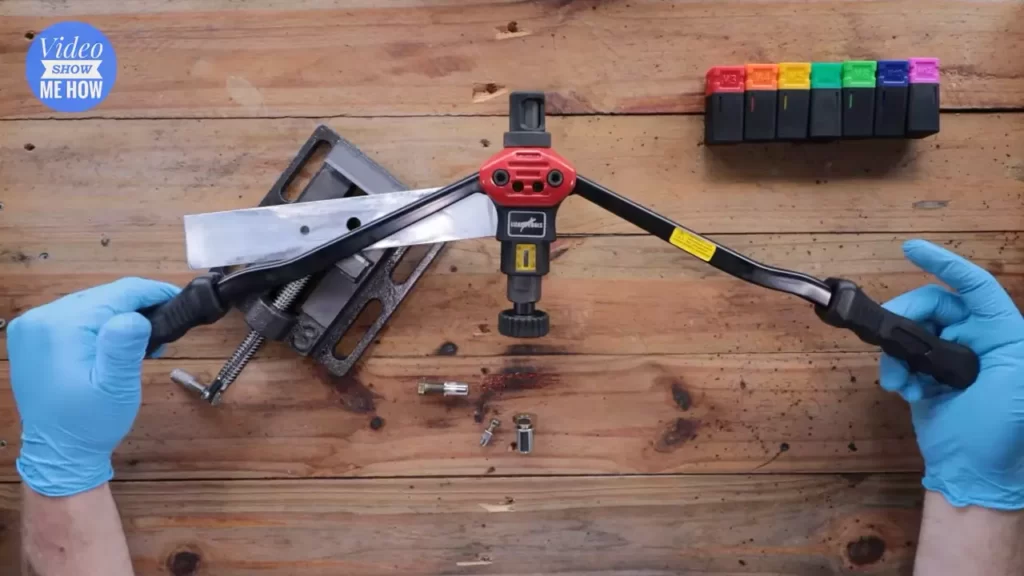
- Rivet Nut Tool: A rivet nut tool is the primary tool required to install a rivet nut. It typically consists of a handle, threaded mandrel, and nosepiece. This tool is responsible for setting the rivet nut in place.
- Drill: A drill is necessary to create a hole in the material where you wish to insert the rivet nut. Make sure to choose the appropriate drill bit size that matches the rivet nut’s diameter.
- Wrench or Socket Set: A wrench or socket set is used to firmly hold the rivet nut tool’s handle while turning the threaded mandrel. This ensures a tight and secure installation.
- Center Punch: A center punch is useful for creating a starting point on the material. This indentation helps guide the drill bit and prevents it from slipping during drilling.
Required Materials
In addition to the essential tools, certain materials are necessary for proper rivet nut installation. These materials impact the durability and effectiveness of the connection. Here are the required materials:
- Rivet Nuts: Rivet nuts come in various sizes and materials, such as steel, aluminum, or stainless steel. Choose the appropriate rivet nuts for your application based on the material being joined and the required strength.
- Drill Bits: Select drill bits that match the diameter of the rivet nuts. It is crucial to use the correct size as an oversized or undersized hole may affect the grip and strength of the rivet nut.
- Protective Equipment: Safety goggles and gloves are necessary to protect your eyes and hands during the installation process. Additionally, wearing ear protection is recommended, especially if you are using power tools.
- Fastener Lubricant: Applying a lubricant, such as oil or grease, to the threaded mandrel of the rivet nut tool can reduce friction and make the installation process smoother.
By ensuring that you have the essential tools and required materials, you are well-equipped to install a rivet nut effectively. Remember to choose the right size rivet nuts and drill bits, use protective equipment, and follow proper installation techniques to achieve a strong and secure connection.
Step 1: Gathering The Necessary Equipment
Introduction to the tools and materials
Gathering the necessary equipment is the crucial first step when it comes to installing a rivet nut. Having the right tools and materials at hand ensures a smooth and efficient installation process. In this step-by-step guide, we will walk you through the essential tools and materials you’ll need to install a rivet nut properly. Don’t worry, we’ll also highlight the importance of having everything ready beforehand, so you can tackle the installation with confidence and avoid any unnecessary delays or hiccups.
The importance of having everything ready
When it comes to installing a rivet nut, preparation is key. Having everything ready before you begin ensures that you can work efficiently and effectively. It eliminates the need for frequent interruptions or frantic searches for tools and materials. By taking the time to gather everything you need, you can maintain a steady workflow and prevent any unnecessary mistakes or delays.
Tools
To properly install a rivet nut, here are the essential tools you’ll need:
- Rivet nut tool: This is the primary tool used to install the rivet nut, and it often comes with interchangeable mandrels to accommodate various sizes of rivet nuts. Make sure you have a tool that is suitable for the specific rivet nut size you’ll be using.
- Drill: A drill is required to create a hole in the material where the rivet nut will be installed. Ensure you have a drill bit that matches the size of the rivet nut’s recommended hole diameter.
- Wrench or spanner: This tool is necessary to secure the rivet nut in place during installation.
- Optional tools: Depending on your specific needs, you may require additional tools such as pliers, deburring tools, and thread sealant.
Materials
Apart from the tools, you’ll also need the following materials:
- Rivet nuts: These are the threaded inserts that are installed into the material and provide a reliable anchor point.
- Material to be riveted: This could be sheet metal, plastic, or any other suitable material that requires an internally threaded hole.
- Fasteners: These are the bolts or screws that will be threaded into the rivet nuts to secure objects in place.
Now that you are aware of the necessary tools and materials, it’s time to move on to the next step, where we will guide you through the process of preparing the material for installation. Stay tuned for Step 2: Preparing the Material!

Step 2: Preparing The Work Area
Before you start installing a rivet nut, it’s important to prepare your work area to ensure a smooth and efficient process. This step is crucial to guarantee your safety and the success of your installation. Follow these steps to properly prepare your workspace:
Clearing the Workspace
The first thing you should do is clear the workspace of any clutter or obstacles that could hinder your work. Remove any tools, debris, or materials that are not relevant to the installation process. This will give you ample space to work and prevent any accidents or mistakes during the installation.
Make sure to clean the area as well, removing any dirt, dust, or grease that could affect the quality of the installation. A clean workspace not only ensures a more professional and polished finish but also helps to prevent unwanted friction or impurities that could compromise the integrity of the rivet nut.
Ensuring Safety Measures
Prioritize your safety and take necessary precautions to prevent any potential hazards during the installation process. Here are some safety measures you should implement:
- Wear protective gear such as safety goggles, gloves, and closed-toe shoes to protect yourself from potential injuries or accidents.
- If you are working with power tools, make sure they are in good condition and appropriate for the task at hand. Always follow the manufacturer’s instructions and guidelines for safe and proper usage.
- Keep your work area well-ventilated to avoid any build-up of fumes or hazardous gases. If necessary, use fans or open windows to maintain a healthy environment.
- Have a fire extinguisher nearby, especially if you are working with flammable materials or in a potentially hazardous environment.
By adhering to these safety measures, you can minimize the risk of accidents or injuries and ensure a secure and successful rivet nut installation.
Step 3: Selecting The Rivet Nut Size And Style
Determining the Appropriate Size
When it comes to installing a rivet nut, one of the key steps is selecting the right size. The size of the rivet nut refers to its dimensions, including the diameter and thread size. Determining the appropriate size is crucial to ensure a secure and effective installation.
To determine the size of the rivet nut you need, there are two main factors to consider:
- Material Thickness: The first factor to consider is the material thickness. This refers to the thickness of the material the rivet nut will be inserted into. It’s important to choose a rivet nut that matches the thickness of the material to ensure a proper fit.
- Required Load Strength: The second factor to consider is the required load strength. Different applications and projects require different load capacities. It’s crucial to select a rivet nut that can handle the expected load to ensure a secure and long-lasting installation.
By taking these factors into account, you can determine the appropriate size of rivet nut needed for your specific project.
Choosing the Right Style
Once you’ve determined the appropriate size, the next step is to choose the right style of rivet nut. The style refers to the overall design and shape of the rivet nut. There are various styles available, including round body, hex body, and more.
When selecting the style of rivet nut, there are a few factors to consider:
- Application Requirements: Consider the specific requirements of your application. Some styles of rivet nuts may be more suitable for certain projects or materials. Consider factors such as accessibility, aesthetics, and functionality when choosing a style.
- Installation Method: Consider the method of installation you plan to use. Certain styles of rivet nuts may be easier to install using certain tools or techniques. It’s important to choose a style that aligns with your preferred installation method.
By carefully considering these factors, you can choose the right style of rivet nut that best suits your project and installation requirements.
Step 4: Drilling The Hole
Now that you have marked the drilling area, it’s time to move on to the next step – drilling the hole for the rivet nut. This step is crucial as it determines the stability and effectiveness of the installed rivet nut. In this section, we will guide you through the process of drilling the hole, ensuring that you use the correct tools and technique for a successful installation.
Marking the drilling area
Before you start drilling, it is important to mark the precise position where the hole needs to be drilled. This will help you achieve accurate results and avoid any mistakes. Begin by measuring the required distance and using a permanent marker to mark the spot on the surface. Make sure to double-check the measurements and alignment before proceeding.
Using the correct tools and technique
Once the drilling area is marked, it’s time to gather the necessary tools and ensure that you use the appropriate technique. Here’s what you’ll need:
- Power drill: Choose a drill with the appropriate size and power for the material you are working with. It is recommended to use a drill press for precise control.
- Drill bit: Select a drill bit that matches the size of the rivet nut. This will ensure a proper fit and prevent any loose connections.
- Clamp: Secure the surface in place using a clamp to prevent any movement and ensure stability during drilling.
- Personal protective equipment (PPE): Always wear safety goggles and gloves to protect yourself from any debris or accidents during the drilling process.
With the right tools in hand, follow these steps to drill the hole:
- Attach the appropriate drill bit: Insert the selected drill bit into the chuck of the power drill and tighten it securely.
- Position the drill: Place the drill bit on the marked spot and align it properly. Make sure the drill is perpendicular to the surface, as this will ensure a straight and centered hole.
- Start drilling: Hold onto the drill firmly and slowly apply pressure to start drilling. Use a steady hand and moderate speed to avoid any sudden movements or damage to the material.
- Monitor the drilling process: Keep an eye on the depth of the hole and adjust the drilling speed accordingly. You should also periodically remove the drill to clear any accumulated debris.
- Finish and clean up: Once you have reached the desired depth, stop drilling and release the pressure on the power drill. Remove any remaining debris from the hole using compressed air or a cleaning tool.
By following these steps and using the correct tools and technique, you can ensure that the hole is drilled accurately and ready for the rivet nut installation. Remember to always prioritize safety and take your time to achieve the best results.
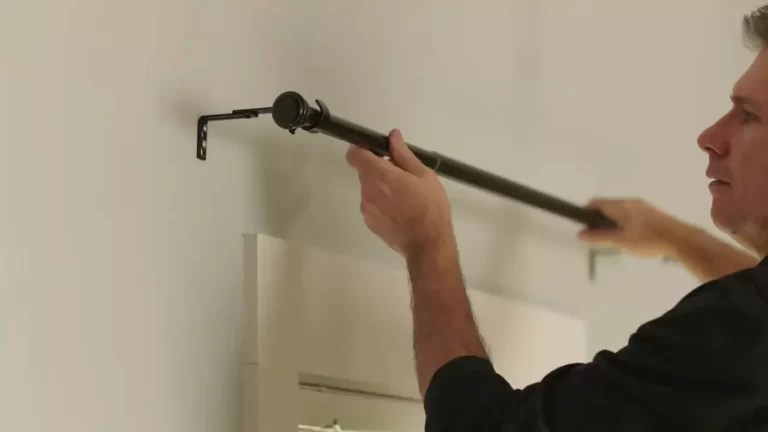
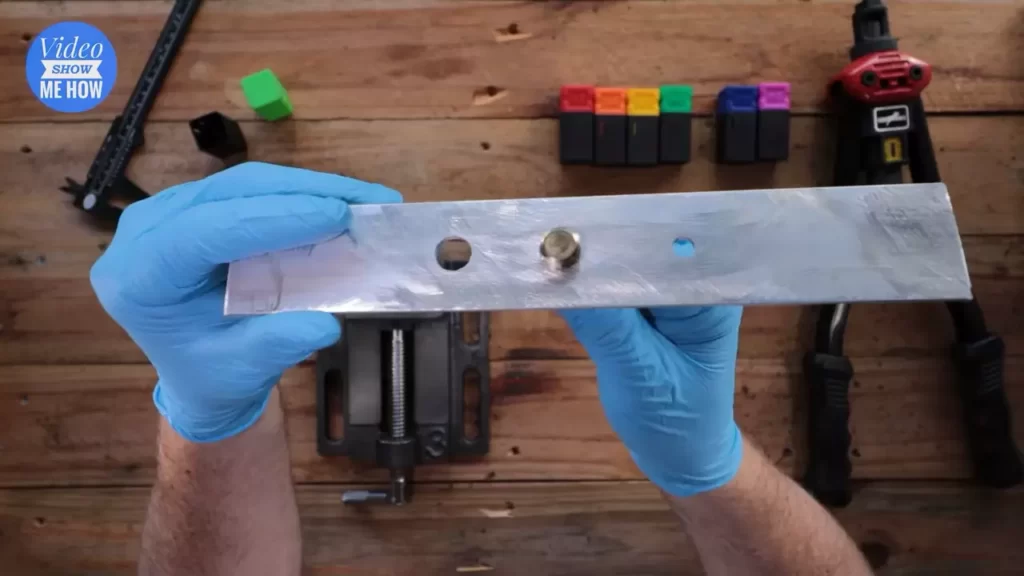
Step 5: Installing The Rivet Nut
Inserting the rivet nut into the hole
With the prep work completed and the hole properly sized, it’s time to insert the rivet nut. Hold the rivet nut with one hand and align it with the hole you’ve created. Make sure the flange is flush against the surface and the threads are facing inward. Gently push the rivet nut into the hole until it sits snugly.
Applying the appropriate pressure
Once the rivet nut is inserted, the next step is to apply the right amount of pressure to secure it properly. This can be done using a rivet nut installation tool or a rivet nut setter, depending on your preference. Carefully position the tool over the rivet nut, ensuring a firm grip.
Applying pressure is crucial to ensure that the rivet nut engages with the material securely. Start by squeezing the handles of the installation tool or rivet nut setter together firmly. This will cause the rivet nut to begin compressing against the material surface. Continue applying pressure until you feel resistance and the rivet nut is firmly in place.
It’s important to note that excessive force can damage the rivet nut or the material. Therefore, be mindful of the pressure you apply throughout the installation process.
Once the appropriate pressure has been applied, release the handles of the installation tool or rivet nut setter. This will allow the tool to disengage from the rivet nut smoothly.
Congratulations! You have successfully installed a rivet nut using the proper technique and equipment.
Step 6: Setting The Rivet Nut
Techniques for setting the rivet nut
Once you have prepared the hole and inserted the rivet nut, it’s time to set it securely in place. This critical step ensures that the rivet nut is tightly fastened and provides a reliable anchor for your intended application. To achieve this, there are a few techniques you can follow:
- Using a rivet nut tool: The most common method for setting a rivet nut is by utilizing a specialized rivet nut tool. This tool applies controlled pressure to compress the nut, creating a secure connection. To use the tool, follow these steps:
- Place the tool’s nosepiece over the rivet nut.
- Hold the handles firmly and squeeze them together to initiate the compression process.
- Continue squeezing until the rivet nut is fully set, ensuring it sits flush with the surface of the material.
- Release the handles and remove the tool from the set rivet nut.
- Using a wrench or spanner: In situations where a rivet nut tool is not available, a wrench or spanner can be used. This technique requires a bit more manual effort but can still yield satisfactory results. Here’s how to use this method:
- Select an appropriately sized wrench or spanner that can fit over the rivet nut.
- Place the wrench or spanner onto the rivet nut, ensuring a snug fit.
- Hold the wrench or spanner firmly in one hand and use the other hand to turn the nut clockwise, applying pressure as you rotate.
- Continue tightening until the rivet nut is fully set and sits flush with the material’s surface.
- Once set, you can remove the wrench or spanner.
Remember, regardless of the technique you choose, it’s essential to ensure a secure and sturdy placement for the rivet nut. This ensures that the fastener will withstand the intended load and provide long-lasting support. Taking the time to properly set the rivet nut will save you from unexpected failures down the line.
Step 7: Inspecting The Rivet Nut Installation
Once you have successfully installed the rivet nut, it is crucial to inspect the installation to ensure it has been done correctly. This step is essential for guaranteeing the durability and reliability of the application. In this section, we will cover two key aspects to check during the inspection process: proper alignment and the integrity of the installation.
Checking for Proper Alignment
Begin by visually inspecting the rivet nut to ensure it is aligned correctly. A misaligned rivet nut can lead to difficulties when attaching accessories or fasteners, compromising the functionality of your application. To check for proper alignment:
- Verify that the flange of the rivet nut is flush with the surface it is installed on. This alignment ensures a secure fit and prevents any movement or loosening of the rivet nut over time.
- Ensure that the thread of the rivet nut is perpendicular to the surface. A skewed or slanted thread can hinder the proper tightening of fasteners and accessories.
By performing these visual checks, you can confirm that the rivet nut is aligned correctly and ready to support your application effectively.
Verifying the Integrity of the Installation
Inspecting the integrity of the installation is crucial for determining the strength and stability of the rivet nut. A faulty installation can lead to premature failure or weakened performance. To verify the integrity of the installation:
- Check for any signs of damage, such as cracks or deformations, on the rivet nut itself. These imperfections can indicate an improper installation or a rivet nut with manufacturing defects that may affect its performance.
- Test the rivet nut by applying a slight force perpendicular to the surface. It should remain firmly in place without any wobbling or movement. If you notice any looseness or instability, the installation may need to be reviewed and potentially redone.
- Tighten a fastener into the rivet nut to ensure a secure connection. The fastener should thread smoothly without any resistance or cross-threading.
By conducting these checks, you can ensure that the rivet nut installation is structurally sound and capable of withstanding the intended load and usage.
Inspecting the rivet nut installation is a vital step in the overall process. By checking for proper alignment and verifying the integrity of the installation, you can avoid potential issues and ensure the long-term functionality of your application.

Step 8: Troubleshooting Common Issues
Installing a rivet nut can sometimes present certain challenges. In this step, we will discuss some potential issues you may encounter and provide tips on how to resolve them. By being aware of these common problems and knowing how to troubleshoot them, you can ensure a successful installation of your rivet nut.
Identifying potential problems
Before we delve into the solutions, let’s first identify some common issues that may arise during the installation process. By understanding these potential problems, you’ll be better equipped to troubleshoot and resolve them:
- Insufficient grip: One of the common problems is when the rivet nut does not provide enough grip or holding power. This can occur if the rivet nut is not properly threaded or if the material you are installing it into is too thin.
- Cross-threading: Another issue to watch out for is cross-threading, which can happen when the rivet nut and the installation tool do not align properly. This can result in damaged threads and an insecure connection.
- Inadequate compression: If the rivet nut is not compressed enough, it may not create a tight and secure fit. This can lead to a weak connection that is more prone to loosening or coming undone.
Tips for resolving issues
Now that we have identified some potential problems, let’s explore some tips for resolving these issues and ensuring a successful installation:
- Check the threading: Ensure that the rivet nut is properly threaded onto the installation tool. If it feels loose or difficult to thread, double-check and make any necessary adjustments.
- Use the correct tool: Make sure you are using the appropriate installation tool for the size and type of rivet nut you are working with. Using the wrong tool can lead to improper installation and potential issues.
- Apply proper pressure: When tightening the installation tool, apply steady and consistent pressure to compress the rivet nut. Be careful to avoid overtightening, as this can also cause problems.
- Inspect the connection: After installation, carefully examine the connection to ensure it is secure and properly aligned. If any issues are detected, consider removing and reinstalling the rivet nut to ensure a proper fit.
- Seek professional assistance if needed: If you are encountering persistent issues or are unsure about any aspect of the installation process, it is always advisable to seek assistance from a professional or consult the manufacturer’s guidelines.
By following these tips and keeping an eye out for potential problems, you can troubleshoot common issues and successfully install a rivet nut. Remember to exercise patience and take the time to ensure a proper fit, as this will result in a safer and more reliable connection.
Step 9: Finishing Touches And Cleanup
Now that you’ve successfully installed the rivet nut and completed the major steps, it’s time to focus on the final touches and cleanup. This is an important part of the process as it ensures a professional finish and leaves your work area in a clean and organized state. Follow these simple steps to complete the installation and achieve the desired results.
Final steps for a professional finish:
- Inspect the installed rivet nut: Begin by inspecting the installed rivet nut to ensure it is properly seated and secure. Check for any gaps or misalignment that may have occurred during the installation process. This step is crucial as it ensures a strong and reliable fit for the application.
- Trim excess thread: Using a suitable cutting tool like pliers or bolt cutters, carefully trim any excess thread protruding from the installed rivet nut. This will not only enhance the appearance of the finished project but also prevent any potential snags or accidents in the future.
- Apply a protective coating: If required, consider applying a protective coating or finish to the installed rivet nut. This step not only adds an extra layer of protection against corrosion and wear but also enhances the overall aesthetic appeal of the project.
- Perform a functionality test: Before considering the installation complete, it is essential to perform a functionality test to ensure that the rivet nut is functioning as intended. Test the application by attaching the appropriate fastener and applying the necessary torque. This will help confirm that the installation is secure and reliable.
Cleaning up the work area:
After completing the final steps for a professional finish, it is crucial to clean up the work area. This not only ensures safety but also helps maintain a productive environment for your future projects. Follow these guidelines to effectively clean up your work area:
- Remove any debris: Start by removing any debris, such as metal shavings or excess material, that may have accumulated during the installation process. Use a brush or vacuum to clear the area thoroughly.
- Dispose of waste materials: Properly dispose of any waste materials, such as cuttings or packaging, in designated waste bins or recycling containers. This will help keep your work area organized and environmentally friendly.
- Wipe down surfaces: Use a clean, lint-free cloth or paper towel to wipe down surfaces and remove any dirt, grease, or adhesive residue that may be present. Pay attention to areas surrounding the installed rivet nut to ensure a clean and professional appearance.
- Store tools and materials: Finally, store your tools and materials properly in their designated places. This will not only help you maintain a clutter-free workspace but also prolong the lifespan of your tools.
By following these final steps for a professional finish and cleaning up your work area, you can ensure that your rivet nut installation is not only structurally sound but also aesthetically pleasing. Remember, attention to detail and proper cleanup are essential aspects of any successful project.
Frequently Asked Questions On How To Install A Rivet Nut
How Do You Install A Rivet Nut?
To install a rivet nut, start by drilling a hole in the material and select the appropriate rivet nut size. Insert the rivet nut into the hole and use a rivet nut tool to compress it. Finally, tighten the rivet nut until it is secure in place.
What Are The Benefits Of Using Rivet Nuts?
Rivet nuts offer several benefits, such as providing a strong and reliable fastening solution in thin materials. They allow for easy access from one side of the material and do not require welding. Additionally, they are removable and can be used in various applications, providing versatility.
Can You Install A Rivet Nut Without A Tool?
While it is possible to install a rivet nut without a tool, it is not recommended. The use of a rivet nut tool ensures a proper and secure installation, providing a stronger and more reliable fastening. Using a proper tool also reduces the risk of damaging the rivet nut or the material being fastened.
Conclusion
Installing a rivet nut is a simple process that can greatly enhance the versatility and functionality of your projects. By following the steps outlined in this guide, you can confidently tackle any application requiring a rivet nut. Remember to choose the appropriate tools, measure accurately, and follow safety precautions.
With a little practice, you’ll be able to effortlessly install rivet nuts and enjoy the benefits they provide. So get started and take your projects to the next level!